A blog about quilting and using the LEFT-EZE Rule - my HST/QST Ruler designed for LEFT-HANDED Quilters -
Pages
- Home
- LEFT-EZE™ Rule
- LEFT-EZE™ Rule - Tutorials
- LEFT-EZE™ Rule - Size Chart
- LEFT-EZE™ Rule - Free Pattern & Tutorial
- LEFT-EZE™ Rule - Reviews/Testimonials
- About This Blog - And Me
- Rules
- Reviews
- Quilt Journal
- QJ - Floral Applique
- Sudoku Quilts
- Studio Organization
- Fabric Storage Tips
- Left-Handed Quilting (LHQ) - Introduction
- LHQ - Basics
- LHQ - Rotary Cutting
- LHQ - Construction
- LHQ - Hand Sewing
- LHQ - Binding
- LHQ - Finishing The Quilt
- LHQSQ - LHQ Sampler Quilt
- UFOs/Projects/Squirrels
- Quilt-Along - LHQSQ 2.0
- Privacy Policy
Thursday, March 31, 2016
I have a plan -
I spent some time the other day -
Setting up some more stuff on my new computer -
Just taking my time -
Doing a bit whenever the mood strikes me -
And when I think I may have the PATIENCE -
To mess with any potential problems -
That might arise - ;))
And all the while -
I was thinking about how I wanted to widen my FMQ "practice" top -
And looking ahead to some of my other classes -
When I came up with a PLAN - ;))
I downloaded and printed the class materials for the next class -
The Secrets of Free-Motion Quilting with Christina Cameli -
And saw more "practice sandwiches" in solid colors were needed - ;))
Other FMQ classes gave patterns for quilts -
To be used to practice the teacher's techniques -
And one asked for a package of pre-cut felt rectangles -
Which I DON'T have in my stash - ;))
Considering ALL of the unquilted tops in that there pile -
I am NOT looking forward to making yet ANOTHER top -
Or more "practice sandwiches" -
Or buying MORE stuff -
So that I can practice my Free-Motion Quilting - ;))
THEN -
The proverbial "light bulb" went ON - ;))
(not OFF - as I have heard some say - haha)
Why make more "practice sandwiches" -
When I could take those same solid colors -
In large "chunks" -
Add them to the sides of my practice quilt as borders -
And then practice my FMQ ON THE BORDERS - ?!?! - ;))
SOOOOOOOOOOO -
I re-installed EQ7 on my new computer -
Might as well -
I was re-installing some of my other favorite little programs -
And I was already in "installation" mode - ;))
Then I drafted a version of what I have so far -
Plus the top and bottom yellow borders -
And got this - ;))
Then I added the borders -
That I "saw" in my head - ;))
That should give me a dozen more "practice" areas -
In addition to the yellow sashing/borders - ;))
I think it will work -
What do you think? - ;))
Talk to you later - gotta go - gotta sew -
Monday, March 28, 2016
Design Wall Monday - 3/28/16
DESIGN WALL MONDAY -
Check out all of us who link up with Judy L. -
At Patchwork Times on Mondays.
We have some awesome stuff on our walls!
Well, THEY do - ME - not so much sometimes - ;))
===
On my wall today -
The "extra" hourglass units -
From making my FMQ class practice blocks - ;))
I didn't realize that it has been three weeks since my last post -
But - you really haven't missed much - ;))
For the last three weeks -
There has been NOTHING on my design wall -
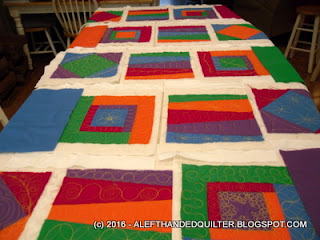
Because I have been TRYING to get this dang thing together -
And I only got as far as getting the rows together -
And putting on the two side borders - ;))
The FMQ practice blocks were layered to be quilted "as you go" -
But - of course - I didn't space them the same distance apart -
On the backing fabric - ;))
If I HAD - I could have skipped the part about cutting the blocks apart -
And then putting them all back together again WITH sashing between them -
I could have just sewn the sashing on the top -
And then sewn the rows together and been done with it -
But - NOOOOOO - I had to do it the hard way - ;))
===
NOTE TO SELF -
Think ahead next time and include the sashing between the blocks on the rows - ;))
===
Then the blocks themselves came out all different sizes -
Some of the quilting pushed the fabric "out" on some blocks -
And made the block "bigger" than planned -
If that makes sense -
So I cut them all down to
I thought that I could maybe offset them to minimize the differences -
But I didn't like the look - ;))
I don't want to bore you with all of the fun I had -
With the back strips not coming out right -
Either too wide or too narrow to make the batting join without a gap or overlap -
Or the "air sewing" with no bobbin thread -
Or the "bird's nest" bobbin messes on the back for no apparent reason -
Or the fun I had trying to use the Bias Tape Maker -
That's a post for another time - ;))
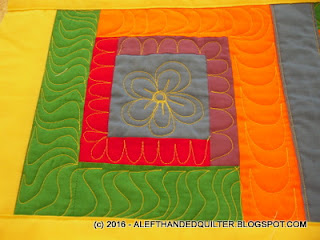
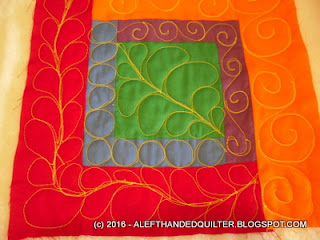
So I'll just show you photos of some of the blocks -
And the yellow sashing that I used between the rows - ;))
I like the yellow sashing with the yellow thread that I used to quilt the blocks -
BUT -
===
NOTE TO SELF -
Use a darker sashing next time so the block fabrics don't show through - ;))
===
And some of the sashing cut off some of the quilting -
But - oh, well -
Done is better than perfect - right? - ;))
I still have to add the top and bottom borders -
But it's looking a little tall and skinny -
So I think that I want/need to add some more to the sides -
To widen it out a bit -
Maybe I could use those "extra" hourglass blocks - ;))
All in all -
I'm REALLY getting tired of messing with it -
But it is so close to being DONE -
That I don't dare stop now -
Or it will be another UFO -
And the whole point of this FMQ class -
Was to make a dent in that pile -
Not to ADD to it - ;))
But I would really rather get back to practicing my FMQ -
Which is WAAAAAAY more FUN than QAYG - ;))
I made a quilt using this technique over 20 years ago -
And I remember now why I haven't made another one since then - ;))
Talk to you later - gotta go - gotta sew -
Monday, March 7, 2016
Design Wall Monday - 3/7/16
DESIGN WALL MONDAY -
Check out all of us who link up with Judy L. -
At Patchwork Times on Mondays.
We have some awesome stuff on our walls!
Well, THEY do - ME - not so much sometimes - ;))
===
On my wall today (kinda) -
The three FMQ practice blocks -
That I played with last week - ;))
I finished those and then made the last set of practice blocks -
I obviously need WAAAAAAAAAAAY MORE practice - ;))
My spirals need work -
And my free-form feathers are awful -
BUT - I learned a LOT -
And I had a LOT of FUN!! - ;))
This week I want to get these blocks -
And their friends -
In some semblance of order -
So that I can put them together -
In a "quilt-as-you-go" fashion -
For my FMQ "BEFORE" Quilt -
So we'll see how that works out - ;))
Talk to you later - gotta go - gotta sew -
Friday, March 4, 2016
Friday update - 3/4/16 -
I'm still working on my FMQ lessons - ;))
If you want to learn FMQ -
I wholeheartedly recommend this class - ;))
"Free-Motion Quilting Essentials" with Christina Cameli -
This link will take you to Gene Black's blog - he mentions it - HERE -
You could go directly to the Craftsy site - or Christina's blog -
But Gene's an "affiliate" - so if you sign up through his blog - and his ad link -
I think he may get compensation of some sort -
And I don't mind promoting my friends -
Because Craftsy and Christina get paid either way - ;))
One thing I wanted to mention -
If/when you start working on the "Essentials"class -
Promise me that you won't skip around and "cheat" -
(Like trying "Feathers" first) -
And that you will start at the "beginning" -
And work your way through the lessons - one at a time.
I know some of you already know how to do it -
BUT she teaches the basics in such a systematic order -
Each step builds on something she showed before -
And I think you'll get so much more out of the class -
If you at least watch them in order - ;))
You may even discover some "bad habits" that you have to "unlearn" - ;))
Me?? - I'm a blank slate - haha - ;))
I'm up to Lesson #5 - ;))
I made that first feather and then got a little cocky -
"I got this!" -
And the rest of that lesson looks like crap - ;))
Oh, well - it's just practice - and I need LOTS of practice ;))
And as I mentioned to one of my bloggy buddies when we were discussing some FMQ designs -
...the most amazing thing to me was that - as I was thumbing through both of her books - I'm NOT afraid of any of those designs anymore - I KNOW I can do them - maybe not WELL at first - but I CAN do them - ;))
Talk to you later - gotta go - gotta sew -
Subscribe to:
Comments (Atom)


