Friday, December 31, 2010

So here's the Plan...

Since I listed my UFOs in order of "Almost Done" to "Barely Started" - I decided that the goal is to move everything to the top of the list - and then off it altogether and over to the "Done" list.

I thought maybe I could start by combining a couple of groups - or by doing some "chunks" -

  • 1 - Need(s) Label - Heart - Scrap Card - Story and Photo
I could finish this one up and also show you how I make labels - FPP hearts - scrap cards - and do my stories.  (You can take your own photos.;))

  • 6 - Need(s) Story and Photos
These should go rather quickly - except for the photo part.  I try to take photos of my quilts as I go along - I love the "in progress" shots.  But - it is such a pain to take photos of a finished quilt in my house.  I hang quilts on a curtain rod/pole on the wall behind the sofa in the family room - but moving the sofa - climbing up on a ladder to hang a quilt - climbing back down to take the photo - climbing back up to take it down and turn it around so I can take a photo of the back - and then back down again - etc. - is a royal PITA.  Maybe I'll try to put them on the bed instead (yeah, right - after I actually make the bed, huh?)

  • 11 - Need(s) Quilting and all of the above
  •   1 - Need(s) Basting and all of the above
If I basted the one - I could add it to the group that needs to be quilted (11).  Free Motion Quilting is not my "thing".  Other blogs are far better at explaining how to do that - check out "A Few Scraps" and "The Free Motion Quilting Project" - you will find them listed on the right sidebar.  So those may be on my UFO list a while longer - until I feel like practicing my quilting (or send them out to be quilted).  I do want to finish the baby quilts, though - I would like the "babies" to get them before they hit kindergarten!!

  •   2 - Need(s) Back - Sleeve - Binding - Label and all of the above
Then I could work on these two and show you how I make the Back - Sleeve - and Binding.  Then baste them both and add them to the "Need Quilting" pile - along with all the other ones!!  Free Motion Quilting appears to be looming up ahead - don't you think??  I don't mind sending out my larger quilts to be quilted - but it seems silly to me to send out the smaller crib/wall hanging sized ones.  I've quilted twin-sized quilts before - I should be able to quilt the little ones myself!!

  •   3 - Need(s) Top Construction - Layout - Borders - etc.
  •   9 - Need(s) Block Construction - Partially Done - etc.
  •   5 - Are Cut and Need to be Pieced - Not Started Yet - etc.
  • 13 - Are Prepped - Pre-washed - Pressed - and Ready to Cut - etc.
The ones that are partially done (3 + 9) - pieced - can be worked on "whenever" - I'm not worried about those.  I'm also not going to worry about the ones that haven't been cut out yet (13) - or the ones that are cut and not started yet (5) - their time will come.  And I have to have something to play with!!  (Did I just say that I'm not worried about 30 of my UFOs??  No wonder I have so many!!)

  •   6 - Are Cut and Basted for Hawaiian Applique - Wallhangings - etc.
  •   7 - Are Cut and Basted for Hawaiian Applique - Pillowtops - etc.
The Hawaiian Applique ones (6 + 7) are a challenge.  Those were basted many years ago and just waiting for me to "retire" and have the time to do them "by hand" in the traditional Hawaiian manner.  I mean no disrespect (by the way, disrespect is NOT a verb) - and truly wish that I could complete each and every one of them by hand.  But - since I can no longer do handwork - I will have to figure out a way to finish them by machine.  Perhaps I could use them to practice some "threadpainting" techniques - that might be fun!!  I will have to think about that - which is probably why these are still UFOs!


So - I think that covers all 64 of these suckers.  Now I  have a "PLAN".  I know, I know - "PLAN" is a four-letter word - and - "The best laid plans..." and all of that - but it's better than nothing - and that will have to do for now.

Wish me luck!!

===========

The Plan - Revised -

The stuff I wrote above was drafted before I received Heather's comment about the UFO Challenge on Patchwork Times.

Interesting idea - but I can't decide if I want to formally join the challenge or not.  I'm not much of a joiner - and I do march to a different drummer - so maybe not this time.  On the other hand - Judy is asking for twelve different UFOs and I already have eleven "Stages of Completion" - so if I add one more "Stage"  - I could work on my "Stages" while everyone else tackles one quilt.  That might actually work.  I think I'll try that!!

And I even have the perfect title for "Stage 12" - 

Whatever I Feel Like Working On Today!!


HAPPY NEW YEAR EVERYBODY !!


Talk to you later - gotta go - gotta watch that ball drop!!

    Good Grief!!

    I HAVE SIXTY - FOUR (64) UFOs!!

    SIXTY - FOUR!!

    OH CRAP!!

    I had to make a speadsheet to keep track of them all - the rows have the names of the quilts - the columns across the top have the steps that need to be completed.

    So - in order of "Almost Done" to "Barely Started"  -

      6 - Need(s) Story and Photos
      1 - Need(s) Label - Heart - Scrap Card - Story and Photos
    11 - Need(s) Quilting and all of the above
      1 - Need(s) Basting and all of the above
      2 - Need(s) Back - Sleeve - Binding - Label and all of the above
      3 - Need(s) Top Construction - Layout - Borders - etc.
      9 - Need(s) Block Construction - Partially Done - etc.
      6 - Are Cut and Basted for Hawaiian Applique - Wallhangings - etc.
      7 - Are Cut and Basted for Hawaiian Applique - Pillowtops - etc.
      5 - Are Cut and Need to be Pieced - Not Started Yet - etc.
    13 - Are Prepped - Pre-washed - Pressed - and Ready to Cut - etc.
    64 - TOTAL

    SIXTY - FOUR - not counting the three that I gave away and the two that are not even mine (I'm just helping out) - in eleven different "Stages of Completion".  Geez!!

    But I guess it could be worse - I didn't count the ones that are in my head -

    OR -

    the patterns that I want to try
    the fabric collections that I want to use
    the charm packs
    the jelly rolls
    the layer cakes
    the fat quarters
    and the kits - in my "Fabric Stash Room".  That would get the number up to a couple of hundred, for sure!!  And the stuff Santa brought me - forgot about that!!

    I REPEAT - GOOD GRIEF!!

    OK - Kitty - breathe!!

    So now I need a plan of attack...


    Talk to you later - gotta go - gotta plan - and breathe -

    MY LIST OF UFOs - 2011


    UFOs listed by "Stage of Completion" - in order of "Almost Done" to "Barely Started" - 

    (NOTE - To see updates to this list - and to track my progress - please click on the "UFO - 2011" Page Tab above.  It's easier to update the "Page" than it is to find this post every time I make a change - Thanks!!)

    Stage 1.  Need Story and Photos
    • Space - The New Frontier
    • Big & Bold
    • Serenity
    • Topsy Turvy
    • Springtime - Mystery Quilt
    • Christmas Lights
    Stage 2.  Need Label - Heart - Scrap Card - Story and Photos
    • B/W/R Pillowcases (5)
    Stage 3.  Need Quilting and all of the above
    • Sampler Quilt
    • Watercolor Heart
    • Top/White
    • Red/White/Blue
    • Purple/Green/Black
    • Pre-Stenciled Wholecloth
    • Lion - H
    • Lion - C
    • Lion - J
    • Cottage Wall Hanging
    • No-Waste Windmill (Pungkin Peer Charm Pack)
     Stage 4.  Need Basting and all of the above
    • Summer Lotus
     Stage 5.  Need Back - Sleeve - Binding - Label and all of the above
    • Rules
    • Placemats/Throw
     Stage 6.  Need Top Construction - Layout - Borders - etc.
    • Citrus Chips
    • B/W/R - Red Cosmo
    • B/W/R - Black Stripe
     Stage 7.  Need Block Construction - Partially Done - etc.
    • Floral Applique
    • Kuuipo
    • Kimono Girl
    • Blended Quilt
    • Watercolor Vase
    • Batik Dimes
    • B/W/R - Red Stripe
    • B/W/R - Black Cosmo
    • B/W/R - Multi
     Stage 8.  Cut and Basted for Hawaiian Applique - Wallhangings - etc.
    • Woodland Lei - stone blue on white
    • Iris - white on blue
    • Breadfruit - stone blue on white
    • Hibiscus - red on white
    • Hibiscus - pink on white
    • Hibiscus - red on white
     Stage 9.  Cut and Basted for Hawaiian Applique - Pillowtops - etc.
    • Hibiiscus - red on white
    • Ulu - green on muslin
    • Pineapple - green on muslin
    • Hibiscus - dark yellow on light yellow
    • Ginger - red on white
    • Stephanotis - black on white
    • Woodland Lei - peach on rust batik
    Stage 10.  Cut and Needs to be Pieced - Not Started Yet - etc.
    • Hexagon Floral Tablecloth
    • Bali Wonder Blocks
    • Bali Pops - Mint Chip
    • Jungle - Black
    • Jelly Beans
    Stage 11.  Prepped - Pre-washed - Pressed - and Ready to Cut - etc.
    • Ties
    • Salt Water Taffy
    • Taxi
    • Willow
    • Fairy Frost Confetti
    • SSCQ
    • Suzanne
    • Mama's Garden Quilt Kit
    • Fudge Brownie - Wall Hanging Kit (2)
    • Spring Blue & Yellow
    • Double Peony Table Topper
    • Hearth & Home Walll Hanging
    Stage 12 .  Whatever I Feel Like Working On Today!!

      Thursday, December 30, 2010

      HAPPY NEW YEAR!!

      Here's wishing you all a VERY HAPPY NEW YEAR!!

      May it be filled with love - good health - good wishes - happiness - prosperity - and, of course, a whole lot of quilting!!

      My New Year's Resolution - 

      I'm not very good at New Year's resolutions.  Let me rephrase that - I like to make New Year's Resolutions - I'm just not very good at keeping them.  But I like to make them anyway - just for fun!!

      So this year - I resolve/hope to finish a bunch of UFOs.  Notice I did not say how many - just a "bunch" - because you know how it goes - good intentions and all of that.  It gives me a goal - but is kinda vague.  It is still a resolution - and a very good one I think!!  I might actually be able to do it this year - or at least I can give it a good try!!

      First I need to update a list of UFOs that I made a while ago.  I tried to categorize them by "stage of completion" - thinking it might be easier to finish the ones "almost done" first.  (My version of "making a list - and checking it twice", I guess.)  It was no surprise that my list was much longer than I thought it would be - and now I have to add a few more things to it.  So the list part should be fun - or depressing - not sure which one yet.

      Second - now that I'm doing this blog - I have a different kind of incentive - I can finish a UFO and post my progress as I go - to show you TWIDI - The Way I Do It.  Maybe I can kill two birds with one stone - as the saying goes.  That might be interesting since you should know by now that I don't necessarily do anything the way you're "supposed" to do it (because I'm special)!!

      And I always thought it would be great to write a Left-Handed Quilting book - totally backwards.  Start with making a label and then binding the quilt and working backwards to choosing a pattern and fabric.  I thought it might make more sense and make it easier to make decisions as you went along if you knew where you were going to end up.  Maybe this project will turn out to be a version of that - we'll see.

      So in the next few days - I need to update my UFO list - so I can get a good start on Saturday.  Even if my resolution only lasts a month - I should be able to make some sort of dent in the pile, don't you think??  Or is it just wishful thinking??  Finishing UFOs??  What am I thinking/drinking/smoking??


      Talk to you later - gotta go - gotta sew -

      Thursday, December 23, 2010

      MERRY CHRISTMAS!!

      I received this Christmas Card the other day from a dear friend - and want to share it with you -

      Please click on this link -  Christmas Card

      MERRY CHRISTMAS!!


      Talk to you later - gotta go - gotta wrap some presents -

      Wednesday, December 22, 2010

      Slow Poke Quilter

      I found a new site - Mama Made This - Slow Poke Quilter.

      WOW!! - a lady after my own heart!!  And with a bunch of followers who feel the same way!!  I will need to take some time to read her posts - but in the meantime - I added her badge to my sidebar.  I think she agrees with me that quilting is not a race - it's a process - and it's supposed to be fun!!

      So - Rule #3 - Remember - Quilting is Supposed to be FUN!

      In previous posts I have sometimes mentioned my sister-in-law.  We share a birthday - I am five years older.  We are both left-handed.  She is a gourmet cook - I am a quilter.

      I am always amazed at her culinary expertise and she is impressed with my quilts.  I think we both agree that it is easy to impress the other because neither one of us knows how to do what the other one does.  She makes her elaborate meals look easy - but I can't do it for the life of me.  I  make quilts that are easy, but look complicated - and she is impressed with what appears to be a time-consuming and difficult hobby.

      She knows that I have "worked" on some of my quilts for years.  She doesn't realize that I was "working" on others at the same time - and that the "work" was actually "play" and I was having FUN!!  I didn't finish them because I didn't WANT to - it would have been like packing up all of my toys and going home - and who wants to do that when they are having such a good time!  My quilts are fun to play with and I actually miss them when they are done.

      Now that she has discovered quilting - we have something else to share.  Only problem is - she won't be as easy to impress anymore.  Oh, darn!!


      Talk to you later - gotta go - gotta sew -

      Tuesday, December 21, 2010

      Santa's Sisters

      Silly me - THIS is the quilt I should have entered in the Weekly-Themed-Contest.
      I didn't realize that the entries did not have to be completed in the last year - until I submitted "Christmas Lights" and used up my "One entry per person per week."  This quilt won a 1st Place Blue Ribbon in a local quilt show a few years ago.
      ===========


      Santa's Sisters

      Santa Paula - top left
      Santa Monica - top right
      Santa Barbara - center
      Santa Anita - bottom left
      Santa Fe - bottom right
       
      Machine Pieced
      Machine Appliqued
      Foundation Paper Pieced
      Machine Quilted
      53" x 53"
      Started - August 1998
      Completed - December 1998

      Pattern - My Family
      Incredible Quilts for Kids of All Ages
      Pg. 89-95
      By Jean Ray Laury (c) 1993
      Row 2-1 - Santa Paula
      Row 2-3 - Santa Fe
      Row 3-2 - Santa Anita
      Row 5-4 - Santa Monica
      Row 6-1 - Santa Barbara

      Years ago I saw a Christmas Card that read "Merry Christmas from Santa and his Family".  Inside was a drawing of Santa and his brothers and sisters with names like - Santa Maria, Santo Domingo, etc.  I laughed - and put it back on the rack - but never quite forgot it.  I thought that it would make a great quilt someday - but I had absolutely no idea how to do it.  That was until I found Jean Ray Laury's book - Eureka!  It had cartoon pictures of faces! Now I could make blocks with girl faces and names of various cities that started with "Santa".

      I chose Santa Paula - Santa Monica - Santa Barbara - Santa Anita - and Santa Fe from a long list of possibilities.  They became "Santa's Sisters".

      They say that sometimes the quilt talks to you - and this one definitely talked to me.  I wanted the layout to match "Blueprint 12C" in the book - Design Your Own Quilts - by Judy Hopkins (c) 1998 - Pg.54-55.  (I told you I have a lot of books!)

      Like this -
      Top Left -              X
      1/2 step over -       X
      whole step over -      X
      whole step over -         X
      1/2 step over -              X

      But it insisted on going in an "X" formation.

      Once the faces decided where they wanted to go - the rest sort of designed itself - step by step.  Hourglass Blocks worked perfectly as alternate blocks - framing each face.  Foundation Paper Pieced trees - ornaments - and hearts - filled in "holes" along with other blocks as needed.

      Of course, the interfacings and fusibles that were available for applique back then were not near as soft as the stuff that is available now - so the faces are extremely stiff and I have to be very careful how I fold it so as not to crease a face.  Don't want the "girls" to have any more wrinkles than necessary, right?

      I had so much fun making this quilt.  It's one of my all-time favorites.  Someday I want to make one of "Santa's Half-Brothers" - with San Juan - San Francisco - San Diego - San Clemente - and San Jose.

      P.S.  You have to be careful ironing on the "Holly Letters" used in the title block - they can melt.  Ask me how I know!!


      Talk to you later - gotta go -

      Friday, December 17, 2010

      Dear Heather -

      Dear Heather -

      My stats show your blog (apassionatequilter.blogspot.com) as a "Referring Site" to my blog.

      THANK YOU!!

      I have tried - and tried - and tried - to visit your blog - but EVERY time I try - your page flashes ON my screen - and then - just as quickly - flashes OFF again.  (Sometimes I think my computer acts like a spoiled brat - if it would just do what I told it to do - everything would be fine!!)

      Anyway - I can't tell if the problem is on my end or on yours.  I have no other way of contacting you - and I thought you should know.  (And I'm crossing my fingers that you are actually reading this!)

      I did manage, however, to visit your ETSY site - and I want to know where you got the sewing machine in your drawing - that sucker sure looks left-handed to me!!

      Sincerely,
      Kitty


      =========

      Anyone else out there having the same problem - or is it just me??  Let me know.  I'd really like to check out her blog and see/know what she thinks of mine.  Thanks.

      Talk to you later - gotta go -

      Thursday, December 16, 2010

      Vote For Me

      Last Sunday night I checked the Quilting Gallery website and took a look at their Weekly-Themed Contests.  I voted for Julie Fukuda's Tablerunner for the Holidays - barely making the voting deadline - Sunday 11:59PM - but better late than never, right?  Right!  Julie - you got my vote.  I love your stuff!!

      Anyway - while I was there - I checked out the contest for this week - Christmas (non-tablerunner).  I don't usually enter contests like this - BUT - imagine my surprise when I realized that I have a quilt that would actually qualify!!

      So - I entered it.  Wow!!  What fun!!

      My quilt is called Christmas Lights - and it was a 3-part Mystery Quilt featured in last year's Quiltmaker magazine (July/August 2009 - Sept/Oct 2009 - Nov/Dec 2009).  It was designed by the wonderful and fabulous Bonnie Hunter!!  I love her site - quiltville.com.  She makes the most amazing scrap quilts and has her famous "Scrap-User's System".  She has also completely redone the instructions for this quilt and posted them on her website - for FREE!!


      Anyway, I made it for Grandson #1 - whose birthday is December 23.  He helped me with the layout and recognizes scraps that I used in this quilt as having come from other quilts that I made for him and his brothers.

      When we were putting the blocks on the design wall - I tried to explain that I wanted the blocks to be "on point" with the red points on the left and right.  He finally understood when I said "First Base" and "Third Base"!!  Boys!!  Gotta luv 'em!!

      Then he laughed when he saw the border fabric I chose - half-eaten gingerbread men and cartons of milk!!  (You never know what you will find in my stash - but I knew that fabric would come in handy one day!!  It made me laugh when I saw it - and I just had to have it!!)


      My friend, Mary, quilted it with a "Christmas Lights" all-over pantograph pattern - it seems like that pattern was just made for this quilt.  I truly love how it turned out.

      This quilt was my first attempt at a magazine Mystery Quilt - and - my first HUGE scrap quilt - and it didn't even make a minor dent in my scrap stash!!  Go figure!!  Guess I'll just have to make more scrap quilts, huh?  

      So - anyway - VOTE FOR ME!!

      Voting is open Friday to Sunday 11:59PM - HERE.

      Thanks!!


      Talk to you later - gotta go -

      Wednesday, December 15, 2010

      Another reader - YAY!!


      Wow!!   Now I know of four people who actually read my left-handed quilter blog -

      #1 - My favorite sister-in-law
      #2 - Quilting, Sewing GRANNY - my very first "Follower"
      #3 - Julie Fukuda (Japan) - who commented on my "Surfing" post

      and now...

      #4 - Rose - who commented on my last post - and my second "Follower"

      YAY!! - another Flipping Lefty!! 


      We need a slogan -  like -
      Flipping Lefities Unite!!
      But that comes out F.L.U - so gotta think some more on that one!!

      I'm really hoping that other left-handed quilters out there in blogland will find this blog eventually - and that they will leave comments - and tell me/us what gives them trouble - what they need help with - and also share their own tips and tricks.  There is always more than one way of doing things - and this blog is only my way.


      Talk to you later - gotta go - gotta take some photos for my next couple of posts.  It's a real pain trying to explain this stuff without photos!!  Sure glad I figured out how to do that!!

      Monday, December 13, 2010

      LHQ - Rotary Cutting - Basics

      LEFT-HANDED QUILTING - Rotary Cutting - Basics

      ============
      Note - these instructions are written in LEFTISH.  If you are right-handed - just reverse the directions.
      ============


      BASICS

      THIS IS HOW I DO IT - TIHIDI

      General Info

      • Press the fabric before you cut it
      • You want the cuts to be straight and accurate
      • Always use a rotary cutting mat
      • Always use acrylic rulers - roll the rotary cutter blade against the edge of the ruler
      • Always press down firmly on the rotary cutter
      • Always cut AWAY from your body
      • Caution - Blades are sharp!! - Safety First!!


      Placement of the Rotary Cutting Mat
      • Place the rotary cutting mat so that the #1/1 square is in the bottom right hand corner - you want the numbers to run along the bottom from right to left and from bottom to top (unless you are comfortable counting backwards).


      First Cut - Straighten the Edge 

      Method # 1 - Right (Wrong) Hand Cut
      • Fold the fabric in half lengthwise
      • Line up the fabric with the fold on a grid line on the cutting mat with the raw edge to the right
      • Place the ruler on the fabric with the right edge close to the raw edge of the fabric
      • Line up the ruler with a vertical grid line and the top of the ruler hooked to the top of the mat - 90 degree angle to the fold
      • Hold the ruler with your left hand
      • Using your right hand - cut along the right-hand side of the ruler trimming and straightening the raw edge
      • ADVANTAGE - trimmed edge is on the right

      Method # 2 - Left-Hand Cut
      • Same set-up as Method #1 - but instead of using your right hand - go around to the other side of the cutting table and use your left hand to cut along the left-hand side of the ruler trimming and straightening the raw edge 
      • ADVANTAGE - trimmed edge is on the right


      Method # 3 - Left-Hand Cut
      (the method used in the Overview - and my favorite method)
      • Fold the fabric in half lengthwise
      • Line up the fabric with the fold on a grid line on the cutting mat with the raw edge to the right
      • Place the ruler on the cutting mat with the left edge just over the raw edge of the fabric
      • Line up the ruler with a vertical grid line and the top of the ruler hooked to the top of the mat - 90 degree angle to the fold
      • Hold the ruler with your right hand
      • Using your left hand - cut along the left-hand side of the ruler trimming and straightening the raw edge
      • ADVANTAGE - trimmed edge is on the right

      Method #4 - Left-Hand Cut
      • Fold the fabric in half lengthwise
      • Line up the fabric with the fold on a grid line on the cutting mat with the raw edge to the left
      • Place the ruler on the fabric with the left edge close to raw edge of the fabric
      • Line up the ruler with a vertical grid line and the top of the ruler hooked to the top of the mat - 90 degree angle to the fold
      • Hold the ruler with your right hand
      • Using your left hand - cut along the left-hand side of the ruler trimming and straightening the raw edge
      • DISADVANTAGE - trimmed edge is on the left - and the trimmed fabric must be turned so the trimmed edge is on the right when you go to make the second cut


      Second Cut - Cutting Strips
      • Fold the fabric in half lengthwise with the trimmed edge on the right
      • Line up the fabric with the fold on a grid line on the cutting mat with the raw edge to the right 
      • Decide how wide you want the strip to be (3" in the photo below)
      • If the strip width is less than the width of the ruler - place the ruler on the fabric with the right edge of the fabric at the width line - the fabric showing under the ruler will be the finished cut strip (3" in the photo below)
      •  If the strip width is greater than the width of the ruler - use the grid lines on the cutting mat to align the ruler
      • Line up the ruler with a vertical grid line and the top of the ruler hooked to the top of the mat - 90 degree angle to the fold
      • Hold the ruler with your right hand
      • Using your left hand - cut along the left-hand side of the ruler
      • Turn the strip and cut off the selvage

      Sub-Cuts - Cutting Patches - Squares & Rectangles
      • Press the strips if necessary
      • Line up the strip with both a horizontal and vertical grid line on the cutting mat
      • Decide how wide you want the patch to be (3" in the photo below)
      • Place the ruler on the fabric with the right edge of the fabric at the width line - the fabric showing under the ruler will be the finished cut square or rectangle (3" in the photo below)
      • You may also use the cutting mat grid to measure the patch -
      NOTE - That's why you want the numbers on the cutting mat to run from right to left.
      Example - If the raw edge starts at the 2" grid line on the mat - you can/may cut 4" rectangles on the 6" - 10" - 14" grid lines - just count 2 + 4 (6) + 4 (10) + 4 (14) - etc.  You are NOT counting backwards - just from right to left.
      • Line up the ruler with a vertical grid line and the top of the ruler hooked to the top of the mat - 90 degree angle to the fold
      • Hold the ruler with your right hand
      • Using your left hand - cut along the left-hand side of the ruler


      There you have it -

      I'm not saying that it is the best way - or the easiest way - it's just The Way I Do It - TWIDI - another new word - sounds like Tweety!

      I use all four methods at various times.  Sometimes I use the grid on the mat.  Sometimes I don't use the grid lines on the mat at all.  Sometimes I just use the grid on the ruler.  It depends.

      Bottom line - I just do what works for me.  So I'm making that -

      Rule #2 - Do What Works For You!


      Talk to you later - gotta go - gotta sew -


      Sunday, December 12, 2010

      LHQ - Rotary Cutting - Overview

      LEFT-HANDED QUILTING - Rotary Cutting - Overview

      ============
      Note - these instructions are written in LEFTISH.  If you are right-handed - just reverse the directions.
      ============

      Rotary Cutting seems to be the most confusing part for a new left-handed quilter.  Everything seems to be backwards and we have a hard time wrapping our heads around it.

      One of the special challenges lefties face is that we do some things left-handed and we do other things right-handed.  It's all part of our coping mechanism in this right-handed world.

      Lefties don't do EVERYTHING left-handed.


      So I have a quick quiz for you.

      When you use a knife to cut some veggies on the cutting board - which hand do you use?

      If you answered - right hand - skip this whole thing.  You can/may use a rotary cutter right-handed and follow the "directions" as they are written for the right-handed world of quilting.

      If you answered - left hand - you have come to the right place.  Keep reading.  I will try to take the mystery out of this part.

      First, I'll give you a quick Overview (below) - then I'll go into more detail in the next post - LHQ - Rotary Cutting - Basics.

      Overview

      STEP 1 - 

      Gather your pressed fabric - rotary cutting mat - rotary cutter - acrylic ruler

      STEP 2 - 

      Line up the fabric on the mat
         Fabric to the left
         Ruler on the right

      STEP 3 - 

      Straighten the raw edge of the fabric

      (I can think of 4 different ways to do this - but you get no choice in this part.  Choices are included in the next post.)

      Cut along the left side of the ruler


      STEP 4 -  

      Cut strips in whatever size you want - (3" is shown in the photo below)


       STEP 5 -

      Cut strips into squares, rectangles, triangles, etc. - (3" shown in photo below)


      ============

      Next up - 

      LHQ - Rotary Cutting - Basics

      Details if you want them.


      Talk to you later - gotta go -

      Tuesday, December 7, 2010

      Time Out -

      Time Out - 

      Due to a family emergency this blog will be delayed a bit.

      When things calm down - I'll be back to post the Rotary Cutting stuff.

      So - kind readers - please bear with me.  Thanks.

      Gotta go -

      Wednesday, November 24, 2010

      LHQ - Instructions vs. Directions

      LEFT-HANDED QUILTING - Instructions vs. Directions


      Again - this post originated as information written for my sister-in-law who was a beginning quilter at the time - and has been updated for this blog.  I hope that it may be of help to other lefties out there in blogland.

      ============

      I want to make a distinction between INSTRUCTIONS and DIRECTIONS.

      INSTRUCTIONS

      The instructions tell you how to make a quilt -

      how much fabric you need,
      the size of the blocks you will make,
      the number of blocks you will make,
      the size of the quilt you will have when you are done,
      and the basic steps you need to complete your project.

      The instructions will be the same for both left and right-handed quilters.

      What can really mess you up are the directions.  I think that it is the directions that confuse us lefties the most.

      DIRECTIONS

      The directions, by definition, are directional - referring to any point an object can face -

      NORTH/SOUTH - EAST/WEST - TOP/BOTTOM - UP/DOWN - FRONT/BACK - LEFT/RIGHT - and DIAGONAL.   And don't forget that CIRCLES can be drawn either clockwise or counter-clockwise.


      As lefties, we need to be especially aware of any reference that is directional.


      Rule #1 - Don't Forget that YOU ARE LEFT-HANDED!

      NORTH/SOUTH - TOP/BOTTOM - UP/DOWN - FRONT/BACK - are usually not a problem.  If you look in a mirror, your reflection is not reversed from your head to your toes - you are still standing upright - and you still face front.

      However -

      EAST/WEST - LEFT/RIGHT can be tricky.  Most diagrams and photos feature right-handed quilters - doing their thing - right-handed.

      My advice is to take a pencil and circle obvious right-handed references as you read the instructions for the first time.  Then you can go back through the instructions a second time and decide if you are comfortable doing the step right-handed or not.  If you want to do it right-handed, erase the circle.  If you want to do it left-handed, the circle will remind you that you have to compensate when you get to that step.

      Some newer quilting books have diagrams and photos for both right-handed and left-handed quilters.  I know they think that they are helping me - but the reality is - they just confuse me!!  It's like trying to read a bilingual book and having to search through it for the stuff written in English.  It would be easier to read, I think, if they just wrote two separate books - but they don't.  So with these books - I do a variation of the circle thing.  The first time I read them - I take a pencil and cross out the obvious right-handed references.

      Just like the numbers on the rulers that go both ways - I just cross off the ones I don't want.


      DIAGONAL is an often forgotten direction.  One of my favorite quilts is the result of a mistake I made when I forgot to compensate for diagonal cuts.


      I tried to duplicate a pattern in the book Strips that Sizzle  by Margaret J. Miller (That Patchwork Place, 1992) - and I broke Rule #1 - I forgot that I was left-handed.  I didn't realize, until after I had cut them ALL, that my diagonal cuts were "backwards".  Instead of going from bottom right to top left, they were all going from bottom left to top right.    

      Here is an example of what I was trying to duplicate -

      This what I cut -


      so this is what I got -
      Just one small problem - the colors were on the wrong side!!

      (I'll tell you the whole story of my "Blue/Yellow Monster" one of these days.  That sucker was up on my design wall for over two years!!)

      Anyway - in an effort to help - so you can just read through my instructions without having to think about whether or not the directions are backwards - I will try to write them in "LEFTISH".  If there is an area where you may need to pay special attention - I will tell you.

      I want you to be able to spend your time quilting - not decoding the instructions / directions.

      This is supposed to be FUN!!

      Talk to you later - gotta go - gotta write the Rotary Cutting stuff -

      AND HAPPY THANKSGIVING!!


      Tuesday, November 23, 2010

      Please Stand By -

      Please Stand By - We Are Experiencing Technical Difficulties.

      Isn't that what the TVs used to show on the screen when they were having problems?  I think so.

      Anyway - I've been having problems - 

      Right after I posted my "tome" on "Supplies" with all those photos - my printer/copier/scanner/fax decided not to work anymore.

      So - we had to get a new one - install it - and learn how it worked.

      Then when I was about to take photos for my next post - my camera battery ran out and had to be re-charged.  (It's not like I haven't been using it!)

      Then I had to learn how the new scanner worked - so I could scan some drawings I had made and wanted to post.

      Then I got a Jury Summons - more fun - so I had to deal with that.

      Now - I'm a little off my schedule.  I really wanted to post my "Rotary Cutting - Basics" (chapter?) before Thanksgiving - but I don't even have it written up yet - much less taken all the photos I need to explain what I'm doing.  So I think I will post "Instructions vs. Directions" tomorrow (it's almost done) and then work on "Rotary Cutting - Basics" and post that after the holidays.

      Right now - it's time for my nap - so -

      Talk to you later - gotta go -

      Saturday, November 20, 2010

      LHQ - Went surfing today

      LEFT-HANDED QUILTING - Went surfing today

      I went "surfing" today - and found some stuff you might like -

      #1 - Joann's® is having a sale - 50% off Rotary Cutting Tools - go check it out!!  I think it ends on the 24th - but I'm not sure.  I found my blue Dritz® rotary cutter on sale for $7.49 and my yellow/green Fiskars® rotary cutting mat on sale for $22.49.  Sure beats full price!!  (I never buy stuff from Joann's at full price.  They always have a sale eventually.)

      #2 - A place advertising left-handed scissors.     Left Hand NZ.
      They say that their scissors are genuinely left-handed.  I think they might be right!!  Check out the Blue/Orange Harlequin scissors - Code - IMP68-H.  It's about the fifth one down.  It looks like to me that the blue/left blade is on top and the orange/right blade is on bottom.  They might be real left-handed scissors!!  Does anyone out there have a pair of these?  Are they really left-handed?  Let me know!!

      #3 - A place advertising left-handed rulers.   Anything Left-Handed - UK
      They say that their rulers are "scaled from right to left for drawing lines in the natural direction for a left-hander."  Then it shows a photo of a ruler reading 5-4-3-2-1 with the pencil line going from right to left!!??  If that is for a left-hander - I guess I'm a right-hander 'cuz I usually draw my lines from left to right!!  I put a ruler down - it reads 1-2-3-4-5 and if I want to draw a 3" line I start at "0" and go to "3" and stop.  If I wanted to draw from right to left I would just start at "3" and go to "0".  Why do I need a ruler scaled from 5-4-3-2-1?  Would this ruler actually help any of you?  Do you draw your lines from right to left?  No wonder we are all so damn confused!!

      #4 - Then I found a place selling left-handed stuff.  Lefthandersday
      Scroll down until you get to the "Left-hander's mug".

      It says "It's a left-handed thing...you wouldn't understand!"  I LOVE IT!!

      And after all the fun I have flipping my rulers - I want a mug that says 

      "I'm a Flipping Lefty!"

      What do you think?  Should I make one?  Do you think it would sell?


      #5 - Then I did a couple of Yahoo searches just for fun.

      A - left handed quilter - 336,000 hits
      And thanks to Quilting Bloggers - I'm on Page #3 - #27.  Thanks, guys!!

      B - left handed quilters club - 133,000 hits
      And thanks to Quilting Bloggers - I'm on Page #1 - #4.  Thanks, guys!!

      C - left handed quilters association - 185,000 hits
      Most of the "Left Handed Association" references were for the "National Association of Left Handed Golfers." (NALG)

      Most of the "Quilters Association" references were for the "International Machine Quilters Association."

      I think we need to start our very own "International Left-Handed Quilters Association".  (ILHQA)  I know at least two people who would join.  Me and my favorite sister-in-law.  How about you?  Would join?


      Talk to you later - gotta go -

      Thursday, November 18, 2010

      LHQ - Supplies

      LEFT-HANDED QUILTING - Supplies

      If you have ever bought a Wonder Mop® - and taken it home and mopped and twisted and mopped and twisted and mopped and twisted until the mop fell apart because you had unscrewed it - you might be Left-Handed!  ( My apologies to Jeff Foxworthy - but I just couldn't resist!)

      As Left-Handed Quilters (LHQ), we are all painfully aware of the fact that some supplies marked "for right or left handed use" are not really for "left-handed use".  They are a right-handed person's version of what they think can be used left-handed - just like the gravy ladle, manual can opener, coffee mug with the logo facing away from you, etc.  You know what I mean.  You can use them left-handed - but they are not really left-handed.

      With that in mind - I thought I would share a list of some of the stuff I use.  And any "links" provided are there so you can see the "catalog" info on the item - if I could find it.  The link is not necessarily the best source for the item.  It is just to give you an idea of what I'm talking about - you really should shop around for the best price in your area.

      Also - be aware of the fact that a lot of this information was originally intended for my sister-in-law - a beginning quilter.  I do not - in any way - want to insult anybody's intelligence.  If you are an experienced quilter - just ignore the stuff you already know.  You might want to read it anyway, though,  just in case I say something interesting.  You never know, I might.


      Anyway - here we go -  it's probably going to be pretty looooooong - just warning you!!

      Fabric - Batting - Needles - Thread - Seam Rippers are neither left nor right-handed so they are not included in this list.  We can talk about them later though, if you want.


      Sewing Machine

      Sorry, they are ALL right-handed.  Actually, I think that is to our advantage.  All of the dials are on the right side - and we are already used to telephones, adding machines (I'm a retired CPA), and every household appliance known to man being right-handed - so that is no big thing.  Our advantage comes into play with all the stuff that happens on the LEFT - the needle, the screws, fabric and pins.  I think we have an easier time with the little screws on the left and threading the needle.  We also have an easier time maneuvering the fabric.

      I have three sewing machines and one serger.  I refer to them as my Pinto, Toyota, Lexus, and Sergio.  The sewing machines all have the same basic features, but each is a step-up from the other.  They are all free-arm sewing machines with variable stitch length and width, reverse stitching, various stitches, buttonhole, variable thread tension, and various presser feet available.

      My Pinto is a Montgomery Ward® - Signature 2000.  I have had this one for years and am just too lazy to get it off the shelf to take its picture.  When the day came that I needed a machine that had adjustable pressure and a "drop-feed" feature - I got my Toyota - a White® - Model 1777.  I have this one set up on the dining room table to do free motion quilting.  I'm going to do a Free Motion Quilt Along so it's all ready to go.  The "L" and "W" in black marker on the dials were put there by the staff at the sewing machine store - it was a demo model - and I just left it 'cuz I could never tell which dial was for stitch "length" or "width" either. ( I'll tell you about the dinosaurs later.)


      When the day came that I needed/wanted a new "electronic" machine - I got
      my Lexus - a Husqvarna® - Viking Lily 555.  She's my baby.  I don't know what I'm going to do when she breaks so I try to take real good care of her.  I have her set up in front of my window to do piecing and applique.  She usually has her cover on since she sits in front of the window, but I took it off to take her picture.

      Sergio is a Brother Serger 1034D.  I only turned him on once (pun intended) - and don't know him very well just yet.  One of these days...


      Iron and Ironing Board

      My iron has the cord coming from the middle of the back - that makes it "left-handed" in my book..

      It is also an older iron without the automatic shut-off feature and I love it!  When I need to press something, it is always ON!  I had a newer one and didn't like it when I had been sewing for a while and tried to press something just to find that it had turned itself OFF!   I'm a grown-up and am perfectly capable of remembering to shut off my iron when I'm done - I don't need it to do it for me.  (Same goes for the damn coffee pot - I go to get another cup of coffee and it has turned itself OFF!  But I guess that's what the microwave is for, huh?)

      I set up my ironing board at sit-down height and with the pointy end on the left.  That way I can put my iron on the pointy end and use the square end to press fabric.  I just "scoot" from my sewing machine to the ironing board when I need to press something.

      Pins

      I like the yellow flat pins with the little "flower" heads.  They are long enough to handle easily and they lie flat when you pin.  You can iron over them without leaving marks on the fabric and they don't melt.

      I know pins are non-directional - but the way you use them may not be.

      The direction in which you pin depends on which hand you want to use to REMOVE them as you sew.  Remember that the pieces are fed into the sewing machine with the raw edge to the right, and pin the pieces so the head of the pin will be next to the hand you want to use to remove it.
       
      If you prefer to use your left hand, then pin with the pointy end of the pin closest to the raw edge of the fabric - like the top pin in the picture.

      If you are comfortable removing them with your right hand, pin with the head of the pin closest to the raw edge of the fabric on the right - like the bottom pin in the picture.


      Either way, you will be removing the pins as you go along.  It is not a good idea to sew over pins.  If the needle hits the pin, it may break the needle, bend the pin, and even knock your machine out of alignment.  And the broken piece can wind up anywhere - on the floor, inside the sewing machine, or in your eye - not a good idea!  That being said, I do occasionally sew over pins - I slow down when I reach the pin and the needle seems to glide right over them.  I have, however, broken a few needles and replacing them in the middle of a seam is real pain!  (I have also jammed a needle through my thumb while trying to change a presser foot.  You can ask my sister-in-law about that one!)  So - be careful!!


      Wooden Presser Stick and Stiletto


      The thing on the left is a wooden presser stick for Foundation Paper Piecing - or "finger pressing" seams.  They do make left-handed versions - make sure you get the correct one.  ( I almost said "get the right one" - geesh!)


      A stiletto is just a long, pointy stick used to hold down the fabric as it goes under the presser foot.  Sometimes your finger or fingernail just won't do.  You will find these for sale in catalogs for $5-$6, but I use the "cuticle sticks" found in the nail care department of Wal-Mart to do the same thing - and - they come in packages of 4 for only a couple of bucks.  You could also use a chopstick or bamboo skewer.  I just love finding stuff and using it for a totally different purpose!

      Scissors

      The rotary cutter and mat have replaced the traditional scissors.  You will, however, need a pair of small scissors to cut threads as you sew.  I use Fiskars® - 5" micro-tip.  I have three - one at my Lexus - one at my Toyota - and one on my ironing board.  The extra-fine tip is great for detailed work.
       

      The left-handed scissors that I have seen have the handles reversed but not the blades.  They are easier to hold in your left hand, but the cutting edge is on the wrong side and blocks your line of sight when cutting.  My orange-handled Fiskars® - 8" - scissors are like this.  So are my Fiskars® "Softouch" scissors, which are cool since they stay open and need pressure to close - great for arthritic hands.  I've had them so long that the slide lock has broken and I have to put a rubber band around them to keep them closed!!  I have also found that it is easier to cut around something if I hold the "something" in my right hand and cut around it "clockwise".  That way, the part I cut off isn't the part I wanted to keep!!

      Do not buy "applique" scissors - they are right-handed.
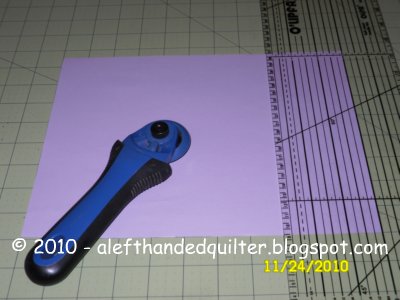

      Rotary Cutter

      I use a blue Dritz® 45mm rotary cutter.  I prefer the Dritz® rotary cutter to the Olfa® brand.  The Olfa® (yellow) has too much exposed blade to suit me.  I think it is extremely dangerous and has to be opened and closed - and locked when not in use.  And some models need to be disassembled and then reassembled for left-handed use.

      The Dritz® (blue) comes in different sizes - 45mm and 60 mm - and is pressure-sensitive.  The blade is automatically locked until you actually press down to cut.  It has settings for light and heavy-duty use.  It is always ready for use - and can be safety locked.The 45mm blade is the perfect size for me and is truly for left-hand use without having to disassemble and reassemble the cutter.  As an extra bonus - it uses generic replacement blades - and generic blades are usually cheaper - yay!!

      Again, be careful!!  The blades are extremely sharp and they should only be used with a rotary cutting mat.  And if you drop it - don't try to catch it - just let it hit the floor - the pressure of the "hit" may engage the blade and we sure as hell don't want that to happen!!


      Rotary Cutting Mat

      Rotary cutting mats protect your cutting surface and prolong the life of your rotary cutter blade.

      I recommend a mat at least 18" x 24" in size - the larger the better, whatever you can afford.  I use an old gray Fiskars® with one plain side and a 23" x 34" orange grid on the other side.  It is so old that the orange lines have been cut away in some sections.  I use it when I'm cutting something that doesn't need grid lines on the mat - 'cuz it doesn't have them!

      I also have a brand new Fiskars® mat that is pale yellow on one side and pale green on the other.  Both sides have a dark green 24" x 35" grid.  The mat itself is 25" x 36" and is just a tad bigger than my cutting table - so it hangs over the edge a little.  It's really not a problem, though - I just push it back until it is flush with the front edge of the table.


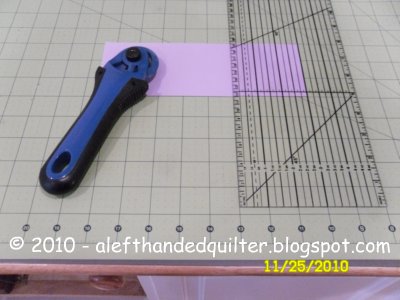
      What is a problem for me is the numbers on the grid.  They confuse me. I think that the numbers are set up for right-handed quilters.  They seem to run backwards to me.

      So -TIHIDI -

      Since I cut from the RIGHT edge of the fabric, I put the square with number "1/1" in the BOTTOM RIGHT corner.

      I place the mat so that the numbers 1 to 35 run from RIGHT to LEFT along the bottom and the numbers 1 to 23 run from BOTTOM to TOP along the right side.  

      You may think that this makes you count backwards - but it really doesn't.  I'll explain what I mean when I get to Rotary Cutting.

      Rulers - MY FAVORITE!!!

      I have a LOT of rulers!

      I have four that I actually use.  None are truly left-handed.  I have to compensate differently depending on which ruler I use - what a pain!!  (Why can't someone just make a left-handed ruler?  I'll design it for you - I just want credit - and the bucks!!)

      EDIT UPDATE - I DID design a Left-Handed Ruler - to cut HST and QST easily - LEFT-Handed - follow the link or check out the tab at the top of my blog. I call it the LEFT-EZE Rule™ - because we do! - LOL - ;))

      (Sorry for the glare in the pictures - the overhead lights don't play well with the plastic rulers.)

      I use a Quilter's Ruler - Mini-Square - 6-1/2" x 6-1/2" square ruler to square up blocks.


      It still has the markings on it from my Halloweeny tablerunner/placemat.  I forgot to flip it over before I cut my charm squares.  If I had - I might not have screwed up the second set.  (I use alcohol wipes to remove the marker lines.)


      My favorite ruler is the O'Lipfa® Lip Edge Ruler.  Mine is 5" x 23".  It's long enough to cut fabric as it comes folded off the bolt.  It also has a lipped edge that works like a T-square and hooks on the top edge of the cutting mat so that it doesn't slip while cutting.  I especially like it because the numbers go 1-2-3-4-5 from left to right.  Just the way I like it!!


      My least favorite is the Omnigrid® - 6" x 24".  It has 1-2-3-4-5 going from left to right - and - from right to left.  That's too many markings for me.  I use it to fold my fabric.  (That's a post for another day.)


       But I can make it work for me if I put stickers on the numbers I don't want to see.


      My Fiskars® - 6" x 12" - is used a lot.  Even though the numbers are backwards for me - I have found a way to compensate.

      You can't really see in this picture - but the numbers go 5-4-3-2-1 from left to right across the bottom of this ruler - and from 11 to 1 up the left side - and 1 to 11 up the right side.


      If I turn it around - to read the other side (without flipping it over) - the numbers go 5-4-3-2-1 from left to right across the bottom of this ruler - and from 11 to 1 up the left side - and 1 to 11 up the right side - exactly the same way.  Definitely right-handed.

      I want it to read -1-2-3-4-5 from left to right across the bottom of this ruler - and from 1 to 11 up the left side - and 11 to 1 up the right side.


      OK - so now if I flip it over - sure enough - I can get the numbers to go the right direction - I just have to read them "BACKWARDS".  Don't you just love it when all you have to do is "reverse it"?  Yeah, me too!!


      So I put stickers on the one end - 


      and the other end.  I don't bother with the sides - I learned early on to read upside-down and backwards - I think we all did.


      NOW it's a left-handed ruler!!  And I want the credit - and I want the bucks!!

      ===

      OK - so that's all I can think of right now.  It's your turn.  Has any of this information helped you?  Have you found something really neat that you use and that you want to share?  What have you found?  Where did you find it?  What do you use?  How do you use it????  Tell me - tell me!!

      Next up - Rotary Cutting - so -

      Talk to you later - gotta go - gotta write some more stuff -

       -

      Wednesday, November 17, 2010

      Off and Running -

      So - yesterday when I signed off - I said I had another idea and would be right back.  Sorry it took me longer than I thought it would - but it was totally worth it!!

      When I left - I went over to Quilting Bloggers and submitted my blog for inclusion in her directory.  This morning I got an email from Michele Foster saying that my submission had, indeed, been accepted and has been added to the directory.  THANK YOU, MICHELE!!

      Now, if you go to her site and search for "A Left-Handed Quilter", my blog will show up.  Yay!!  The only problem is that you have to enter the name exactly as I entered it - without the quotes - but with the "A" and the ""hyphen" between "left" and "handed".  If you enter "lefthanded quilter", it won't come up.  It's a Catch-22 - you can find my blog if you know the name - exactly.  And if you already know the name - you have already found it!!??

      But the up side is - IT WORKED!!

      AND - IT'S OFFICIAL!! - 

      I HAVE A FOLLOWER - AND SHE'S NOT RELATED TO ME!!  YAY!!

      Welcome to my blog Quilting, Sewing GRANNY - I just checked out your site and that fabric stash video is hilarious.  You made my day - in more ways than one.  I will, for sure, be adding your blog to the ones I read.  I don't know how to "Follow" another blog yet - so when I figure it out - I'll be there.  And I have pictures of my own stash that I want to share someday.

      In the meantime - I need to get some tips, tricks, and tutorials written up - so I can post them.  I have to find all the instructions - emails - and such that I wrote for my sister-in-law to help her with her quilting projects.  And I have a bunch of stuff in my head that has to get down on "paper".  That takes time.  And I need to know what you guys want to know.  How can I help?  You need to leave me a comment telling me what gives you the most trouble - maybe someone out there can help.  I don't pretend to know everything - and can only tell you how I do it.  I'm hereby making up a new word - "TIHIDI" - "This Is How I Do It" - if you say it out loud, it sounds kinda like "Tahiti" - cool!!

      So here's the plan - the next couple of Left-Handed Quilting (LHQ) posts are going to be about -

      1.  Supplies
      2.  Rotary Cutting
      3.  Instructions vs. Directions

      That should get us started.  And then we can go from there.

      Talk to you later - gotta go - gotta write stuff -

      Tuesday, November 16, 2010

      Housekeeping Chores -

      LHQ - Today I did a little housekeeping.  No - no - not "house" housekeeping - I mean "blog housekeeping".  I went back to my old blog (Quilt Bum - no relation to Marianne Fons) and imported my posts to this new blog.  I also did a little re-editing while I was at it.  At the beginning of the posts I wrote a little note saying that they had been imported - and edited.

      You will see - if you read them - that they are not "Left-handed" at all.  They are just me rambling on about what I was doing at the time.  From Saturday's post - Third Time's a Charm - New Mission - all the posts are "real-time" - and have not been posted before.

      I've decided to do a little experiment.  When I googled "Left-Handed Quilter" - I got a variety of stuff - but not my blog.  I want left-handed quilters to be able to find my blog!!

      I have it set so that Google should pick up on the first 25 characters in my blog when it does its web searches - so I thought "A Left-Handed Quilter" would show up.  But I didn't see it.  My experiment is this - I put "LHQ" as the first three characters of this post.  Those three letters seem to be an odd enough combination to be somewhat unique - so I'm going to publish this post and then google "LHQ" - to see what I get.  Be right back.

      OK, I'm back. "LHQ" came up with 2,840,000 hits.  It seems that it is an acronym for "Local Headquarters" and "Life History Questionnaire".  Who knew?  So the experiment failed.  But I have another idea.  Be right back.

      Monday, November 15, 2010

      About This Blog - And Me

      I am a A Left-Handed Quilter.  A couple of months ago I decided to start a blog so that I could share my love of quilting and maybe some pictures of my projects and an occasional rant.  I posted for a while and changed the blog name a couple of times.  Now I'm here.  Welcome to my new and improved blog!!

      I am not a professional quilter.  I quilt for fun.  I am no expert and I am not perfect, but I have won my share of blue ribbons at the local county fair and at a Quilt Show in a near-by town.  I have never entered a quilt in a juried show or any type of international competition.  Maybe someday.

      I made my first quilt out of two sheets and some batting in 1973.  I tied it with yarn and bound it with pre-packaged quilt binding.  Quilting books and magazines were scarce back then - but I had them all.  My first "real" patchwork quilt was for my first nephew in 1976.  So I have been quilting for a while now.  I love to quilt.

      I don't take classes.  My left-handedness always gets in the way. I have taken only three classes in my life - not counting Home-Ec classes in seventh grade.

      #1 - Hawaiian Applique - 1977
      We lived in Hawaii for about five years.  My husband called me one day with information on a local Hawaiian quilting class.  I figured that if I lived in Hawaii I should learn to either quilt or hula - and I sure as hell wasn't going to learn to hula - so quilting it was.

      I tried to prepare for the class by cutting out the pattern and turning under the edges and basting them all down - like my books showed.  When I got to class, the Hawaiian ladies laughed at the "haole" - very politely, of course - but they still laughed at me.  Hawaiian applique is all "needle-turned" applique.  They showed me how to do it their way - but my left-handedness still got in the way.  I have at least ten Hawaiian applique pillows and wallhangings in my UFO pile.  They are all cut and basted - but not sewn.


      #2 - Hawaiian Applique - again - 1985
      This time I attended a class in Burbank - it was offered  in conjunction with some quilt show - I don't remember exactly when - a long time ago.  Anyway, we split off into teams of two and it was my job to press the fabric before we were to fold and cut it.  The damn iron and ironing board were set up backwards!  And the sewing - again - my left-handedness got in my way.  One of those - all you have to do is reverse it classes.  Yeah, right!  That one is in my UFO pile, too.

      #3 - Floral Applique - 1995 - (What is it with me and hand applique classes?)
      This time I took a series of classes from a little German lady who had made the most gorgeous quilt I had ever seen!!  It was at a local quilt show and I literally stopped in my tracks!!  Her color shading and workmanship were incredible!!  Anyway, when I heard that she was teaching classes, I signed up immediately.

      The first block had a leaf - long and skinny - curved to the left.  She showed us how to start at the bottom of the leaf and sew up the right side on the outside curve of the leaf.  We were to stop at the point on the top so she could show us how to turn it before we sewed down the left side and inside curve.  Great!!  I started my leaf at the bottom - went up the left side and hit the inside curve first.  I showed her my problem and she said, "Oh, you are left-handed!  I cannot help you."  Terrific!  I had been there before.  I told her "Never mind, I'll figure it out myself.  Show me how you do your colors."  I learned everything she could teach me about how she chose her colors - how she shaded her roses - everything except how to sew the block.  Those blocks are at the very top of my UFO pile.  (I did manage to figure out the applique sewing stuff on my own and that is going to be one gorgeous quilt when I get it done!!  Stay tuned.  I'll show you when I get there.)


      So, anyway, I don't take classes.  I buy books.  I have a lot of books.  I love books.  I read every single one of them from cover to cover.  What I don't like are the pictures in the books.  They are usually "right-handed".  And they usually say stupid things like - "If you are left-handed - just reverse it."  We all know it isn't that simple.  But it is a right-handed world - so we try to adapt.  I do my best to figure it out - and then I do what works for me.


      My sister-in-law is new to quilting.  She and I share the same birthday - I am exactly five years older than she/her.  I  married her brother three weeks after she married her husband - over thirty years ago.  She is also left-handed.  She is taking some quilting classes and we email back and forth all the time.  I try to help when she gets stuck on something.  When I told her my blog name problem and mentioned a couple of new names, she said -

      "I'm partial to "A Left-Handed Quilter" because it is definitely something that makes you (us) unique.  I hope you can include the left handed idea in your blog name somehow.  There are plenty of left handed quilters out there (supposedly one in ten) and we always need help with quilting challenges.  In my class this summer, there were three lefties in our group of ten.  We all just had to quietly sit there trying to translate how to execute the cutting and sewing of each block in our "backwards" brains.  There was really no sense asking questions of our "right-handed" teacher; because unless you are left handed,, you just don't get the questions,  It's like speaking a foreign language!  It would have been great for me to have been able to tell the other southpaws to just go to your blog!  You could post some of those great instructions you wrote for me and reduce the global confusion once and for all!"

      I hadn't really thought about doing a "Left-handed" blog - I was just looking for a new name.  But I understood exactly what she was talking about - and I think she's right - we all need a "Left-handed" blog - so - that's what I'm going to do.

      I'm a very visual person.  I like someone to show me how they do it - and then I can figure out what will work for me.  So I can try to do the same for you - do some tutorials and try to explain how I do things and then show you how I do it.  Now that I have figured out how to add pictures to my blog - I can take photos to show you what I'm talking about.  (See, my two previous attempts at blogging actually taught me some stuff - yay!!)

      I also want to be perfectly clear - there is always more than one way to do things.  I'm not saying that my way is the easiest - or the best - or anything.  But maybe, just maybe - it will help you.  I certainly hope so.

      Then maybe I can get other bloggers to share their tips and tricks and I can make a list of their blogs for reference.  Maybe we can all help each other.  Wouldn't that be great?  The possibilities are endless.

      And because doing things left-handed really is like speaking a foreign language - I am creating a new language.  I am going to write my instructions in what I like to call - "LEFTISH" - and (I've always wanted to say this) - "If you are right-handed - just reverse it."  

      Talk to you later - gotta go - gotta sew -

      LinkWithin

      Related Posts Plugin for WordPress, Blogger...