I got up early to wait for the delivery guy to bring a package that required my signature - BOB likes it when they ring the doorbell to let me know that I have something on the front porch waiting to be stolen - and they don't always do that - but if I have to sign for it - they ring the doorbell - and hand it to me - LOL - ;))
Then it was my regular Mail Call -
And I got some squishy mail -
I opened the package to find some 1/4 yard cuts in BLUE and YELLOW - one of my favorite color combinations!! - but I was good - I resisted the temptation to play with them - I just petted them and put them all back in the package - to wait until AFTER I finish quilting and binding both of the Interweave quilts -
Then after the house got cleaned -
My Scrabble friend/neighbor came over for a game -
By the time she left - it was dinner time -
And I hadn't sewn a stitch all day -
But now that all of my "chores" are done -
At least until Monday -
When I start over at the top of the list - again -
I can hereby designate Saturday and Sunday as PLAY DAYS - YAY!! -
It will be FUN to see how much I can get done -
When I don't have to worry about doing any "chores" first - ;))
Talk to you later - gotta go - gotta sew -
So no sewing progress to report today -
But I did some "chores" -
And revisited an old Squirrel -
So I made progress on a couple of other fronts - LOL - ;))
Talk to you later - gotta go - gotta sew -
Of the Dear William Interweave is quilted -
So maybe tomorrow I can quilt the second half -
Then -
After I layer/baste/quilt the Victoria and Albert Interweave -
I can make the binding for both and bind them - ;))
Talk to you later - gotta go - gotta sew -
I got the Dear William Interweave pinned -
With the "pin moors" -
They are much easier for me to use than safety pins -
And I like how the pins sit on TOP of the quilt -
Making them easy to remove, too -
Then I found a cone of GREEN thread -
And unwound some on top of the backing -
The thread looks darker on the cone -
But the unwound pile blends in pretty well - you can hardly see it -
My RED chair has found a new home -
It's the perfect height for my "in-the-ditch" quilting table -
And I was able to get several vertical rows quilted this afternoon -
My back sure does like the "sit-down" sewing - quilting stuff -
Better than the "stand-up" pressing - layering - fusing - pinning stuff -
It's too bad I can't do it ALL sitting down - LOL - ;))
Talk to you later - gotta go - gotta sew -
And fused -
The Dear William Interweave is coming along slowly -
Tomorrow I'll put some pins and "pin moors" in it to stabilize it a little more -
Even though it's fused -
Other quilts that I have fused tended to separate sometimes with handling before they were fully quilted - so the pins are extra security - and with the "pin moors" - they sit on top of the quilt and are easily removed as I come to them -
For those of you who are wondering how I plan to quilt it -
It won't be anything fancy -
Just "quilt-in-the-ditch" down the columns -
Vertical lines every two inches should be plenty -
I don't really think I need to quilt it horizontally, too -
But I'll see when I get that far - LOL - ;))
Talk to you later - gotta go - gotta sew -
Took up my whole day - ;))
The first one was assembling the BLUE Chair -
It went together pretty easily -
Once I figured out what the deal was with the casters -
The first two snapped on pretty easily after I wiggled them a bit -
But the other three didn't want to play nicely -
So - what's a girl to do? -
YouTube to my rescue - LOL - ;))
I found a video showing how to replace the casters - HERE -
And saw what I was doing wrong -
Then remembered my Dad saying - "Anything is easy if you know how!" -
So now that I know HOW it goes together -
I think I could fix my RED chair with a set of new casters and a new "lift" -
I found the "parts" on Amazon for less than the cost of a new chair -
But I wondered there for a minute -
Because - the last time I looked -
The chair WITHOUT the seat back was more expensive -
Than the one WITH a back -
So I would have to pay EXTRA for them to NOT include the back - LOL - ;))
That's like paying EXTRA for them to leave the sugar OUT of the cookies - ;))
===
My second chore was a LOT more time-consuming -
And took the rest of the day -
But I can now say that my "tax organizer" is on its way to my accountant -
So - with two more "chores" OFF my "to do" list -
I plan to get back to pressing and fusing -
The Dear William Interweave quilt - ;))
Talk to you later - gotta go - gotta sew -
But surely - ;))
The Dear William Interweave is layered with fusible batting -
And ready to fuse/press -
But I had to take a break -
To open the box for my BLUE chair -
Oh - goody!! -
It took me a minute to realize -
That I was missing the Allen wrench and screws -
But they were still in the box -
So it's all good - LOL - ;))
The diagram doesn't look THAT hard -
So I'll play with it later -
See if I can put it together myself - ;))
BOB thinks that -
If I can put a quilt together with lots of itty-bitty pieces -
I should be able to put together a chair with 6 main pieces -
5 casters -
And 5 screws - LOL - ;))
Talk to you later - gotta go - gotta sew -
Is as far as I got today -
After I finished my "chores" - ;))
I pressed the backing for the first Interweave quilt -
And I'm probably lucky that I got THIS far -
It seemed like I no sooner straightened out a section to press -
And the doorbell would ring -
I'd come back -
Press about two inches -
And the phone would ring -
I'd come back -
Press another two inches -
And it was the doorbell again -
So when I finally got it all pressed -
I basically gave up -
And took a photo for this post -
Tomorrow - I'll try to add the batting -
And one of the tops -
But don't hold me to it - LOL - ;))
Talk to you later - gotta go - gotta sew -
It probably doesn't look like much -
But I got the batting cut into two pieces -
One for each of the Interweave quilts -
And I got the GREEN backing split into two pieces, too -
And that's more than I had done yesterday -
So I'm calling it PROGRESS - LOL - ;))
Talk to you later - gotta go - gotta sew -
Dangled in front of me -
Sometimes persuades me to do something that I don't really want to do - ;))
I've been stalling when it comes to layering - basting - and quilting -
Those two Interweave quilts -
And I don't really know why -
So I found a "carrot" -
That will be my "reward" -
If I can get myself in gear -
A brand new flat-pack -
Island Batik - Glowing Embers -
I let myself open the package -
And I may pet the fabric -
And I may sort the strips -
But I'm trying to hold off on cutting them -
Until I get the Interweave quilts layered and basted -
After I do that -
I plan to do some "in-the-ditch" quilting -
And the batik strips will give me something pretty to play with for my posts -
Because the "quilting" will probably be boring -
At least that's what I told myself -
And it sounded really good in my head - LOL - ;))
Talk to you later - gotta go - gotta sew -
Is cut for both Interweave quilts - ;))
I took a queen-size batt - 90" x 108" and unrolled it -
Seems like the unrolled length is the 90" part -
And I want it to be 64" -
So I cut off a chunk -
I still have to split it in half down the center -
That should give me two at 54" (108"/2) x 64" (already cut) -
But it's only batting -
So I didn't take a photo - LOL - ;))
By the time I finished my "chores" -
And measured and cut the batting -
I was getting tired -
So I didn't "tear" the backing -
YET -
It was all folded nicely in the package from the quilt shop -
So I took it out of the package and measured and counted the folds -
Then decided where I wanted to "tear" it -
But I don't trust my MATH when I'm tired -
So I put a paperclip in the edge -
At the point where I think I SHOULD "tear" it -
And will re-calculate it again tomorrow - ;))
The backing is 108" x 108" -
So I want to do the same thing that I did with the batting -
Cut off a chunk -
And split it down the middle -
To get one piece for each of the two tops - ;))
I also realized that I should tear it length-wise -
So the selvage will be at the top or bottom of the backing -
Since the jelly roll strips are cut that way -
The selvage ends of the strips are at the top and bottom of the quilt -
And I thought it would work out better -
If the length-wise and width-wise grain of the top AND back -
All run the SAME way - ;))
Talk to you later - gotta go - gotta sew -
To the GREEN backing that I set aside -
For the Dear William Interweave -
And the Victoria and Albert Interweave -
I still think the GREEN will work with both of them -
And that I'll save the BROWN for something else -
So -
After tomorrow's "chores" -
I think I'll tear up some backings - LOL - ;))
Talk to you later - gotta go - gotta sew -
Sunday was a lazy day -
And I didn't sew a stitch - LOL - ;))
My friend stopped by to pick up her "re-covered" heating pad -
The fabric that I chose made her laugh -
And she likes it!! - YAY!! - ;))
===
On a totally different subject -
Way back when -
I told you about my New Chair - HERE -
I LOVE my RED chair -
The back broke the first time I leaned back in it - years ago -
But that's no biggie - it forces me to sit up straight - LOL -
And the seat is not padded -
It's made of "High Density Polymer" -
Translation - plastic - not metal - LOL -
But I like the "Comfort Molded Tractor Seat" -
It's REALLY comfortable -
For long hours of sewing and stuff -
And it "scoots" nicely between the sewing machine and ironing board -
On my laminated floor -
But - after all these years -
The pneumatic lift no longer works properly -
It has ONE height - the LOWEST possible position -
And it REFUSES to stay up where it's supposed to be -
Which is getting VERY annoying -
So I spent some time this afternoon looking for a replacement -
Shhh - don't let it know - or it'll stop "rolling" next -
Lately it likes to "shed" part of one caster wheel -
When I least expect it -
And I constantly have to "pop" it back on -
Anyway -
I found another one just like it on Amazon - in a Nautical Blue - HERE -
And I had to laugh -
The price differs according to the COLOR you want -
SAME chair + DIFFERENT color = DIFFERENT price -
I could order another Wine Red one for $51.14 -
Or I could get the Nautical Blue one for $41.84 -
And save about $10 -
The COLOR doesn't make it any more or less COMFORTABLE -
But it does make it more or less EXPENSIVE - LOL -
Then - if I want "expert assembly" -
It'll cost me another $70.79 -
For a $40 chair - LOL -
Nah - I don't think so -
I think I'll get the Nautical Blue one -
Save the extra $10 -
And pass on the "expert assembly" -
If I can't "assemble" it myself -
I'm pretty sure that I have some friends who could help me with it -
You know -
Maybe if I hemmed some of their pants -
Or re-covered a heating pad for them -
Just kidding -
My friends and I don't keep score - LOL - ;))
Talk to you later - gotta go - gotta sew -
Thank you all for the kind comments on my binding yesterday -
It looks like everybody likes the RED! - ;))
Just so you know -
The separate joining of the RED and the GRAY is/was NOT my idea -
I learned it watching a YouTube video by Jordan Fabrics - HERE - ;))
I posted about my favorite binding methods - HERE -
And Jordan Fabrics has several videos with great techniques - HERE -
My favorite, of course, is the Flanged Binding - HERE -
And I LOVE the separate joining of the two strips -
It takes a bit more time -
But it is TOTALLY worth it -
It is the FLATTEST join EVER!! -
And I HIGHLY recommend it - LOL - ;))
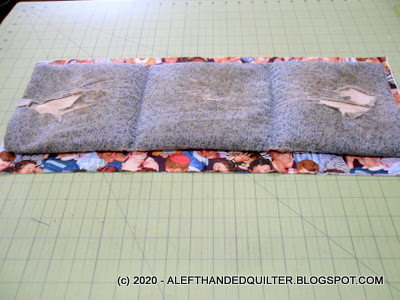
So - after I stared at and petted my quilt most of the morning -
I had a friend over for lunch -
She bought lunch as a bribe -
Because she wanted to ask me if I would "fix" her heating pad -
It has three pockets filled with rice -
That she can put in the microwave to heat up -
As you can see - it was a bit frayed in spots -
So - rather than try to "mend" it -
We decided to just "recover" it -
And after she left -
I found some fabric that is PERFECT for those of us who are "of a certain age" -
It's a 1/4 yard piece - folded over -
And the size was PERFECT!! -
If you can't read it -
It says -
The Saturday Evening Post and Norman Rockwell -
© Licensed by Curtis Publishing -
It stitched up pretty quickly -
I just folded the fabric right sides together and stitched down the long edges - turned it inside out - slipped the old heating pad down inside - stitched across the two "flat" sections - like on the original - tucked in the ends and stitched it closed - easy peasy - IF you know how to sew - which most of my friends don't - for some reason - LOL. And like my Dad used to say - "Anything is easy - if you know how!" - and I do - ;))
Here's a close-up of the fabric -
Norman Rockwell was great at painting children -
I hope she likes it - ;))
Talk to you later - gotta go - gotta sew -
My Floral Applique is bound!! -
Ta Dah!! - ;))
I finished the "join" this morning -
And you can barely see it -
But the RED is joined in one spot -
Just to the LEFT of center -
And the GRAY is joined in a different spot -
You can see the faint line closer to the RIGHT edge of the photo -
From here they are both virtually invisible -
Before dinner I got around the first two corners -
And was going to stop at this point -
And post the photos -
But then after dinner -
I got another burst of energy -
And decided to finish it -
It still needs a label -
But that is for another day - LOL - ;))
And now - as I look as these photos -
I'm second-guessing my decision to use the RED flange on the binding -
I thought it would bring some color to the edge -
But I don't really like it as much as I thought I would -
Not that I'm in the mood to redo it -
After all these years - LOL - ;))
Talk to you later - gotta go - gotta sew -
Just for fun -
Here are some old photos of my Valentine's Day Sukoku Quilt - ;))
Yesterday was another day lost to "chores" -
And a leisurely game of Scrabble with my friend/neighbor -
But I did manage to "un-sew" both ends of the binding -
Back to the points where I plan to join them -
And that's farther along than I was the day before -
So I guess that it IS progress -
Just not a whole lot - LOL - ;))
Talk to you later - gotta go - gotta sew -
I was all set to start sewing down the second side -
But wanted to double check that the binding would fold over enough -
Before I went too far -
I didn't want to have to "un-sew" any of it -
Sewing it down once is plenty for me - LOL -
And this was the perfect place to stop -
Since I had to cut the thread and re-position the quilt anyway -
So I flipped over some of the binding -
And stitched a little bit - with a big old "basting" stitch -
And checked the back -
A stitch line just outside the binding is good enough for me - LOL -
So then I finished sewing it down to the back - all the way around -
And will "join" the ends next - ;))
I think it's going to be pretty -
But I'm not going to rush it - ;))
Talk to you later - gotta go - gotta sew -
And the binding is still right where I left it yesterday - LOL - ;))
I guess I had more "chores" to do than I thought -
And when I finally finished them -
My "Scrabble" friend/neighbor came over to play a game -
Then - the next thing I knew -
It was dinnertime -
And I hadn't sewn a stitch -
AGAIN - LOL - ;))
Maybe I shouldn't make any plans for tomorrow -
Just sit back and wait to see what happens -
Might get more sewing done that way - LOL - ;))
Talk to you later - gotta go - gotta sew -
Takes me some time -
But I'm usually in no rush -
And it almost always turns out to be time well spent - ;))
I really wanted to take advantage of the trimming that my friend did when she quilted my Floral Applique - and wasn't looking forward to trimming it down even just a "little" - she had already trimmed it a little "large" to allow me a "fully stuffed binding" - so why do it again and risk messing it up? - LOL -
So - knowing that my "normal" width binding would be a "little" too narrow -
I played with various settings to see what my options were -
First I stitched a "baseline" between her stay-stitching and the trimmed edge -
Lining up her stay-stitching under the left guide of my walking foot -
And using the longest stitch possible on this machine -
A big old "basting" stitch worked just fine -
And it would be "inside" the binding anyway -
So it didn't have to be "pretty" - LOL -
Then I used the "baseline" to line up my binding -
Instead of the edge of the quilt -
So that gave me a "little" extra binding width to roll to the front -
Then I tried various settings on my walking foot -
Still using the "basting" stitch for my testing -
Since it's easy to pull out the stitches if I don't like the results -
Far left -
Not bad - a nice seam allowance -
But it didn't leave enough to fold over -
So - I tried the middle setting -
Which is about 3/8" from the right edge of the walking foot -
And my "normal" setting for stitching down binding -
Same result - not that much to fold over -
And then the far right one -
Which is about 1/4" from the right edge of the walking foot -
It may look too skinny -
But it's not any narrower than the seam we use for piecing -
So I'm OK with that - LOL -
But I was worried - would this line of stitching cover the stay-stitching? -
YES - this last one covered the stay-stitching line on the back -
AND folded nicely to the front -
To give me a "fully stuffed binding" -
Bingo!! - LOL -
By the time I figured out my settings -
I only had enough mojo to stitch the binding down the first side of the back -
So - tomorrow - after my "chores" -
I plan to stitch some more -
And we'll see how far I get - LOL - ;))
Talk to you later - gotta go - gotta sew -