This morning I finished webbing the columns -
For my Upstairs/Downstairs - Gleaned - top -
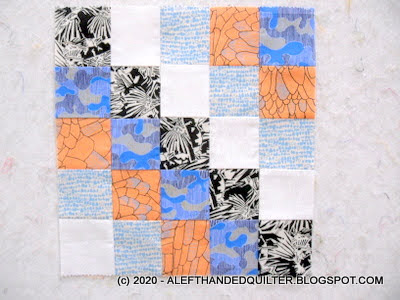
Gleaned - © Carolyn Friedlander - Robert Kaufman -
And then sewed all of the vertical seams -

So now it's a top!! -
Ta Dah!! - ;))

I like how the coloring of the blocks make them look "pixelated" -
I decided to run the dominant ORANGE down the longest diagonal -
And the second ORANGE a couple of rows below that -

One set had WHITE squares going diagonally from the left to the right -
Another set had WHITE squares "stair-step" in the other direction -

The BROWN and GREEN ones filled in the rest nicely -

It even looks good upside down - LOL - ;))

And with this layout it's fairly easy to spread the colors to balance them out -
Each set of six blocks makes one diagonal row -
And automatically fills in the corner in the same sequence -
First I decided which one I wanted to be SET #2 - the longest diagonal - ORANGE -
Then I chose the prettiest BLACK/WHITE for SET #1 - the row above the ORANGE -
And then the order I wanted the rest of the blocks in the FIRST column -
I had 4 dominant/center colors - and two SETS of each - so I labeled them A and B -
And came up with this sequence -
- Black/white - A
- Orange - A
- Brown - A
- Green - A
- Black/white - B
- Orange - B
- Brown B -
- Green B -
Then I set up a simple stair-step layout - 6 columns - 8 rows -
- Set 1-8-7-6-5-4
- Set 2-1-8-7-6-5
- Set 3-2-1-8-7-6
- Set 4-3-2-1-8-7
- Set 5-4-3-2-1-8
- Set 6-5-4-3-2-1
- Set 7-6-5-4-3-2
- Set 8-7-6-5-4-3
Trust me - it's easier to DO than it is to EXPLAIN - LOL - ;))
Tomorrow I plan to play with Gene's HST Medallion Quilt -
And try to decide what color(s) I'm going to use -
In addition to the pretty jelly roll and turquoise batik - LOL - ;))
Talk to you later - gotta go - gotta sew -