Tuesday, December 25, 2018
Merry Christmas - 2018
For the past few years -
I have shared a beautiful Christmas Card -
That I received one year from a dear friend - ;))
It is one of the most beautiful Christmas Cards -
That I have ever seen -
So I wanted to share it with you -
Again this year - ;))
Please click - HERE -
And -
Have a Very Merry Christmas!! - ;))
Talk to you later - gotta go - gotta sew -
Monday, December 24, 2018
Merry Christmas Eve - 2018


Jingle Bell -
Jingle Bell -
Jingle Bell -
Rock - ;))
===
Yeah, I know that I post this every year -
But I couldn't resist posting it again -
Hope you don't mind - ;))
===
Merry Christmas!! - ;))
Talk to you later - gotta go - Santa’s coming -
Sunday, December 23, 2018
A little quilting -
Is planned - in between all of the holiday activities -
Starting with this Christmas Blocks Table Topper - 6x6 - from long ago -
It's already been stitched-in-the-ditch along the larger block seam lines -
So it needs some more in-the-ditch along the skinny strips -
And some FMQ fun stuff in the rest of it -

I quilted the little Christmas Blocks Table Runner - 3 x 2 - a while ago -
So I pinned it to the design wall above my sewing machine for reference -
I can tell at a glance what designs I used so I can use the same ones - or similar - on the larger one -

Keeps me from having to fumble around trying to find it -
And I can sit back and decide what I want to quilt where - LOL - ;))

Then - if I have time - I can play with O Happy Christmas -

Some of you may remember this one -
It's been sitting in the Mountain To Be Quilted for some time now -
And wants to come out to play - LOL -

I think it says it all -
MERRY CHRISTMAS!! - ;))
Talk to you later - gotta go - gotta sew -
Friday, December 14, 2018
A few more -
Neutral string blocks -

And that's about it for today -
More chores are scheduled for tomorrow -
So we'll see how much sewing I can get done - ;))
Talk to you later - gotta go - gotta sew -
Thursday, December 13, 2018
Cutting a Diamond - LEFT-HANDED -
I recently saw a video demonstrating how to cut a Diamond unit -
First - RIGHT-HANDED -
Starting at the LEFT end of the strip - placing the 45-degree line at the BOTTOM of the strip and making the first cut just to the RIGHT of the selvage - to cut off the end - for your scrap basket -


Then move the ruler to the RIGHT to the line that measures the same as the strip width -

Make your second cut - one diamond - nice and neat - ;))

Then she REVERSED IT -
And demonstrated how to do the same thing - LEFT-HANDED -
Starting at the


Then move the ruler to the

Make your second cut - one diamond - nice and neat - ;))

UMMMMMMMMMM - NOOOOOOOOOO -
I really appreciate that she tried to REVERSE IT for LEFT-HANDED Quilters -
BUT -
I do not like "back-handed" cuts -
They are awkward - by definition - and potentially dangerous -
It would be like me telling a RIGHT-HANDED quilter to cut a diamond THIS way -
Also "back-handed" - awkward - and potentially dangerous -

THIS IS HOW I would cut a Diamond - LEFT-HANDED -
Starting at the


Then move the ruler to the

Make your second cut - one diamond - nice and neat - ;))

To me - the trick is knowing WHAT to REVERSE - ;))
Of the four things that were reversed -
ONE of them didn't need to be - it was OK just the way it was -
Placing the 45-degree line at the BOTTOM of the strip makes a BIG difference -
And makes it MUCH easier to cut STRAIGHT UP the LEFT side of the ruler -
From the BOTTOM LEFT to the TOP RIGHT -
A MUCH more NATURAL direction - UP and AWAY from you - ;))
And as one of my RIGHT-HANDED friends said -
No matter how hard they try -
Some instructors still think RIGHT-HANDED - ;))
Maybe I should just throw this out there -
If any of you/them are looking for a LEFT-HANDED consultant -
I'm available - LOL - ;))
Talk to you later - gotta go - gotta sew -
Wednesday, December 12, 2018
This post -
Is for my friend - Frog Quilter - who said that she was making some CHEVRONS (Diamonds in a Rectangle) in this post -
I know she has a LEFT-EZE Rule -
And I already have a tutorial on How to Make a Diamond in a Rectangle -
But here's another "How To" - a shorter version - with some more photos -
For her and all of the other Left-Handed Quilters in blogland - ;))
Cut your RECTANGLES per the instructions -
And using the SAME WIDTH STRIP - cut some HST -
If you need the "corners" to be in the Top Right and Bottom Left -
Layer your fabrics RIGHT SIDE UP -
I have two in this stack - but I have cut four layers at a time with no problem -

Cut a second set -
The FLAT TOPS will be on the TOP RIGHT -
The same side you want them in your Chevron -

Lay one out on the rectangle with the flat end at the top -
And the pointy end on the side -

Fold it down - right sides together -
And you'll see that the flat end fits nice and neat in the corner -

If you're doing one with the corners on Top Left and Bottom Right -
Layer your HST fabrics with the WRONG SIDE UP - and follow the same steps -

Take it to the sewing machine and sew from the flat edge to the pointy end -
Standard 1/4" seam allowance -

Because the 1/4" seam allowance is "built-in" in the ruler -
You will come out at the end where the point overlaps the rectangle -
Perfect 1/4" -

Press it back to the corner to make sure it fits before you trim the excess rectangle bit -

Take another HST with the FLAT TOP on the TOP RIGHT -

And position it in the bottom corner with the flat end at the bottom -
And the pointy end on the side -

When you fold it up - right sides together -
The flat end fits nice and neat in the corner -
And it looks just like the other one only it's WRONG SIDE UP -

Take it to the sewing machine and sew from the flat edge to the pointy end -
Standard 1/4" seam allowance -
And you will come out at the end where the point overlaps the rectangle -
Perfect 1/4" - just like the other one -

Press it back to the corner to make sure it fits before you trim the excess rectangle bit -

Trim the dog ears - and that's it -
The Chevron is the same size as the original rectangle - ;))

Hope this helps -
All you have to do is cut a HST for the corner from the same width strip -
And I think it beats having to draw lines -
On a whole bunch of squares - LOL - ;))
Talk to you later - gotta go - gotta sew -
Tuesday, December 11, 2018
A little mindless sewing -
Some neutral string blocks -

With more strings over here -

And more bits and pieces over here -

I have a plan of sorts -
But that's the fun of mindless sewing -
I can keep on sewing -
And worry about the rest later - ;))
Talk to you later - gotta go - gotta sew -
Sunday, December 9, 2018
Testing -
A new Free-Motion Quilting foot - a Janome Convertible FMQ foot -
It has a closed toe - and an adjustable height screw on the top - which is why I bought it. I thought that it would be easier to adjust than the elastic hair band that I have been using - so I set myself up to play with it - ;))
My White (brand name) sewing machine has three needle positions -
Left - center - and right -
But I couldn't get the needle centered in the hole -
If I use the "center" needle position - it's too far to the left -

And if I use the "right" needle position - it's too far to the right -

So I went back to my open-toe generic foot - with its elastic hair band -

And tried the new foot on my Husqvarna Lily 555 -
Which has numerous needle positions -
Found the one that would center the needle in the hole -
And tried it out -
So-so stitching on the front -

But definite tension issues on the back - LOL -

After futzing with various tension settings for a while -
I finally gave up -
And re-installed the walking foot -
Re-set all of the settings back to where they were originally -
And played with the blocks on the wall - ;))

Talk to you later - gotta go - gotta sew -
Saturday, December 8, 2018
Saturday update - 12/8/18 -
While I took a little break from blogging this past week -
I played with my Free-motion Quilting -
Trying to find my groove - ;))
First up -
I finished my Autumn Squirrel with the Ugly Christmas Sweater back -
It was small, reversible and didn't need binding -
So it was the perfect choice to start my practice session - ;))

I sewed a wide zig-zag over the opening (that I used to turn it all inside out) in white thread so that I would know where it was when I quilted it from the front - you can't see it very well in this shot -

But it's visible in this one -
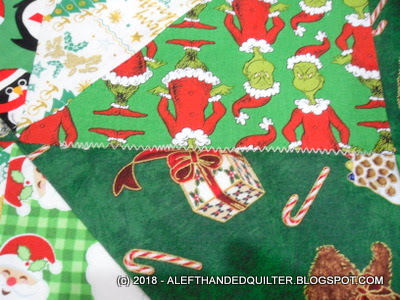
And I got pretty dang close to the diagonal line on the other side. When I realized just how close it was - I marked the ends with pins - removed the white zig-zag stitching and quilted in my name/year using the programmed stitches on my sewing machine and a dark brown thread on top. It's virtually invisible - and it sewed/closed that "opening" perfectly - ;))

Because of the bulk in the corners where the seams come together -
I decided to use my walking foot to quilt straight down the center of each square in each direction - which is my "go-to" on my Upstairs/Downstairs quilts -

I used a brown thread on top and a gold thread in the bobbin -
I like how the thread blends in on the browns -

And the oranges -

And the texture on the back -

Bypassing most of the places where all of those points come together -
Bonus!! - ;))

Then I played with my FMQ on this old practice piece until I ran out of room -


Then switched to another practice piece -
Some loops from the front -

And the back -
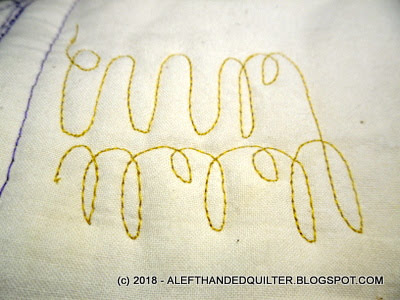
A couple of spirals -

And then some more spirals until I finally found my groove - ;))


So then I decided to FMQ my Five Stars Plus 5 using white thread -

"Orange peels" in the checkerboard squares -
Loops in the QST - Hourglass Blocks -

Wavy lines in the HST and corner squares -

More wavy lines in the Flying geese - center squares - and corner HST -
"Orange peels" in the yellow star points -
Little loops in the green -

Let's just say that "matching/blending thread color" is my new BEST friend - LOL -
It hides a LOT of wonky stitching - ;))
My FMQ is not that great yet -
But it IS getting better -
And that's all I really care about - ;))
I still need to bind the last two -
But I have a couple more quilt tops that I want to play with first -
Before I go on a binding spree - LOL - ;))
Talk to you later - gotta go - gotta sew -
Subscribe to:
Posts (Atom)
LinkWithin
