Who knew that Bonnie Hunter's Orca Bay Mystery Quilt -
Would be good for FOUR new UFOs for 2012??
I had already added Orca Bay RED to Stage 5 -
But had forgotten to add the EXTRAS to Stage 7 -
So - I fixed it -
Stage 5. Need Back - Sleeve - Binding - Label - etc.
Orca Bay RED
Stage 6. Need Top Construction - Layout - Borders - etc.
Stage 7. Need Block Construction - Partially Done - etc.
Orca Bay - Blue Extra
Orca Bay - Red Extra
Orca Bay Bones - Black/White Extra
=====
This being Leap Year -
And this being the EXTRA Day -
I think that I might work on the EXTRA stuff today -
Or not - ;))
And -
Oh - yeah -
I went back to calling my WISPs - Works In Slow Progress -
UFOs - Un-Finished Objects -
Technically they are both -
But UFO is shorter -
And fits better on my new button -
Over there on the side -
The RED one -
Telling the world -
That -
I am the QUEEN of UFORIA -
where UFOs Reside In Abundance -
Feel free to grab the button -
If you have a bunch of UFOs -
And do NOT feel the LEAST BIT guilty -
Even though someone else -
Thinks that you should - ;))
Talk to you later - gotta go - gotta sew -
Wednesday, February 29, 2012
Tuesday, February 28, 2012
BOB and I don't do "Challenges"
BOB and I don't DO "challenges" -
Life is challenging enough -
So BOB and I think -
That if you need to be "challenged" -
To do your hobby -
Then -
You need -
ANOTHER hobby - ;))
But then again - it's probably just me.
By the way -
BOB is my alter-ego -
Bitchy Old Broad -
Check out the peachy button on the sidebar -
BOB even has her own blog -
Quilter BOB -
Talk to you later - gotta go - gotta sew -
Monday, February 27, 2012
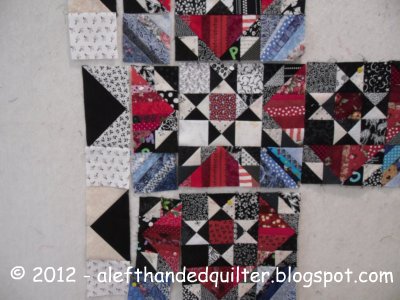
Design Wall Monday - Orca Bay - Extra Stuff
DESIGN WALL MONDAY - ORCA BAY - 2/27/12
Check out all of us who link up with Judy L. at Patchwork Times on Mondays.
We have some awesome stuff on our walls!
Well, THEY do - ME - not so much sometimes - ;))
===
I just realized that -
I still need/want/have to tell you -
What I have planned for the Orca Bay "Extra" stuff -
A. Orca Bay - Blue Extra A -
String blocks - 7 done -
Option 1 - Make 7 coasters - 3”x3”
Option 2 - Make 3 coasters and one 2x2 mug rug - 6” x 6”
Option 3 - Make two more for a 3x3 tablemat - 9” x 9”

B. Orca Bay - Blue Extra B -
String blocks - 14 half done -
Option 1 - Finish them up and add them to the 7 blocks already done = 21 -
Make one coaster and one 4x5 tablemat - 12” x 15”
Option 2 - Make more and make an actual quilt - ;))

C. Orca Bay - Red Extra -
String blocks - 51 need trimming
Option 1 - Make two mug rugs - 5" x 5" - and one 7x7 quilt - 35” x 35”
Option 2 - Make more and make an actual quilt - ;))

D. Orca Bay Bones - Black/White Extra
47 Black/white blocks on wall -
Option 1 - Make one quilt - BOB’s WAY - ;))
Option 2 - Make two quilts - one black - one white

Option A4 - B3 - C3 and D3 -
Do nothing -
Doing nothing is ALWAYS an option - ;))
===
I think I already know what I'm going to do -
But -
If you guys have any other ideas -
Please let me know -
Any and all suggestions are welcome - ;))
Talk to you later - gotta go - gotta sew -
Sunday, February 26, 2012
My New Chair
Got this baby at Walmart -
Comes in all kinds of colors -

The seat -
Is a TRACTOR seat - ;))
And large enough -
To fit my larger than usta be-hind!!
I got tired of my old chair -
Sitting so low -
That -
Even WITH a pillow -
“The Girls” rested on my desk -
(Had to call them “The Girls” -
Not sure if you can say “BOoBs” -
On a blog - or not - if you can’t -
We can just pretend that BOB -
Spelled her name wrong - ;))
Anyway -
This chair goes up much higher than my old one -
And it slides/glides on the laminated floor -
Real well -
Sometimes a little TOO well -
Gotta make sure I hold onto the sides -
When I sit down -
Or it’s liable to leave without me! ;))
I LOVE IT!! ;))
And - it’s RED!! ;))
I couldn’t show it to you -
Before I showed you Orca Bay RED -
Didn’t want you getting any ideas - ;))
Talk to you later - gotta go - gotta sew -
Saturday, February 25, 2012
Orca Bay RED - Borders
BEFORE -

AFTER -

What a difference a border makes, huh??
It still looks BUSY to me -
But I DON”T CARE anymore -
Because - now -
It’s BUSY AND RED!! ;))
And I LOVE RED!!
===
This next part is to show you -
How I Did it -
============
Note - these instructions are written in LEFTISH.
If you are right-handed - just reverse the directions.
============
I had said that it needed one more border -
OK - I did that -
Put some more “geese” up on the wall -
Only RED ones this time -
Add some squares -

Add some “wings” -

Might need another border -

Laid the first round out on my handy-dandy mini-design boards

And for the second round of red -
What about left-over strips -

What about this great red/purple print -

What about both left-over strips AND the red/purple print -

What about left-over strips in the center sections -
And something else in the corners -

Yeah - that might work -

Sew the center sections first -

Add the corners -
To the top and bottom strips -

When I pin on my borders -
I put an extra pin in the side -
To help keep it square -


Sometimes the seam needs to get pressed -
The other way -
To let it “nest” with the top seam -

The pin in the red “goose” section -
That goes the “wrong” way -
Is marking the match point -
Of the black “goose” on the bottom side -

If the whole seam on the top section -
Lines up with the seam on the bottom section -

Chances are -
My block corners will match better -

And the top will come out more square -

It’s not as perfect as the professional quilters can get -
But it’s good enough for me - ;))
And it would have been a whole lot easier -
If I had KNOWN -
That I was going to add those RED borders -
When I was still sewing the center "chunks" -
I could have just sewn BIGGER "chunks" - ;))
Talk to you later - gotta go - gotta sew -
Friday, February 24, 2012
Studio Organization & Fabric Storage Tips
You ever come across a site/blog -
Doing something -
That you ALREADY did??

Well -
The other day -
I ran across a new section at The Quilting Gallery -
Called The Learning Center - hosted by Pat Sloan.
Welcome to the newest section of the Quilting Gallery site, The Learning Center, hosted by Pat Sloan. Starting in February, we’ll be touching on all aspects of quilt making including project storage, exploring various quilting techniques and options of finishing up your quilts, and hearing about new products from Quilt Market.
When I got to the part that said -
A Space of your Own - Share your “before” photos
I read it wrong - and linked up photos of my sewing room -
I'm #8 -
But I guess it’s OK -
The photos are from 2009 -
So that’s BEFORE now - right?
Anyway -
When I got to the part about Fabric Storage Tips -
Fabric Storage Tips and Share your stash to Win!
It said -
How to Enter: Create a NEW blog post on your own blog, take a photo or several photos of your stash for your blog post. Link back to this post, or to the Learning Center main page – there are graphics you can use, telling your readers that you’re sharing your stash for a chance to Win!. Come back to this page and add your post to our Link Party below.
Link directly to your blog post.
I didn’t want to do all of that -
Because I ALREADY did -
So I left a comment instead -
Response #7 -
A Left-Handed Quilter says:
February 21, 2012 at 3:24 pm
I have several OLD posts on my blog telling how I fold and manage my stash – if anyone is interested. Basically I organize by color – type – theme – and works in progress. I pre-wash the fabric – press it – and fold it around a 6″ ruler as if the ruler were a “bolt”. Then – depending on how thick it is – either lay it flat on a shelf – or fold it in half and put it on the shelf like a book. If I were to stack them one on top of the other – I would always want the one on the bottom! ;))
The OLD posts that I was referring to are listed on my page - Left-Handed Quilting -
But - just because it says - Left-Handed Quilting -
Doesn’t mean that the info may not apply to you if you are right-handed -
If it is directional - you can just reverse it - ;))
Anyway -
To make it easier for you -
My dear readers -
To find the info -
I made TWO new pages -
At the top of my blog -
Studio Organization
My Sewing Room
LHQ - Sewing Room #1 - My Happy Place
LHQ - Sewing Room #2
LHQ - Sewing Room #3
LHQ - Sewing Room #4
And
Fabric Storage Tips
Fabric Stash and Scrap Management
LHQ - Scrap Management
LHQ - Scrap Dilemma
LHQ - Fabric Folding
LHQ - Fabric Stash Management
LHQ - Fabric Stash Room
Check them out -
You might find something you can use - ;))
Talk to you later - gotta go - gotta sew -
Thursday, February 23, 2012
Applique Thursday - 2/23/12
This is Thursday -
And I have decided to link up with Angie -
A Quilting Reader's Garden -
on her Applique Thursdays -
Check out her blog for some wonderful applique eye-candy -
My contribution this week is another block from my Ellen Heck class -
QJ - Floral Applique -
Part I - D - Iris
http://alefthandedquilter.blogspot.com/2011/09/qj-floral-applique-part-i-d.html

Talk to you later - gotta go - gotta sew -
Wednesday, February 22, 2012
Thimbles
Today’s topic is THIMBLES -
Bonnie Hunter - over at Quiltville ® did a linky thingy on Monday -
But I was busy showing off my Orca Bay RED -
So I’m a little late to the party -
But I thought I would add my two cents -
And link up anyway -
Join the club - so to speak - ;))
Mind you -
I am not paid by any of these guys -
This is just my opinion -
And I could be wrong - ;))
===
So -
Thimbles - being a very PERSONAL thing -
I have a collection -
Just like everyone else -

Some work for me -
Some don’t -
Mostly - I use the dirty one - ;))

Thimble Pad -
Leather - didn’t even open the package -
Don't remember why -

Under Thimble -
I tried to use ONE -
On my underneath hand -
But I couldn’t FEEL the needle -
So I stopped using it -

Quilter’s Finger Wrap -
Didn’t care much for these -
Felt like i was wearing a band-aid -

Thimble It -
I like these for my underneath hand -
Even bought another package -

Misc -
Some more for the underneath hand -
Didn’t like them either -

Little round ones -
Think I tried the one on the right -
It slid too far down my finger -
Past my first knuckle -
And the dimples are on the SIDE -
So I didn’t like this one either -

Black -
This one has a hole in the end -
For your fingernail -
But it fits really loose -
And has no dimples -
So is used for the underneath hand -

All of the thimbles above -
Live in a drawer on my shelf -

My fave - and a spare -
I always come back to this one -
It is adjustable -
Allows for my fingernail -
And had decent enough dimples -
IT WORKS FOR ME!!

Talk to you later - gotta go - gotta sew -
Tuesday, February 21, 2012
Orca Bay RED - 2/21/12
I am such a SLOW POKE Quilter -
It took me a looooooooooong time to tell you the story of Orca Bay RED -

I wasn’t so much “teasing” as I was “stalling” -
I needed to string it out so that I had "time" to sew -
And I sew S - L - O - W - L - Y.
I really do ENJOY the PROCESS -
But -
It takes me a long time to do the actual sewing -
re-arranging -
put the blocks up -
take them down -
take photos as I go along -
try to sew some more -
put that up -
sew some more -
put that up -
change my mind -
take it down -
put it back up -
and then there's the photo downloading -
editing -
post writing -
editing -
editing -
editing -
editing -
before I can post -
hoping to avoid something -
that sounds like a jumbled mess.
Toward the end -
I was getting tired of working on it -
And I knew that if I dropped it -
I would NEVER pick it up again!!
So it was NOW or NEVER - ;))
I got my "second wind" -
When I decided to add RED borders -
So I just kept plugging away -
Hoping to finish it up by the end of the month.
I'll show you later -
How I did the borders -
After I clean up my sewing room -
Looks like it was hit by an Orca Bay Hurricane - ;))
Then -
I want to play with my free-motion stuff -
I have a pile of small tops that I want to use for practice -
Talk to you later - gotta go - gotta sew -
It took me a looooooooooong time to tell you the story of Orca Bay RED -
I wasn’t so much “teasing” as I was “stalling” -
I needed to string it out so that I had "time" to sew -
And I sew S - L - O - W - L - Y.
I really do ENJOY the PROCESS -
But -
It takes me a long time to do the actual sewing -
re-arranging -
put the blocks up -
take them down -
take photos as I go along -
try to sew some more -
put that up -
sew some more -
put that up -
change my mind -
take it down -
put it back up -
and then there's the photo downloading -
editing -
post writing -
editing -
editing -
editing -
editing -
before I can post -
hoping to avoid something -
that sounds like a jumbled mess.
Toward the end -
I was getting tired of working on it -
And I knew that if I dropped it -
I would NEVER pick it up again!!
So it was NOW or NEVER - ;))
I got my "second wind" -
When I decided to add RED borders -
So I just kept plugging away -
Hoping to finish it up by the end of the month.
I'll show you later -
How I did the borders -
After I clean up my sewing room -
Looks like it was hit by an Orca Bay Hurricane - ;))
Then -
I want to play with my free-motion stuff -
I have a pile of small tops that I want to use for practice -
Talk to you later - gotta go - gotta sew -
Monday, February 20, 2012
Design Wall Monday - Orca Bay - 2/20/12
DESIGN WALL MONDAY - ORCA BAY - 2/20/12
Check out all of us who link up with Judy L. at Patchwork Times on Mondays.
We have some awesome stuff on our walls!
Well, THEY do - ME - not so much sometimes - ;))
===
My Orca Bay wallhanging needed one more border -
So -
I put some more “geese” up on the wall -
Added some squares -
Added some “wings” -
Changed my mind -
Sewed some more “geese” -
Put them up on the wall -
Added some more squares -
Changed my mind again -
And -
Added a second border -
I know - I lied -
I said I was going to add ONE more border -
But I think that it needed another one -
To balance it out -
And -
Just in case I need to square it up a bit -
After it’s quilted - ;))
So -
Now -
I THINK that this top is finally DONE!!
Drum roll - please -
TA DAH!!
I call it Orca Bay RED -
Betcha didn’t see that coming -
Or did you? ;))
Talk to you later - gotta go - gotta sew -
Sunday, February 19, 2012
Orca Bay - 2/19/12
So now I have a GIANT 9-patch on the wall -
And all of the "string blocks" seem to be going the "correct" way -
(If they weren't - it would be easy to fix - ;))

At this point -
With 28 match points -
I can either sew it together in rows -
Or columns -
If I sew it together in rows -
Row 1 - Match three seams twice
Row 2 - Match one seam twice
Row 3 - Match two seams twice
Row 2 to 3 - Match eight seams once
Row 1 to 2/3 - Match last eight seams once
If I sew it together in columns -
Column A - Match three seams twice
Column B - Match one seam twice
Column C - Match two seams twice
Column B to A - Match eight seams once
Column C to A/B - Match last eight seams once
Either way - doesn’t really matter -
Same number of match points -
Personally - I prefer columns -
It just seems to help keep it straight in my head -
If I sew it together the same way that I see it up on the wall -
I like to start at the bottom of the column -
Sew two "chunks" - A2 to A3 -
Then add the next one to the top - A1 to A2/A3
It seems logical when I have pressed A2/A3 -
To just add A1 to the top - right sides together -
Pin it - match the three seams -
Sew it -
Put it back up on the wall -
Take down B2 and B3 -
And repeat the sequence -

And - to me -
My “chunk” method just seems easier -
Than the “standard” method of sewing 9 rows -
And trying to match 8 seams each time -
The size of the "chunks" seems more manageable -
Than trying to wrestle the "whole" thing -
When you add another row -
Anyway -
My opinion -
And just How I Do It -
Now it needs one more border -
And I can call this top DONE!! ;))

Talk to you later - gotta go - gotta sew -
And all of the "string blocks" seem to be going the "correct" way -
(If they weren't - it would be easy to fix - ;))

At this point -
With 28 match points -
I can either sew it together in rows -
Or columns -
If I sew it together in rows -
Row 1 - Match three seams twice
Row 2 - Match one seam twice
Row 3 - Match two seams twice
Row 2 to 3 - Match eight seams once
Row 1 to 2/3 - Match last eight seams once
If I sew it together in columns -
Column A - Match three seams twice
Column B - Match one seam twice
Column C - Match two seams twice
Column B to A - Match eight seams once
Column C to A/B - Match last eight seams once
Either way - doesn’t really matter -
Same number of match points -
Personally - I prefer columns -
It just seems to help keep it straight in my head -
If I sew it together the same way that I see it up on the wall -
I like to start at the bottom of the column -
Sew two "chunks" - A2 to A3 -
Then add the next one to the top - A1 to A2/A3
It seems logical when I have pressed A2/A3 -
To just add A1 to the top - right sides together -
Pin it - match the three seams -
Sew it -
Put it back up on the wall -
Take down B2 and B3 -
And repeat the sequence -

And - to me -
My “chunk” method just seems easier -
Than the “standard” method of sewing 9 rows -
And trying to match 8 seams each time -
The size of the "chunks" seems more manageable -
Than trying to wrestle the "whole" thing -
When you add another row -
Anyway -
My opinion -
And just How I Do It -
Now it needs one more border -
And I can call this top DONE!! ;))
Talk to you later - gotta go - gotta sew -
Saturday, February 18, 2012
Orca Bay - 2/18/12
OK -
I promised to show you How I Do It -
How I Assemble A Quilt in Chunks -
============
Note - these instructions are written in LEFTISH.
If you are right-handed - just reverse the directions.
============
First the middle “chunks” -
Left side -
Off the wall -
Onto a mini-design board

Right side -

Bottom -

Top -

Then that leaves -
Bottom right corner -

Top right corner -

Bottom left corner -
And yeah - I fixed the blue one -
After I took the photos - ;))

Top left corner -

See how it breaks down
Into FOUR 4-patches? -

Match the center seam of each 4-patch -
At the small yellow dots -
Join the top two -
Join the bottom two -
Join the top to the bottom -
At the large yellow dot -
Just like a GIANT 4-patch
You obviously need your design wall handy -
And you don’t want to be transporting this anywhere -
While you are putting it together -
But - for me -
This is easier -
Than trying to sew long rows together -
Keeping the blocks going the “correct” way -
And trying to match a ton of seams on each and every row -
This way -
I just match one or two seams at a time -
One “chunk” at a time -
Pinning and pressing as I go -
Until I get all NINE patches sewn -
It's really a LOT like sewing "units" of a block together -
Just bigger "units" - ;))

Next quilt -
Try putting it together this way -
Just for giggles - ;))
Talk to you later - gotta go - gotta sew -
Subscribe to:
Posts (Atom)
LinkWithin
