And a peek at the Autumn Squirrel - ;))
The Tiny Wonky Stars are fun but waste a lot of fabric - and take more time than they should - so I think I'll go back to making crumb blocks -
The Autumn Squirrel was going to be a surprise - but I changed my mind - I'll show you in a minute -
I pressed some creases in some crumbs for the star "legs" - which helped with placement and gave me a stitching line - but the trimming makes crumbs that are too small to use. If I'm going to use up my crumbs - I think they are more "useful" in crumb blocks with minimal waste -
Anyway - I made a bunch of star "legs" -
And the four new stars on the right - for a total of six -
I doubt that I'll make any more -
I think that I'll work up a layout for these and let it go at that -
My Autumn Squirrel isn't anything you haven't seen before - but I may get "creative" with the backing - we'll see how it goes -
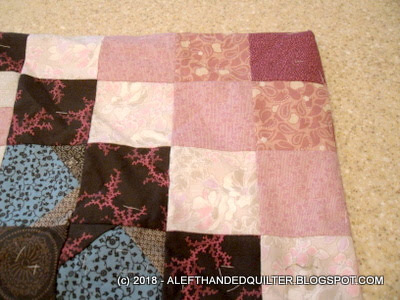
I'm making some Upstairs/Downstairs blocks like I did before - HERE -
But this time using 2-1/2" strips - 5 x 5 - 10" finished blocks -
And only 9 blocks - 3 x 3 - so it should be about 30" x 30" -
I pulled 15 strips and should be able to get three blocks from each set of 5 strips -
So I left them folded and trimmed the selvages -
Then cut 14" off the right end -
Leaving me with the folded section in the middle - that - when unfolded - is a little over 14" -
Total of 3 sections of each strip to be mixed/matched in sets of 5 for the blocks -
Sorted them and sewed the sets of 5 -
Pressed the middle one OUT and the end ones IN -
Then sewed the "tubes" -
Tomorrow I'll cut them up -
And try to press my monster quilt so that I can get to the quilting part - ;))
By the way - if you don't hear from me for a couple of days at a time - in the next couple of months - don't worry - I've been posting daily since June - which - like the Tiny Wonky Stars - takes much more time than it really should - and I'm REALLY getting behind on some chores that need to be done before the end of the year -
And I'm running out of year - LOL - ;))
Talk to you later - gotta go - gotta sew -
The Autumnal Equinox was officially Saturday - September 22, 2018 -
here in the U.S. -
So I'm a week late -
But I saw an Autumn Squirrel that I simply cannot resist -
5 strips (2-1/2") will make 3 blocks -
And I need 9 blocks -
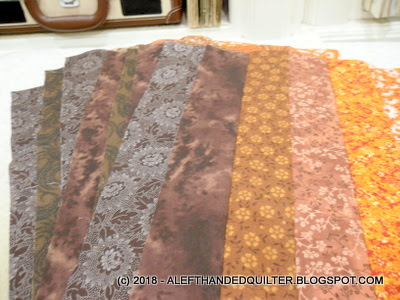
So I pulled 15 strips in brown and orange from a jelly roll that I had on hand -
And - in case you're wondering -
I did make some more star "legs" -
Found a crumb for the center -
And made one more Tiny Wonky Star -
So now I can choose to play with my monster quilt -
Or make a Tiny Wonky Star-
Or do some mindless sewing on my Autumn Squirrel -
Or chase a totally different Squirrel -
Depending on my mood - LOL -
So MANY Squirrels -
So LITTLE time - ;))
Talk to you later - gotta go - gotta sew -
Today I was NOT in the mood to wrestle with my monster quilt so I decided to do a bit of cleanup and finish my Tiny Wonky Star instead -
First the cleanup -
This is what I had left when I trimmed the seams on my monster -
And after playing with that -
I wanted to finish the "middle" of the Tiny Wonky Star -
So I sat back and RELAXED and spent some time un-sewing all of the triangles to see what I could salvage - and for the first time in several days I didn't fret about whether or not my "experiment" was going to work - which it did - lucky me - ;))
Then - of course - I had to count the "bounty" - LOL -
There are 4 little triangles at the very top - 4 large ones at the top left - 10 that are Left-Handed below that - and 8 piles of 10 Right-Handed ones on the right with 6 extra below that - for a total of 104 usable bits -
Now I can use my LEFT-EZE™ Rule to trim these to 3-1/2" triangles and match them to HST and QST cut from 3-1/2" strips - that's the beauty of the numbers on this ruler - they are the STRIP SIZE - so there's no guessing - you automatically know what STRIP SIZE you need to match the units you already HAVE - ;))
Then the Tiny Wonky Star - I was going to make a tiny 4-patch for the center - but Gene suggested a twisted or off-kilter one - in keeping with the "wonky" thing - but then I wondered what it would look like with a "crumb" center - it's not like I don't have any - LOL - ;))
So I found one slightly larger than a corner square -
Trimmed it to size -
And I think it will work -
Sewed the top row - pressing the corner squares IN towards the middle -
Sewed the middle row - pressing the center OUT towards the sides -
Sewed the bottom row - pressing the corner squares IN towards the middle again -
I know a lot of people press the top and bottom rows OUT to the sides and the middle row IN towards the center square - but I "reverse it" - LOL -
When I get to the end - it's easier for me to press the finished 9-patch OUT from the middle to the top and bottom rows -
THEN - from the back -
The top and bottom center square seams are pressed IN -
And the side ones are pressed OUT -
The other way - ALL of the center square seams are pressed OUT - and I don't know how people nest the seams from one block to next if they all go OUT the same way - but then again - it's probably just me - LOL - ;))
My way - I have no problem nesting the seams - if they don't nest one way - all I have to do is rotate one unit a quarter turn - and the seams will alternate - one set will go OUT - one set will go IN - easy peasy - ;))
Talk to you later - gotta go - gotta sew -
For those of you who have been patiently following my progress on this monster -
THANKS!! - your encouragement has kept me going - and "on task" -
Except for that one Squirrel the other day - LOL -
And I know that it has taken me a while - because I'm so slow -
But I think you'll like today's post - ;))
===
So to continue the saga -
Today I pinned and sewed the second side seam -
Then trimmed both side seams at 1/2" - before tackling the center seam -
That was a monster - but I found the ends of the two side seams - made them "meet in the middle" - and then pinned out to the fold on the right end -
Then came back and pinned toward the fold on the left end - left a "gap" for turning it inside out - and drew my chalk lines for sewing like I did on the side seams -
Sewed and trimmed again at 1/2" - because I thought 1/4" would be too skinny if I had a problem - and I plan to sew completely around the entire top about 1/2" away from the new "edges" - like on a potholder. It won't need a binding - but if the edges begin to fray - I can always bind it later -
Then it was time to turn it inside out -
And - Oh, crap! -
I was afraid this was going to happen - should have basted it better - but it's too late now - LOL - I just have to cross my fingers that the opening that I left is big enough to get my arm in there if I need to straighten this out later -
Part way through - I had second thoughts -
Oh, dear - what have I gotten myself into? - LOL - ;))
OK - found one corner -
The rest of them are in there somewhere - LOL -
Found the second one -
And then I found the rest of them -
Flattened it out a bit -
And laid it out on the floor -
It's bigger than the floor space -
So the left side is folded over a bit -
But it worked!! -
Ta Dah!! -
The opening is in the lower left corner - and should be easy enough to hide -
I like how the center on this side came together - totally by accident -
I flipped over one corner to see what the other side looked like -
But couldn't really tell -
So I flipped the whole thing over to see the other side -
And again - the left side is folded over a bit because it's so big -
But I LIKE IT!! -
Tomorrow I'll mess with flattening it out - checking that the batting isn't scrunched up or folded anywhere - give it a good pressing to "fuse" the batting where it should be - and stabilize it for quilting - then play with hiding that opening - and removing the basting thread - ;))
To refresh your memory -
This is what it looked like BEFORE I started messing with it -
King-size plus -
WAAAAAAY too big to quilt by myself -
OR send out to be professionally quilted -
Now it's about half the size - two-sided - and a much more manageable size -
I sure wish I could remember where I saw this technique in the first place - so I could give the person credit. Somebody somewhere thought of it first - and it wasn't me. I just tried to recreate something I thought I remembered. I've been quilting for over forty years and have hundreds if not thousands of books and magazines that I have read from cover to cover. I have not been able to find the source of this particular technique yet. It's not like somebody showed me how to do it yesterday. It's something I saw a long time ago and tucked away in my brain until I "needed" it. I looked through some of my older books and spent some time these past few days searching the internet but still haven't found it.
Anyway - THANK YOU!! - whoever you are - it's an awesome technique that I will surely use again - ;))
And I already know how I'm going to quilt it. I have a favorite "pattern" that I've used several times on older quilts. I think you'll like it - so stay tuned - ;))
Talk to you later - gotta go - gotta sew -
Are you tired of seeing this yet? -
Yeah - me, too - LOL -
So these are the last "basting" photos on this monster - ;))
When I turned another corner and needed a filler piece -
I had two smaller scraps in the pile -
And this one fit PERFECTLY -
Turned the next corner -
And the OTHER one fit PERFECTLY -
I was on a roll - LOL -
So used a wider piece for the next round -
And cut the length to size -
And then one last piece finished it up - YAY!! - ;))
Then - because I couldn't wait for tomorrow - even though it was dinner time -
I folded it and pinned the first side seam - starting at the fold -
Carefully matching the raspberry square points to the ones on the other side -
Or at least trying to - LOL - ;))
I don't know why these next two photos look so orange -
But the color is obviously the same as in the photos above -
Not trusting myself to "eyeball" the seam from point to point -
I drew a chalk line down the length of the seam -
And when I got to the last "square" - used the 45-degree line on my ruler along the edge of the patch to see where the "diagonal" should be to get me to the end of the seamline -
Took it to the sewing machine with the huge white table to the left of it so the table could support the weight/bulk of the quilt top -
The cool thing about the seam is that the batting is nowhere near it - so I was able to sew a little - check the seam "matching" the best I could - and then continue sewing along my merry way -
When I finished sewing the seam - I had to turn part of it to the right side - to see how well I was able to "match" the corners of those raspberry squares -
And it looks good enough to me - ;))
Tomorrow I'll sew the other side seam -
Trim them both -
And go from there - ;))
Talk to you later - gotta go - gotta sew -