Thursday, January 27, 2011

LHQ - Scrap Card

LEFT-HANDED QUILTING - Scrap Card

============
Note - these instructions are written in LEFTISH.  If you are right-handed - just reverse the directions. (I love saying that!!)
============

In my post - LHQ - Scrapbook - Overview - I briefly mentioned -   

SCRAP CARD - I take a 3x5 index card and flip it over to the blank side.  I cut a scrap of each fabric I used in the quilt - about 1" wide and just over 3" long.   I line them all up on the card and stitch them to the card about 1/2" from the top - the stitching winds up being on the red line on the back of the card.  After it's stitched - I flip the card over and trim the fabric just past the edge of the card.  Now I have a sample of the actual fabrics I used - to compare to the photos.  I save the rest of the scraps for the "heart" and memory quilt.
========

I take a 3x5 index card and flip it over to the blank side.

I cut a scrap of each fabric I used in the quilt - about 1" wide and just over 3" long.

Because I am making 5 B/W/R quilts - in addition to the pillowcases - I decided to make all of the scrap cards and cut all of the strips at the same time.  Here are the fabric strips that appear in all five quilts plus the extra floral that will appear only my granddaughter's quilt.


I line them all up on the card and stitch them to the card about 1/2" from the top - the stitching winds up being on the red line on the back of the card.  (The fabric strips in the photo below are the ones used in the pillowcases.)


Layer the fabrics on the card from the bottom up.


It's easier to sew if the layers go from top to bottom - no edges to snag.


After it's stitched - I flip the card over


and trim the fabric just past the edge of the card.


Here we are - all of the cards done for the 5 B/W/R quilts and the Pillowcase(s) scrapbook page.


Now I have a sample of the actual fabrics I used - to compare to the photos.

I save the rest of the scraps for the "heart" and memory quilt.

And - I get to update my UFO list - YAY!!


Talk to you later - gotta go -

Wednesday, January 26, 2011

LHQ - Attaching Quilt Labels

LEFT-HANDED QUILTING - Attaching Quilt Labels

============
Note - these instructions are written in LEFTISH.  If you are right-handed - just reverse the directions. (I love saying that!!)
============

My last post was all about "How to Make a Quilt Label".

============

I also talked about "Where to Attach a Quilt Label".

When the labels are all done - I attach them to the lower back of the quilt.

The question is then - which "side" of the back - lower left side or lower right side?

As I look at the back of the quilt - my natural tendency is to want to attach the label to the lower right side.  It just seems more visually pleasing to my eye.

However - my long-arm quilter/friend disagreed - and won!!  She said it should be attached to the lower left side.  Her reasoning was that - if the quilt were ever entered in a Quilt Show - the "white-glove ladies" usually stand at the right side of the quilt (as you face the quilt) - all ready to flip the quilt over to show you the label - if you ask.  In order to do that - the label has to be on that side - which is the left side as you look at the back of the quilt!!

Is this a right-handed world or what?!

========

Then - Heather (A Passionate Quilter) asked me how I apply the label to the quilt.

Great Question!!

I told her that it depends.

I know that sounds like a crappy answer - but there are tons of ways to attach a label to a quilt - and I use a couple of different ones - depending on the effect I want - and depending on whether I want to sew the label on by hand or by machine.

Method #1 - Machine sew the label - topstitch about 1/4" in from the edge

If I don't care if the label stitching shows on the front of the quilt - or if I think I can disguise the stitching well enough to where it is virtually invisible -

I just topstitch the label down - about 1/4" in from the edge


This is a Miniature Watercolor Quilt I made a while back.
The front -


the back -


and the label (kinda crooked - but - hey - it's ON!)


And - as you can see - the label stitching barely shows on the front.


Or this label that I  made "log-cabin" style


and as seen from the front


Method #2 - Machine sew the label - using a decorative stitch

If I think the stitching won't show on the front of the quilt -

I sometimes stitch the label down - using a decorative stitch.

Here I used a "blanket" stitch


And from the front - you can barely see the stitching.


Method #3 - Hand-stitch the label - using an "invisible applique" stitch

If I don't want the stitching to show on the front of the quilt - at all -

I will hand-stitch the label down - using an "invisible applique" stitch -

making sure that the stitching goes through the backing - catching a bit of the batting - but not all the way through to the front of the quilt.

(I'll tell you all about that stitch when I post my progress on my Stage 7 - Floral Applique UFO.)


In general - I prefer to hand-stitch my labels down.  I just think that they look better and more professional that way.  (And it is a MUST if you enter a quilt in a quilt show.  I do believe that the Quilt Police frown on machine-sewn labels!)

But - when I make a quilt for my grandkids - I will machine-sew the label - for durability.  (And I'm pretty good at making sure the stitching doesn't show much on the front of the quilt!)

The bottom line - how you apply your label to your quilt is personal preference.

Oh, and by the way - I'm making another rule -

Rule #4 - Don't be Afraid to Annoy the Quilt Police!


Talk to you later - gotta go - gotta sew -


Tuesday, January 25, 2011

LHQ - Quilt Labels

LEFT-HANDED QUILTING - Quilt Labels

============
Note - these instructions are written in LEFTISH.  If you are right-handed - just reverse the directions. (I love saying that!!)
============

In my post - LHQ - Scrapbook - Overview - I briefly mentioned - 
 

LABELS - I also attached samples of the labels I made for N's quilt - your quilt - and another one.  Sometimes I have to set them up at the bottom of the page - on the left - or on the right - depending on where I want them to print on the fabric sheets.  I make sure to leave about an inch around all sides when I cut them out.  I sew border strips to the sides - press them open - and then sew strips to the top and bottom - using a 1/4" seam allowance - press it and square it up.  Then I put it right side down on a piece of muslin - sew completely around the whole thing - clip the corners to reduce the bulk - make a small slit in the muslin - turn it inside out - press it real well - and voila! - a label already to sew to the quilt - and no raw edges to turn under!!

========

For this exercise - I'll show you how I made the label for the practice quilt I made to use in the Free Motion Quilt Along - Designed by Christina - A Few Scraps.  (I just realized that this practice quilt is NOT on my list of UFOs - OH CRAP!! - another one!!)

So - This Is How I Do It -

I make my quilt labels on my computer
  • I write the info I want in a "Word" document
  • I adjust the margins so that I can fit two columns on the page - or sometimes I have to set them up at the bottom of the page - on the left - or on the right - depending on where I want them to print on the fabric sheets.
  • I choose a font I like and adjust the size to accommodate all the stuff I want to put on the label
  • I make it all "CAPS" and "BOLD"

  • then print them on "fabric sheets".  (I use June Tailor ® Sew-In Inkjet Fabric Sheets ™.)

  • I try to print two or three at a time in a column down the left side of the sheet - 
  • and cut them apart
  • then I can run the sheet in the other direction for three more down the other side.

  • Sometimes (like here) I use leftover scraps by taping them to a plain sheet of paper

I remove the paper backing and - according to the manufacturer's instructions - do the "Colorfast treatment".  I rinse the label(s) in cold water - lay it/them on a paper towel - pat (not rub!!) the excess water off - and press it/them with my iron until they are dry.


I make sure try to leave about an inch around all sides when I cut them out.

Because this label is being made from a scrap - the "white space" is barely over 1/2" - but it will still work.  The ink smear from a previous printing will wind up in the seam allowance - so I'm not going to trim it off.  (Sorry about the glare in the photo.)


I use fabric scraps for the borders - they just have to be long enough for the top and bottom borders -

and cut four strips.


I sew border strips to the sides - using a 1/4" seam allowance

and trim them.


press them open

and then sew strips to the top and bottom -


trim it

press it

and square it up.

  • First - the top left corner - 1" seems to be about right

  • trim the left side and the top

  • then flip the label around - set another 1" margin in the top left corner

  • trim the left side and the top

Then I put it right side down on a piece of muslin -


sew completely around the whole thing - using a 1/4" seam allowance


trim it
and clip the corners to reduce the bulk -


make a small slit in the muslin -


turn it inside out -

press it real well -

and voila! - a label already to sew to the quilt - and no raw edges to turn under!!I


When the labels are all done - I attach them to the lower back of the quilt.

The question is then - which "side" of the back - lower left side or lower right side?

As I look at the back of the quilt - my natural tendency is to want to attach the label to the lower right side.  It just seems more visually pleasing to my eye.

However - my long-arm quilter/friend disagreed - and won!!  She said it should be attached to the lower left side.  Her reasoning was that - if the quilt were ever entered in a Quilt Show - the "white-glove ladies" usually stand at the right side of the quilt (as you face the quilt) - all ready to flip the quilt over to show you the label - if you ask.  In order to do that - the label has to be on that side - which is the left side as you look at the back of the quilt!!

Is this a right-handed world or what?!

========

Anyway - my way - the way I described above - just kinda evolved when I discovered the inkjet "fabric sheets" way back when.  And since they were/are so expensive - and I didn't want to waste them - I figured out a way to print them on the computer (because my handwriting sucks!) and then run two columns of labels - one down each side.  I bordered them to make them bigger and the size I wanted/needed.  Then I backed them with muslin because I was lazy and didn't want to have to turn under all of the edges when I sewed them to the back of the quilt.

Basically - I found a way of making quilt labels that worked for me!!

And - apparently I am not the only one who has figured out this particular technique - because in the November/December 2010 issue of Quiltmaker - page 36-37 - is an article/tutorial on HOW TO MAKE A QUILT LABEL!!

Except for me making better use of my "fabric sheets" (I think) by printing two columns of labels instead of just one down the center (and wasting all of the space on both sides) - the tutorial pretty much described something I HAVE BEEN DOING FOR YEARS!!

When I read the article - I laughed out loud!!  (My husband didn't flinch - I talk back to the TV all of the time - and he must have thought it was "one of those times".  He was right!)  I swear - I felt like I had just read all about how some youngun' had just discovered this new fangled thing called a "wheel"!!

I thought it was hilarious!!

So - I went to the Quiltmaker website - and - after reading comments from new quilters about how "wonderful" this technique was - and I totally agree that it is -

And - after reading other comments from experienced quilters - like me - who already do the same thing with their own variations - I registered my own comment (#91).  Quiltmaker

Then I remembered what my Dad used to say -

"Anything is easy - if you know how."

And I realized that in writing this blog - I am doing the exact same thing - spouting off things that you/everyone already know(s).   But then again - I figure that if a magazine can publish stuff that I/we have been doing for years - so can I.

And I try to remember that I was a beginner once, too.

So this Left-Handed Quilting stuff is mainly intended for newbies - beginner quilters - those who don't know this stuff already.

If you are an experienced quilter - and think I'm spouting - feel free to laugh your ass off...


Talk to you later - gotta go - gotta sew -

Thursday, January 20, 2011

I'm a flippin' lefty!!

Remember back in November when I "went surfin" and found some left-handed stuff that I told you about??

Remember I said then that I wanted a mug that said -  

I'm a Flipping Lefty! - ??

Well - I couldn't find one - so I made one.

I changed the format/caps/punctuation just a bit - but it still says the same thing -

I'm a flippin' lefty!!

and then just 'cuz I felt like it - I made a T-Shirt to go with it!!

Sometimes - if you want it done right - you just gotta do it yourself!!

So - check these out -

First - the mug
  • When a lefty holds it - it says "I'm a flippin' lefty!!"
  • When anyone else holds it - either the mug or the writing should be upside down!! (If I did it right correctly!)

Second - the T-Shirt
  • The lefty who wears the T-Shirt can read it by merely looking down!!
  • To anyone else reading the T-Shirt - the writing is upside down!!
I got the idea for the mug when I was "surfin" and remembered all the "flippin'" I do when I try to use a right-handed ruler.

I got the idea for the T-shirt from my Grandson #3.  When he was little - he had a shirt that had a huge "9" on it.  He was learning his numbers and one day we were talking about his "9" shirt.  He looked down - and said - "No, it's not a "9" - it's a "6"!!


Talk to you later - gotta go - 


Tuesday, January 18, 2011

LHQ - Quilt Top Assembly

LEFT-HANDED QUILTING - Quilt Top Assembly

============
Note - these instructions are written in LEFTISH.  If you are right-handed - just reverse the directions. (I love saying that!!)
============

First let me say - this would have gone MUCH FASTER if I didn't stop to take so many photos as I went along - but then - without photos - it would have been MUCH HARDER to show you and to try to explain what the hell I was talking about.

So -

If you are wondering why I haven't posted anything since last Thursday - now you know!!

=====
LEFT-HANDED QUILTING - Quilt Top Assembly

I have another quiz for you -

If you had twenty quilt blocks that you wanted to lay out 4 across and 5 down - with twelve points to match - would you rather sew them together and have to

A.  Match three points - four times

or -

B.  Match one point - eight times - and four points - once.

If you answered A - feel free to skip this post - you assemble quilt tops the way most instructions tell you to - and the way most quilters do.   You sew four blocks together to make one row - make five rows - and then sew the rows together to make the top.  Standard quilt top construction.

BUT -

If you answered B - or - you would like an alternative method of construction - read on.

I'll tell you TWIDI - The Way I Do It .  It's not really left-handed - it's just easier for me.

I don't like quilt tops when they get huge and unwieldy - they are way too hard for me to handle as they "grow".  I don't mind chain piecing - I just like to match as few points as possible at one time.  So - I split my quilt tops into manageable bits and try to have only one really long seam at the very end.

Instead of sewing four blocks together to make rows - I make four columns of blocks on the design wall.  Like an Excel ® spreadsheet - I call the columns - A/B/C/D - and the rows - 1/2/3/4/5.
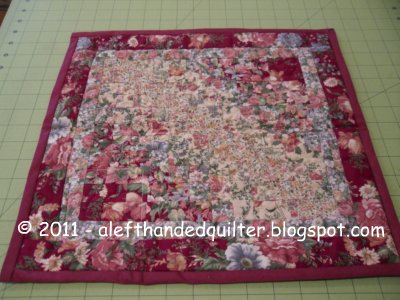
This is a photo of Red Cosmo on the design wall in the hallway.  The photo is sideways - so you can see the 20 blocks - 4 across and 5 down.


Because the photo is sideways - the top two rows on the wall are actually column C and column D - so I started with them first.  I moved both columns to the design wall in my sewing room to show you my "process".


Starting at the bottom - with C5 and D5 - I "flip" the blocks in column D over on top of the blocks in column C - wrong side up - and put a pin on the edge that I want to sew (the right side in the photo).

With the raw edge closest to me - I put in a couple of extra pins before I sew the seam - with the pointy end of the pin at the raw edge (because the raw edge will be to the right as it goes through the sewing machine and I like to remove the pins with my left hand).  Do what works for you!!


Then I just make a stack - CD5 - CD4 - CD3 - CD2 - CD1 - making sure CD1 is the top one in the stack.  I put two extra pins in the C part of CD1 to remind myself that it is the top left block in the second stack.


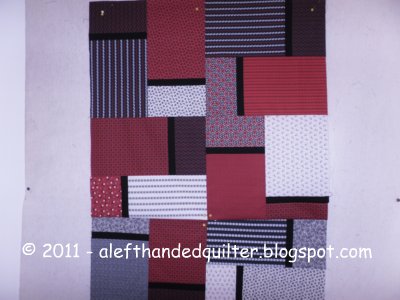
Then I do the same thing with column A and column B.


I put one extra pin in the A part of AB1 to remind myself that it is the top left block in the first stack.  (The photo shows two pins but one is holding the block to the design wall - so it doesn't count.;)  And - because I can be anal at times - I also put a little temporary sticker in the corner with "A1" so that I don't mix up the left and right sides of the quilt.  (Don't laugh - I've done that!!)


Then I chain piece the stacks - ten sets - and I haven't matched a point yet!!

I clip the sets apart - and press rows 1-3-5 to the right - and rows 2-4 to the left.  And put them back in two stacks with AB1 and CD1 on top.


OK - now for some matching - one point - eight times.

FIRST SET OF FOUR MATCH POINTS -  

Sew CD1 to CD2 - one match point - dead center of the four blocks


Sew CD3 to CD4 - one match point - dead center of the four blocks


Sew CD3/4 to CD5 - one match point -


where the pins are


This is where it starts to get a bit bulky for me - so while the blocks are still on the design wall - I flip the bottom CD5 row UP onto the CD3/4 section - and pin them together in a couple of places (you can see the pin in the middle of the red block on the right) - before I take them down.


I take the whole thing to my cutting table and lay them down so that the bottom edge (the side I want to sew) is on the side closest to me.  Then I pin the seam - matching the point first - like I did before.


Sew CD1/2 to CD3/4/5 - one match point -
You can see the yellow pins in the red sections at the bottom center of the photo.


This time - because I like the larger piece to be on the bottom when I sew - I flip CD1/2 DOWN onto the CD3/4/5 section and pin like I did before.  (The top layer in the photo is the wrong side of CD1/2.)


SECOND SET OF FOUR MATCH POINTS - 
Then I repeat the process with the AB columns - for the second set of four match points.

Sew AB1 to AB2 - one match point - dead center of the block
Sew AB3 to AB4 - one match point - dead center of the block
Sew AB3/4 to AB5 - one match point
Sew AB1/2 to AB3/4/5 - one match point

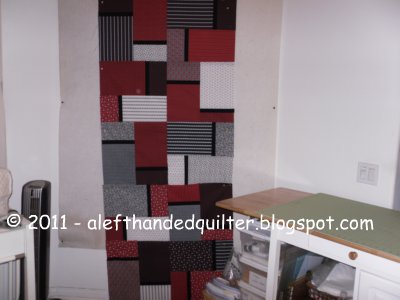
Now you have two sets of ten blocks -
AB1/2/3/4/5 (press seams DOWN)

and CD1/2/3/4/5 (press seams UP)

And I have matched 8 of the twelve points needed - but no more than one point on each seam!!  YAY!!

Now -

Flip the blocks in column CD over on top of the blocks in column AB - wrong side up -

leaving the bottom part just hanging for now -

and put pins on the edge that will be sewn (the right side in the photo).


THIRD SET OF FOUR MATCH POINTS -  Match the last four points on the long center seam - sew it - press it - and you're done!!


Twelve points matched - with no fuss!!

Now - isn't that easier than the way you're "supposed" to do it??

===

By the way - as far as matching is concerned -

sometimes I can do it

and sometimes I just can't!!


Talk to you later - gotta go - gotta update my UFO list -

LinkWithin

Related Posts Plugin for WordPress, Blogger...