A blog about quilting and using the LEFT-EZE Rule - my HST/QST Ruler designed for LEFT-HANDED Quilters -
Pages
- Home
- LEFT-EZE™ Rule
- LEFT-EZE™ Rule - Tutorials
- LEFT-EZE™ Rule - Size Chart
- LEFT-EZE™ Rule - Free Pattern & Tutorial
- LEFT-EZE™ Rule - Reviews/Testimonials
- About This Blog - And Me
- Rules
- Reviews
- Quilt Journal
- QJ - Floral Applique
- Sudoku Quilts
- Studio Organization
- Fabric Storage Tips
- Left-Handed Quilting (LHQ) - Introduction
- LHQ - Basics
- LHQ - Rotary Cutting
- LHQ - Construction
- LHQ - Hand Sewing
- LHQ - Binding
- LHQ - Finishing The Quilt
- LHQSQ - LHQ Sampler Quilt
- UFOs/Projects/Squirrels
- Quilt-Along - LHQSQ 2.0
- Privacy Policy
Tuesday, January 31, 2012
Orca Bay - 1/31/12
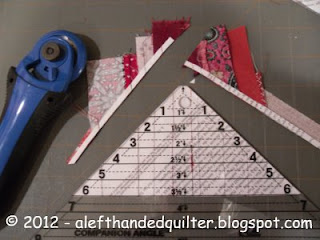
Now my geese need trimming -
And then they can get their WINGS!!
Oh - and by the way -
For those string blocks -
If your sewing machine doesn’t have that nifty little “thread cutter” feature -
Try this -
It comes with stick-um on the back of the cutter -
Just stick it on the back of your sewing machine -
Anywhere you want -
And - the magnetic seam guide is cool, too -
Just be sure NOT to use it on a computerized machine -
They tend to be allergic to magnets - ;))
And - in case you were wondering -
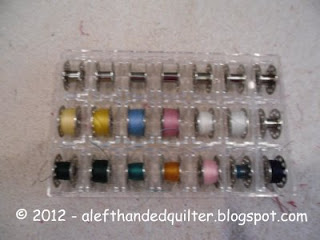
I DID use up most of those odd-ball half-full bobbins -
See?
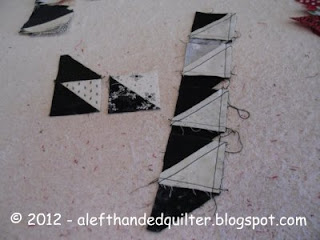
So - back to the black/white corner - for my WINGS -
Dig out the HST units and some black triangles -
For a test run -
Lay them out to be sure -
That they are going the "correct" way -
Almost said "right" way - as opposed to "left" way? ;))
Then the other side -
Four this time -
Just testing - mind you - ;))
Whew!
Got all four going the “correct” way -
I KNOOOOW - I’m as surprised as you are!! ;))
All I have to remember is -
Sew the little black triangle -
To the “White/Neutral” side of the HST units -
Should be easy - huh? -
Wonder how many I'll mess up? ;))
Moving on to the “geese” -
Match up a couple -
Just to see -
(The trimmed dog-ears on the black -
Make them look like they are going to be short -
But they're not - watch - ;))
Actually “sew” them together -
And measure them -
Should sew up to 3-1/2" x 6-1/2" -
Not "perfect" -
But not “bad” either -
So I’m calling these two “good” -
And DONE - ;))
Only have a gazillion more to go -
Talk to you later - gotta go - gotta sew -
Monday, January 30, 2012
Design Wall Monday - Orca Bay - 1/30/12
DESIGN WALL MONDAY - ORCA BAY - 1/30/12
Check out all of us who link up with Judy L. at Patchwork Times on Mondays.
We have some awesome stuff on our walls!
Well, THEY do - ME - not so much sometimes - ;))
===
Woke up yesterday thinking -
Dare I hope to finish these guys today?
I was sure going to try!!
Of course -
I cut it a little close on some -
But they trimmed up just fine -
ALMOST there!
And now I'm - THERE!!
TA - DAH!!
64 RED string blocks -
All DONE!!
And - extra bonus -
I finished -
Just in time for my nap - ;))
Talk to you later - gotta go - gotta sew -
Sunday, January 29, 2012
Orca Bay - 1/29/12
Round and round we go -
All set for Round #4 -
This is FUN!! -
Now that I’m down to the shorter strips -
I can add them to the ones in my lap -
Hey -
Are we to the corners yet?
YAY!! - Corners -
ALMOST DONE with these guys!!
Talk to you later - gotta go - gotta sew -
Saturday, January 28, 2012
Orca Bay - 1/28/12
RED string blocks - batch #2 -
Bonnie has said that -
The first MONDAY in February will be the next Mystery Monday Link-Up.
Since I don't have much time left before the link-up -
I figured that if I’m going to do another batch -
I might as well do the rest of them - ;))
Round #1 -
Organized chaos -
Appropriate oxymoron - ;))
The black/white corner -
To be continued - ;))
Round #2 -
Round #3 -
And I think that I might just put them together -
BOB’s way - remember that??
I thought I had the "Mystery" all figured out -
And I was SOOOO close -
I had the "Bones" right -
I just had the Red Geese framing the white/neutral blocks -
Instead of the black ones -
So maybe I should call my version -
Orca Bay Bones -
What do you think?
Talk to you later - gotta go - gotta sew -
Friday, January 27, 2012
Orca Bay - 1/27/12
Before I started the next batch of RED string blocks -
I thought I would trim up some of the blocks I had -
Slice one down the CENTER -
Watch the DIRECTION of the strips -
Need them to go from SIDE to SIDE -
If I’m cutting UP and DOWN -
Line up the bottom of one “half” -
With the 6” line on the ruler -
Because I am A LEFT-HANDED QUILTER - ;))
Trim UP the LEFT side -
ACROSS the tip -
DOWN the RIGHT side -
Notice the tip gets trimmed too?
No dog-ear at the tip -
Cool, huh?
Pull off the paper -
Just fold it at the seam line -
Give it a little tug -
And the paper just splits apart -
If your paper doesn't just "split" -
And it’s too hard to get off -
You might want to change to a larger needle -
Jeans/Denim #14 is good -
And check your stitch length -
It may need to be shortened up a bit -
The combination of large needle (big holes) -
And short stitch (close together) -
Make for rows of BIG HOLES - CLOSE TOGETHER -
And nice PERFORATED paper -
Easy peasy!!
My Pinto is PERFECTLY suited for sewing string blocks -
And Foundation Paper Piecing -
She tends to have REALLY short stitches -
No matter WHAT the Stitch Length dial says -
Which is one reason she got replaced - ;))
And this is also a GREAT opportunity to use up
All of those odd-ball half-full bobbins -
You know the ones I mean - ;))
Talk to you later - gotta go - gotta sew -
Thursday, January 26, 2012
Orca Bay - 1/26/12
I know everyone else working on Orca Bay is DONE -
But for those other SLOW POKE QUILTERS out there -
Who may not really LIKE string blocks -
Me NEITHER - they seem to take FOREVER if I do them one at a time -
So -
This is How I Do It -
Make a pile of squares -
Like I showed you before -
And it REALLY HELPS to have the strips sorted by LENGTH -
I just start with the longer ones and work my way down -
Stack them -
On the RIGHT -
Take one and press it open -
Flip it over to make sure I’m not short -
Give it another quick press -
Flip it back over and add it to the pile -
On the LEFT -
Over and over and over -
Until I only have one pile -
Then it’s back to the sewing machine -
For another round -
Oops!!
Another one for you to spot if you ever see this quilt in "real life" - ;))
Had a problem with my foot pedal “scooting” on me -
But I solved that pretty quickly -
And in no time at all -
I had 19 blocks all ready to trim up -
Thought I had 20 -
But I was one short -
Surprised??
I’m not. ;))
Now it’s on to the next batch -
Talk to you later - gotta go - gotta sew -
Wednesday, January 25, 2012
Orca Bay - 1/25/12
Moe won -
Moe ALWAYS wins - ;))
And in this case -
Moe is the RED string blocks -
I hate the part where the strip/string that I choose -
Is either too wide - too short - or too “something” -
So -
My CDO kicked in -
(They say that it’s like OCD - but with the letters in alphabetical order -
Like they’re supposed to be - ;))
And I pressed and sorted my scraps/strings/strips by LENGTH -
I'm not worried about the WIDTH so much - they are what they are -
And - none of this “one or two at a time” stuff for me -
I am waaaaaaaaaaaay too far behind to fiddle with this that much -
And lest anyone think that pressing and sorting by length -
Is "far too much planning for a scrap quilt" -
I beg to differ - ;))
I call it "organizing" - so that I can be more EFFICIENT -
Just because it’s scrappy doesn’t mean that it can’t be organized -
And EFFICIENT - ;))
So - assembly line it is -
Change the needle on the Pinto -
(I use a Jeans/Denim # 14) -
Take off the magnetic guide -
Shorten the stitch length -
And off I go -
Until I get a pile of them -
Press one open -
And flip it over to be sure the paper is covered -
Clip the rest of them apart -
And keep pressing - flipping - sewing merrily along -
Merrily along -
‘Til we get to my favorite stage - 4 strips -
Middle strip plus one on one side -
And two on the other side -
If the next strip in the pile is too short for one side -
It just might fit on the other side -
And it does - YAY!!
Talk to you later - gotta go - gotta sew -
Subscribe to:
Posts (Atom)


