Last week I got sidetracked -
Four new dies came out recently -
And since I have two die cutters - the regular one - and the heavy duty one -
When they come out with new dies - I usually check to see if I can make any new "block" (or something similar) with dies that I already have -
And/or if I can make them using my LEFT-EZE Rule™ -
When I read the page for the Chimney Sweep - 10" finished die-
I noticed that their version has the outside edges on the bias -
When they should be on the straight-of-grain -
And saw that I can make a similar version with what I already have - YAY!! -
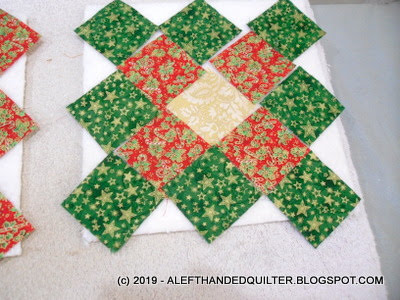
So - for fun - I made the block that I found in EQ - called Arbor Window - ;))
I have a die that will cut "Square-on-point" patches -
So I printed out the EQ rotary cutting instructions for a 9" block -
Which calls for the size of the "Square-on-point" patch that matches my die -
And used it to cut out two sets of "center" patches -
Then - because I needed both HST and QST to fill in the corners and sides -
I checked my LEFT-EZE Rule™ SIZE CHART - for the strip width that I needed - since I can cut BOTH shapes with my ruler from the SAME SIZE pre-cut strips - which is really cool - TWO rulers in one - what a deal! - LOL - ;))
Cut the HST -
Like a square cut in half - once on the diagonal -
And the QST -
Like a square cut into quarters - twice on the diagonal -
The strips were folded over double -
So I cut 2 sets of 4 HST for the CORNERS - and 2 sets of 8 QST for the SIDES -
The smaller ones are HST - they go in the CORNERS because they have the straight of grain on the outside - straight - edges -
The larger ones are QST - they go on the SIDES because they have the straight of grain on the outside - diagonal - edge -
Put the smaller corner HST on the design board first -
Filled in with the QST for the sides -
Sewed the block in diagonal rows - like a quilt that is set "on-point" -
And added the HST corner triangles last -
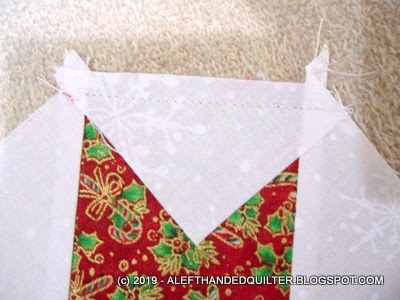
Because I use strips - the dog-ear on one side is cut off -
And lines up perfectly with the edge of the QST on the side -
Pressed the HST corner seams to the corner -
I pressed all of the rows toward the outside edge -
Since I don't like to press seams "open" -
I can always re-press them if I want to set them block-to-block-
Or I can use sashing to avoid having to match the points on the side -
I still need to trim the remaining dog-ears -
Then I made the second one -
And now I have two - ;))
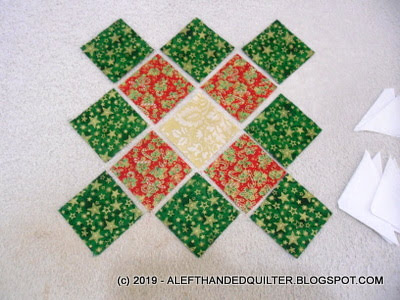
If I add another round of squares - it comes out to a 12" block -
That I have also seen called a Great Granny Squared block -
==
As a side note -
When I noticed that the new die put HST all around the SIDES - and QST in the CORNERS - which results in BIAS edges on ALL of the outside edges - I sent an email to AQ pointing out the error as nicely and as simply as I could -
I couldn't be the only one who noticed - but apparently no one on their end did -
since it was released that way -
I figured that they couldn't correct an error if no one told them that they made one in the first place - but when I tried to explain it to them - they kept insisting that the die was correct as designed. After some back and forth - they finally said that they would pass it along to the Product team for review - so we'll see what happens -
The block works and the pieces fit because the triangle SIZES are right -
But the SHAPES are arranged on the die incorrectly for the fabric grain -
Which leaves bias on the edges -
The smaller triangle on the die for the corners is a QST and should be a HST -
The straight of grain is on the diagonal -
And it should be on the sides -
The larger triangles on the die for the sides are HST and should be QST -
The straight of grain is on the sides -
And it should be on the diagonal -
I have seen patterns/rulers designed with the outside edges of a patch/block on the bias - and some people don't seem to care - and/or they think that it doesn't make a difference - but I think that it does -
I think it's important to have the edges on the straight-of-grain - whether it's a patch or a block - I like a stable block that doesn't have bias/stretchy edges - but then again - it's probably just me - LOL - ;))
Maybe one of you can explain it to them better than I could -
If you want to give it a try - please tell them that "Kitty sent you" - LOL -
I gave it my best shot -
Now I want to go chase some other Squirrels - LOL - ;))
Talk to you later - gotta go - gotta sew -
Yesterday I was asked which die shapes I'm going to use for my Big Box of Magical Things -
I replied -
Great question - and probably the topic for my next post - LOL. I usually use my strip dies - lots of patterns use them - and my ruler does, too - so those are my go-to. Then sometimes I just pull out a basic die and cut some for "later". This time I have two specific patterns in mind - so I pulled the dies for those and I'll see what I can do with the scraps I have.
I have used various methods of "scrap management" through the years - and have yet to find one that really works the same way I do -
I have bins of strips - bins of squares that I never remember that I have - that are never the right size or color anyway to be of any use - triangles that don't match - and odd bits and pieces - so those wind up in my "crumb" blocks - anything and everything works in them - and they're FUN to make -
Then sometimes I pull out a basic die and cut something for "later" - like the Drunkard's Path block - those fit together all by themselves - so it's pretty much - cut and sew - but it's hard to use that die for scraps -
When I feel like "scrap-busting" - I usually use my strip dies - they are my go-to - and I don't have to cut them into squares or rectangles since I can cut those from the strips if I need them -
This time I have two specific patterns in mind that use dies that I already have -
So I pulled the dies for those to see what I can do with these scraps -
I like to start with the larger scraps and die cuts -
Then work my way down to the smaller sizes -
One pattern is simple squares and HST -
The other patterns calls for sets of matching patches in certain size combinations -
So I'm going to start with that one -
One combination is for a Triple 4-patch -
Two 3-1/2" squares and four 2" squares of the same fabric -
The other 4-patches are assorted - so I'll worry about those later -
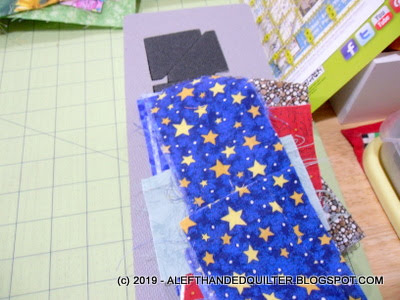
So since the 3-1/2" square is the largest shape - and it needs matching 2" squares - I pulled some of the larger scraps to see how many I can get -
From the 3-1/2" square die -
And this 2" die -
Some of the smaller pieces will fit these other dies in other sizes -
Squares - rectangles - HST -
These will fit the square die -
These will fit the HST die - but need to be matched to some neutrals first -
Which is part of the other pattern -
So I'll do them last -
Right now I'm just setting aside the pieces that will fit when I get to that point -
These guys will fit the rectangle die -
This piece will give me a pair of 3-1/2" squares -
And I need sets of four 2" squares - and some "onesies" -
So I'll see how many I can get from this piece -
The rectangles need to be in sets of 4 matching fabric/colors -
So I got 4 red and one green set -
Since I don't have that many pins -
And don't want to have to recount each and every set -
I flipped a couple of the sets wrong-side-up -
So now I can stack them - and still be able to pull a set of four - when I get there -
Then - I put that stack in a little baggie with an index card that tells me the pattern - the block - the die cut size - the die number - and the "set of 4" part -
These are the 3-1/2" and 2" squares -
I sorted the 3-1/2" ones in piles of two - by fabric/color -
The 2" squares are in piles by fabric/color -
Since I didn't get the same number of squares from each fabric -
They will be counted out separately -
Some of the left-over strips are big enough for the HST die -
So I added them to that pile -
I still have some sorting and counting to do to get the sets matched up -
Then I need to bag them up and label them -
Then some more cutting -
But it's a good start - LOL - ;))
Talk to you later - gotta go - gotta sew -
Sunday I had fun sorting through the Big Box of Magical Things -
First pulling the larger pieces out and setting them aside -
In the pile on the left are good sized chunks of calicos -
The center pile has Elvis - gotta love Elvis - LOL -
The pile on the right has various fabrics including some cool "Chicago Bears" -
My grandsons are fans of another team - so I thought of using that on the back of a Halloween quilt - the colors are right - LOL - ;))
Then I sorted the rest -
I made a pile of batiks - for another confetti quilt -
Other chunks roughly by color and size -
A pile of children and novelty prints -
Triangles -
Bits and pieces -
Solids -
Homespuns - and plaids -
Strips of various sizes -
And block parts -
I have some scrap quilts that have been on my "to do" list for a while -
So I pulled out a couple of my dies -
And will start with the larger scraps -
Working my way down to the smaller ones -
To see if I can get a head start on those scrap quilts -
And make some sort of a dent in this Big Box of Magical Things - LOL - ;))
Talk to you later - gotta go - gotta sew -
Today I put this block together - ;))
Some Squares-on-point -
With HST in the corners -
And QST around the sides -
To go with the RED one that I made the other day -
I'll tell you more about that one next week -
But for now - I have two of them -
And then I set them aside because the mail lady delivered a -
Big Box of Magical Things -
From a friend - THANK YOU!! - you know who you are - ;))
Vicki Welsh has a blog - HERE - and has a Drawer of Magical Things -
And I LOVE that name - so I stole borrowed it for this box - LOL -
Because - as you can see -
It has a Big Bunch of Magical Things in it - LOL -
And I'm going to have a LOT of FUN sorting through it -
PLAYTIME - YAY!! - ;))
Talk to you later - gotta go - gotta sew -
Finally!! -
But it took me two tries -
And most of the week - ;))
Round 1 -
I made some "flanged binding" -
And decided to try to stabilize the edges by tacking down the tulle with a 3-step zig-zag on some chalk lines that I drew on the back - because it was easier to draw them on the back than on the tulle on the front - missed it by a bit the first time on this side - and had to do it a second time - LOL -
Then I tried to use the chalk lines on the back as baselines to line up the binding when I sewed it to the back -
I didn't want to trim it until AFTER I sewed on the binding - because I didn't want to risk cutting the tulle and letting the confetti fall out - LOL -
Added some corner triangles for hanging - and stitched it down - then had to un-sew it all since it wasn't even close to being straight or the corners square -
So - Round 2 -
This time I drew the lines on the front - as straight and as square as I could -
Inside the 3-step zig-zag lines since I didn't want to un-sew them -
I used whatever color of chalk - yellow or blue -
That I needed to make it show up on the tulle -
And sewed a single straight line along the drawn lines -
Used that stitched line as the baseline to sew the binding to the back -
Trimmed it - looks straight enough and the corners are square - LOL -
And wouldn't you know - I cut a corner on the binding when I trimmed it - CRAP! -
But it was on the inside/flange part -
So I was able to hide it in the inside when I mitered that corner - WHEW! -
Folded the binding to the front and stitched it down -
I used the same fabric as the backing for the binding -
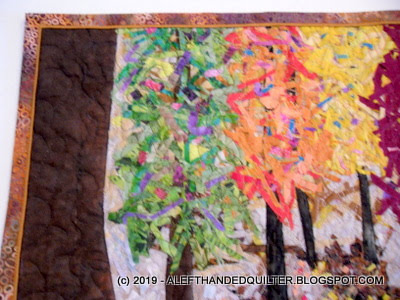
The flange is the gold fabric that you see in the previous photos -
The binding is a little wider on the front than it is on the back - but that's OK -
The tulle is stitched down TWICE so I don't think the confetti is going anywhere -
The top right corner is the one that I accidentally cut -
But it's hidden so you wouldn't know it was under there if I didn't tell you -
And - unfortunately - I lost that second little tree on the right - but I think it's worth it to have the tulle super-tacked down all the way around - next time I'll try not to put a tree that close to the edge - you can see a little of it peeking out from under the flange -
I LOVE the effect of the "falling leaves" -
MANY THANKS to Katie for the suggestion -
And to ALL of you who gave me some great input along the way -
Over-all - it doesn't look too bad for a first try - ;))
Now I have to make a label -
A Scrap Card - that should be fun - LOL -
A Heart for my Memory Quilt -
And work up a Scrapbook Page -
Then I can call it DONE - ;))
Talk to you later - gotta go - gotta sew -