Finally!! -
But it took me two tries -
And most of the week - ;))

Round 1 -
I made some "flanged binding" -
And decided to try to stabilize the edges by tacking down the tulle with a 3-step zig-zag on some chalk lines that I drew on the back - because it was easier to draw them on the back than on the tulle on the front - missed it by a bit the first time on this side - and had to do it a second time - LOL -

Then I tried to use the chalk lines on the back as baselines to line up the binding when I sewed it to the back -

I didn't want to trim it until AFTER I sewed on the binding - because I didn't want to risk cutting the tulle and letting the confetti fall out - LOL -
Added some corner triangles for hanging - and stitched it down - then had to un-sew it all since it wasn't even close to being straight or the corners square -

So - Round 2 -
This time I drew the lines on the front - as straight and as square as I could -
Inside the 3-step zig-zag lines since I didn't want to un-sew them -

I used whatever color of chalk - yellow or blue -
That I needed to make it show up on the tulle -


And sewed a single straight line along the drawn lines -

Used that stitched line as the baseline to sew the binding to the back -

Trimmed it - looks straight enough and the corners are square - LOL -

And wouldn't you know - I cut a corner on the binding when I trimmed it - CRAP! -
But it was on the inside/flange part -
So I was able to hide it in the inside when I mitered that corner - WHEW! -

Folded the binding to the front and stitched it down -
I used the same fabric as the backing for the binding -
The flange is the gold fabric that you see in the previous photos -

The binding is a little wider on the front than it is on the back - but that's OK -
The tulle is stitched down TWICE so I don't think the confetti is going anywhere -
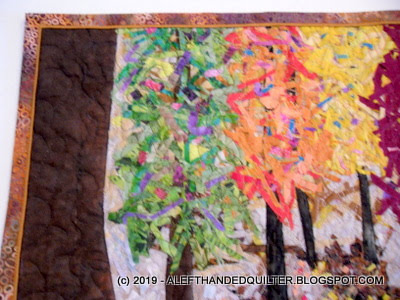
The top right corner is the one that I accidentally cut -
But it's hidden so you wouldn't know it was under there if I didn't tell you -


And - unfortunately - I lost that second little tree on the right - but I think it's worth it to have the tulle super-tacked down all the way around - next time I'll try not to put a tree that close to the edge - you can see a little of it peeking out from under the flange -

I LOVE the effect of the "falling leaves" -
MANY THANKS to Katie for the suggestion -
And to ALL of you who gave me some great input along the way -


Over-all - it doesn't look too bad for a first try - ;))
Now I have to make a label -
A Scrap Card - that should be fun - LOL -
A Heart for my Memory Quilt -
And work up a Scrapbook Page -
Then I can call it DONE - ;))
Talk to you later - gotta go - gotta sew -

5 comments:
When you hang it up, do all those bits stay in place? It makes a nice impressionist painting.
Beautiful! Love the flanged binding.
A lot of work, but worth it all, looks perfect!
Wow, even with the "oops" moments, it worked out great. Since it is a wall quilt (won't be washed) the cut binding is not an issue.
How do you feel about the flanged binding? Would you ever do it on a large quilt?
I think it looks great and all of the oops will never be seen. I have never done the flanged binding. I'm always in too much of a hurry to get the piece finished.
Post a Comment