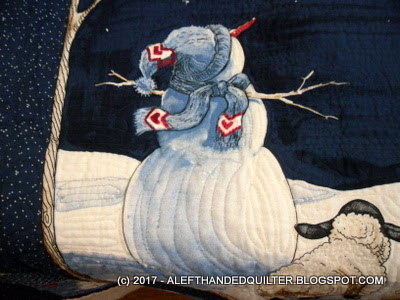
In the last few days I quilted the rest of "Do You See What I See?" -
And a little over half of my "Pinwheel Polka Dot" -
Quilting some "Lazy Eights" in the pink/green squares and side triangles -
I still have the pink/white squares to finish - ;))
I was on a roll and was going to try to finish it today and then see what else I could quilt before tomorrow. I have a bunch of labels already printed with "Quilted - 2017" - they don't say anything about being bound and labeled - so I was going to count them as a 2017 "finish" - haha - ;))
But then I thought -
Nah - I'll be good and change the labels to 2018. They've been "unquilted" and "unfinished" for this long - one more year isn't going to make any difference - and I don't really count them as "done" until I have them bound - labeled - the Scrap Card done - the Heart done - and my Scrapbook updated. I have some of the cards and hearts done - but the rest is too much to get done by midnight - so I'll just play with my FMQ and the new toys that Santa brought me - take the pressure off - and enjoy myself.
Tomorrow is a new day and a NEW YEAR -
Maybe I will be able to get some of my quilts "finished" in 2018 -
If not - there's always 2019 - ;))
HAPPY NEW YEAR!! - ;))
Talk to you later - gotta go - gotta sew -
For the past few years -
I have shared a beautiful Christmas Card -
That I received one year from a dear friend - ;))
It is one of the most beautiful Christmas Cards -
That I have ever seen -
So I wanted to share it with you -
Again this year - ;))
Please click - HERE -
And -
Have a Very Merry Christmas!! - ;))
Talk to you later - gotta go - gotta sew -
Jingle Bell -
Jingle Bell -
Jingle Bell -
Rock - ;))
===
Yeah, I know that I posted this last year -
But I couldn't resist posting it again -
Hope you don't mind - ;))
===
Merry Christmas!! - ;))
Talk to you later - gotta go - Santa’s coming -
On my last post - Cutting Squares and HST using the LEFT-EZE™ Rule - HERE -
There is a part where I said -
===
Now I have two squares with "wings" -
I could cut a HST using a 3-1/2" strip -
And attach it to the other side -
(The whole thing would finish at 3" - but I think that's TMI - ;))
===
How did I KNOW that a 3-1/2" strip would work???????
Because my handy-dandy super-duper LEFT-EZE™ Rule told me so - ;))
Let me explain -
I designed the LEFT-EZE™ Rule with horizontal lines every 1/2" -
The INCH lines are numbered while the 1/2" lines are not -
I thought that numbers on the 1/2" lines would just clutter up the design and make the ruler more confusing than it needed to be - too much information (TMI) -
I tried to keep it SIMPLE -
And thought that it is/was easy enough to figure out that the 3-1/2" line is the one HALF-WAY between the 3" line and the 4" line - ;))
Anyway -
After I made the two squares with "wings" -
I simply put the LEFT-EZE™ Rule on top of it -
With the black triangle tip at the top -
And the bottom of the "unit" on a line -
Then I marked the bottom of the "unit" and the line with a post-it note -
Removed the ruler -
And checked the line that was marked with the post-it note -
It was on the 3-1/2" line -
SO - if I used a pre-cut 3-1/2" strip - I could cut a HST from it - and it would fit perfectly! - ;))
Now I know that designers/pattern writers always talk in terms of "finished" unit size - and that's all well and good - because when they design a quilt they want to know how big the unit will be in the "finished" quilt -
But I get confused with "cut" size and "sewn" size and "finished" size -
And I don't really care about the "finished" size -
When I want to follow a pattern -
Or have a pile of strips that I want to use -
Because that is way too much information - TMI - ;))
All I want to know is -
What SIZE PRE-CUT STRIP do I want/need to make the unit?
I can use the SIZE CHART to find the finished size the designer/pattern writer is talking about -
And then to find the STRIP SIZE that I want/need -
Once I have that -
I'm good to go - ;))
All I need to do is gather my strips - and my ruler -
The strips are PRE-CUT -
And the LEFT-EZE™ Rule has numbers for the STRIP SIZE -
Because that's the only number that matters - ;))
I think sometimes SIMPLE is better - ;))
Talk to you later - gotta go - gotta sew -
Is simple - ;))
I started with some 2" pre-cut strips -
Trimmed the end to straighten the edge - this way -
Or I could do it this way -
Lining up the strip between ANY two parallel lines -
Cut a 2" square using the 2" mark on the LEFT-EZE™ Rule -
(It will finish at 1-1/2" - but I think that's TMI - ;)
Measured off another 2" square -
Until I ran out of strip -
Granted, it was a short strip - but I only wanted two - ;))
For the HST - I grabbed the other two 2" strips -
Layered them Right Sides Together (RST) -
To give me 2 HST that will be "mirror" images -
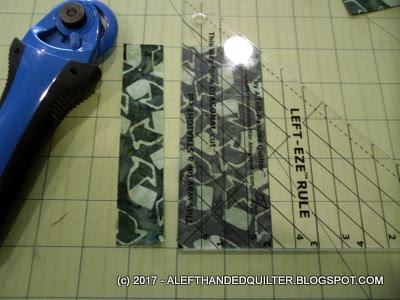
Trimmed the end -
Turned the strip around so that the trimmed end was on the RIGHT -
Lined up the LEFT-EZE™ Rule with the little black tip at the TOP of the strip -
And the BOTTOM of the strip on the 2" line -
Cut UP the LEFT side of the ruler - from bottom left to top right -
The black tip is a dog-ear that is automatically cut off because I used a strip -
Turned the ruler around with the black tip at the BOTTOM of the strip -
And the 2" line at the TOP of the strip -
Cut straight UP the LEFT side of the ruler -
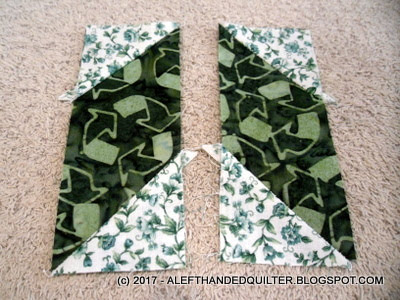
Opened them out with the "flat" ends in the middle -
And they can be "wings" for the 2" strip -
HINT - They will fit together automatically -
because I used the same size strip for both the squares and the HST - ;))
And - if I fold the left HST over onto the top of the square -
The flat top lines up with the edge of the square -
I turn them around when I go to sew them - so the flat tip is at the bottom -
The top lines up with the other end of the square -
And I prefer to sew from that end toward the flat tip -
Ran them through -
Pressed them open -
Time to add the other "wing" -
Fold it down on top of the square -
And the bottom of the HST lines up with the side of the square -
I turned it over to start sewing at the flat end of the square -
Ran those through -
Pressed them open -
Now I have two squares with "wings" -
I could cut a HST using a 3-1/2" strip -
And attach it to the other side -
(The whole thing would finish at 3" - but I think that's TMI - ;))
Or sew them together - ;))
And that's how I cut squares and HST using my handy-dandy super-duper
LEFT-EZE™ Rule - ;))
Talk to you later - gotta go - gotta sew -
I like to figure out if I can make "standard" units using my LEFT-EZE™ Rule - ;))
This time I wondered if I could make a Diamond in a Rectangle -
Using the LEFT-EZE™ Rule -
And the answer is -
YES, I CAN!!
I made a couple of 2" x 5" Diamond in a Rectangle to finish at 1-1/2" x 4-1/2" -
I could have used the LEFT-EZE™ Rule to cut 5" rectangles from a 2" strip -
Lining up the 5" line on the RIGHT edge of the fabric -
And cutting UP the LEFT side of the LEFT-EZE™ Rule -
But I wanted to see if I could use a pre-cut 5" charm square -
So I started with a 5" square of dark green and a 2" strip a little over 7" long -
I want/need two rectangles 2" x 5" - so I lined up the 2" line on the LEFT-EZE™ Rule on the edge of the fabric - using the lines on the mat and ruler to keep everything straight - you can see the tip of the ruler extending up at the top of the fabric -
Cut the first strip - 2" x 5" -
This time I lined up the bottom of the LEFT-EZE™ Rule with the bottom of the fabric - still using the lines on the mat and ruler to keep everything straight -
Cut the second strip 2" x 5" -
Now for the HST -
I used a 2" strip a little over 7" long -
I could cut them one at a time - but since I need "mirror" images - I can cut "both" the left and the right sides at the same time - if I fold the fabric right sides together -
So I folded the 2" strip - and needed to square up the end -
Which I did - using the Vertical lines on the LEFT-EZE™ Rule to keep it straight -
Trimmed off the left edge -
Turned it around so the cut edge is on the RIGHT -
To cut the HST - I lined up the RIGHT edge of the LEFT-EZE™ Rule with the RIGHT edge of the fabric - and with the little BLACK triangle on the TOP of the fabric - the bottom of the fabric will automatically line up with the 2" line - because I cut the strip 2" wide. The little BLACK triangle on the TOP is the dog-ear that is automatically cut off because I used a pre-cut strip - ;))
Cut UP the LEFT side of the LEFT-EZE™ Rule - from BOTTOM LEFT to TOP RIGHT -
Turned the ruler so that I could line up the RIGHT edge of the LEFT-EZE™ Rule with the RIGHT edge of the fabric with the little BLACK triangle on the BOTTOM of the fabric - the top of the fabric will automatically line up with the 2" line - because I cut the strip 2" wide -
Cut UP the LEFT side of the LEFT-EZE™ Rule - to get two sets of HST -
So now - for the Diamond in a Rectangle -
I took one set of HST and placed one on each end - RIGHT sides together - with the FLAT end of the HST lined up with the edge of the dark green rectangle -
I sewed the first set of HST to the rectangle - starting with the FLAT edge on the first one -
And the pointy end of the second one - because I need the "corner" to the right of the needle -
Because the 1/4" seam allowance is BUILT IN the LEFT-EZE™ Rule - the needle falls in the "groove" where the pointy end of the HST extends beyond the dark rectangle -
Both HST sewn on -
Pressed them open -
And got two "mirror" images - for one end of the rectangle -
Took the second set of HST - for the other end -
Which way to "orient" them? -
The same way the other one is - only WRONG SIDE UP -
Stitched those on the same way I did the first set -
All sewn on -
Pressed open -
TWO Diamond in a Rectangle - Mirror images -
And they measure 2" x 5" - which is the size of the original rectangle -
If I were making a bunch of them - I would probably set up an "assembly-line" where I could cut a bunch of rectangles from strips - and a bunch of HST "sets" - separate the HST into two piles - flat side on the LEFT - flat side on the RIGHT - then sew one pile on one end of a bunch of rectangles - then the other pile on the other end. Trim the dog ears and the corners as I went along - probably AFTER I pressed them open - just in case I had to re-sew them for some reason.
There are lots of different ways to do it -
Do whatever works for you - ;))
===
So -
Trim the dog ears -
And the extra fabric "behind" the corners -
And there you have it -
Diamond in a Rectangle using the LEFT-EZE™ Rule -
ONE ruler - AND - LEFT-Handed - ;))
Talk to you later - gotta go - gotta sew -