HAPPY HALLOWEEN!! -
This is the perfect day to -
And to dust off my broom - LOL - ;))
Talk to you later - gotta go - gotta sew -
So that's only half of a set completed today -

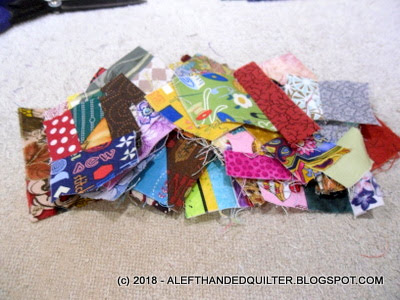
But I had a bunch more crumb "seeds" - here -
Sorted roughly by "size" -
And over here -
A semi-organized mess - LOL - ;))
So I got "in the zone" again for a while and ran them through the sewing machine one right after the other until I had a looooooooooong chain of bits -
Cut them apart - pressed them open - and made a pile -
I try not to put the same fabrics next to each other -
And I really don't worry too much about "color" or "contrast" -
I just try to get the pieces to match "size-wise" and sew them together -
Tomorrow I'll trim a little to straighten a side or two -
Try to match them up again "size-wise" - and do it again -
And again - and again -
Until they are "full-grown" - LOL - ;))
And in case you're wondering - I'm already thinking about my next one. Since there is obviously no chance of me running out of "crumbs" any time soon - I think my next one will have DARK BLUE alternate blocks - that might be pretty - ;))
Which reminds me -
The other ones that I made are still in the "Mountain to be Quilted". I have a bunch of backings to make - some basting to do - and a whole lot of FMQ to practice - so I better get moving -
Or I'll have to reprint all of the labels that say "2018" - LOL - ;))
Talk to you later - gotta go - gotta sew -
Some little itty-bitty 4-patches - in sets of 4 - with a few leftover "oddballs" -
for a scrappy pattern that I found on one of my favorite FREE pattern sites - AllPeopleQuilt - dot - com - that I'll tell you about later - it's a "mystery" - LOL - ;))
Then I finished Crumb Blocks - Set #9 -
Only 5 more sets to go - before I make the BIG blocks to "upsize"
my Deep Red Crumb Squares quilt top from a 4x4 layout to a 5x6 one -
After I cut this layer cake up -
Kaffe Fassett Collective for Free Spirit -
I told Frog Quilter - I have a layer cake that I'm going to cut up for another "Basic Math" quilt for a Quilty Hug for you. It's one that I got from Craftsy - "Kaffe" prints. I don't know what the big deal is with his "collection" - the colors are pretty - but they all have the same "value" - medium. There are very few if any "lights" or "darks". Anyway - the prints are HUGE - and the pattern is simple - so it should show them off pretty well.
As you can probably tell - I'm not a big fan - but it was on sale - so I got it to see what it looked like "in real life". And I don't like it when they "pink" the edges - these are supposed to be 10" squares and barely make it to the inch marks on my cutting mat - on top of the fact that some of them are crooked - you can see the "slant" on the top and bottom stripes -
From the other angle - the left and right ones are crooked. Not that I particularly care - but if I cut it "straight" - I'll be short - and if I cut it to the "size" I need - the pieces will look crooked which then makes my work look sloppy - so it's a "no win" situation. You'd think - for as much as they charge for these things - that they could at least cut them straight. OK - down off my soap box - at least for now - LOL - ;))
Like I said - the colors are pretty - but they all read as "medium" to me -
To prove it - I edited this photo to show in black/white - so that you could see what I mean - but - much to my surprise - there ARE various shades of gray - so I guess it's NOT all medium - and it IS just me - LOL - ;))
But then again - I took this photo a while back on a charcoal gray background fabric that was in my stash. A friend of mine put it in a photo editor for me and made it shades of gray. We agreed that most of the "Kaffe" is almost the same value as the charcoal - ;))
Either way - the colors are pretty - and the Basic Math pattern - Moda Bake Shop - Original Recipe - by Debbie Grifka - HERE - should show off the prints pretty well - and it will make someone a nice Quilty Hug - ;))
Talk to you later - gotta go - gotta sew -
Came from yesterday's crumb "seeds" -
They grew into quite a few blocks today - ;))
Set #5 -
Set #6 -
Set #7 -
Set #8 -
Only six more sets to go -
Then I can start making the BIG blocks - ;))
Talk to you later - gotta go - gotta sew -
But not quite there yet -
The blocks that I made over the past couple of days were "almost done" leftovers from my previous session - so it didn't take much time to finish them off -
This second batch is growing nicely -
But they still have a bit more to go -
Before they're ready for paper to check the size -
And to finish them off -
So they can join their friends - ;))
Today I got "in the zone" for a while and ran them through the sewing machine one right after the other until I had a looooooooooong chain of bits - cut them apart - pressed them open - trimmed a little to straighten one side - and did it again - and again - and again. It was "mindless" in a way - no real thinking was involved - but I didn't let my mind wander too far astray - because I don't dare lose it - LOL - ;))
Talk to you later - gotta go - gotta sew -
Set #3 is now complete -
Set #4 -
Crumb "seeds" at the sewing machine -
Growing nicely -
With some more "parts" ready to be added - ;))
It's not particularly fast -
But it is moving right along -
And it is fun - ;))
Talk to you later - gotta go - gotta sew -
To add to the two I made yesterday -
I usually pin them in sets of 5 or ten to help keep track of how many I have made - but I need 56 for this batch - or 14 sets of 4 -
So I figure it might be easier to pin them in sets of 4 -
And then when I get to 14 -
I can stop - LOL - ;))
So I'm on my third set of four -
And have a few pieces here -
And a LOT more pieces over there -
So I'm pretty sure that I have enough for 14 sets -
And then some - LOL - ;))
Talk to you later - gotta go - gotta sew -
Goes a long way - ;))
First - a couple of almost-done CRUMB blocks -
This one is a tad short -
I could add the Yellow to the top - but it's not quite long enough -
So I could add another little Orange piece to the end -
Or keep it simple and add a longer Purple strip instead -
I decided to keep it simple - I had other things to do - LOL -
And I didn't bother to sew it to the paper -
Just used the paper to see if the block was big enough -
And it was - so I trimmed it to size - ;))
Next up - I put this one in the corner -
And added a Blue piece to the lower right corner - sewing through the paper -
And came up short - UGH -
Oh, well - tore off the paper - un-sewed the blue piece -
Tried it again with another piece of paper and a different Blue scrap -
Finished it off -
And decided that it was easier to use the paper for a size guide - tear it off -
then trim the block to size -
So - two down - and time to try the KITE STRING block - ;))
Made one and die cut a couple of sets of "wings" -
Thinking that one would go on the RIGHT side -
And the other on the LEFT side -
Nope - it doesn't go THAT way -
It goes THIS way -
So what I thought were BOTH sides of the KITE - are NOT -
They are all the SAME side -
In order to get MIRROR images - I'll have to cut them in sets of two with RIGHT SIDES TOGETHER - the die instructions say to cut strips and then fanfold the fabric to cut pairs - I didn't fanfold - my mistake -
And NOW I know that - so I'm glad I tested it before I cut them ALL out - ;))
And as far as trimming the KITE piece BEFORE or AFTER tearing off the paper -
AFTER -
I decided it was easier to tear all the paper off first and then run it through the die cutter again - trying to trim it to match the paper was too tedious - each one needs SIX cuts because there are the obvious four sides AND two itty-bitty cuts on the pointy end - the notches needed to match the "wing" piece - ;))
I'll try some more tomorrow -
See if I can streamline my "system" - LOL - ;))
Talk to you later - gotta go - gotta sew -
Is about all I got done today -
With Monday comes another week's worth of chores to do -
So as long as I had my dies out -
I decided to cut some paper "guides" for my KITE STRING blocks and my "Crumb" blocks -
The KITE STRING blocks could always be sewn "string-to-string" and then die cut - but I think it might be easier if I sew the strings to a paper guide - since I have such a WIDE variety of strings and bits and pieces - I can tell at a glance if a scrap is long enough to be used -
For my "Crumb" blocks - I have a LOT of partial blocks and don't really want to sew the "inner" part to paper - too many little seams - but after they get to be about 2-3" on one side - I can use the paper to see what I need to "finish" them -
For both - I can let the fabric hang off the edges until I get the paper completely covered - and either trim them to the size of the paper and tear the paper off - or remove the paper first and die cut them again for "real" - I'll try it both ways - see if I like one way better than the other - it might be different depending on the block - you never know -
At least that's the PLAN -
We'll see if it works tomorrow - LOL - ;))
Talk to you later - gotta go - gotta sew -
I started sorting my scraps on 10/11 -
And emptied the BIG basket of NEUTRALS on 10/21 -
Eleven days -
And - believe it or not - it was a very FAST eleven days - ;))
When I started - I said -
So I'm going to try a different approach this time -
First - find the blocks/patterns that I want to make in the next couple of months -
Second - decide what color combinations I want to use -
Third - cut the scraps that I have in those COLORS to those SIZES this time -
I'll always have more scraps as I go along so I can always cut them in different sizes for different projects later -
First I thought I would cut some for some Wonder Blocks -
But I can always use FQ for those -
So I decided to use my dies and cut EVERYTHING into strips of various sizes -
I can use my LEFT-EZE™ Rule to make HST - QST - and Flying Geese -
They can be combined in hundreds of variations all from the same size strip -
I can make sets for more Upstairs/Downstairs blocks -
From the longer strips - ANY color combination will work for those -
And any shorter strips can be used for 4-patches and 9-patches -
I can match them to neutral strips and go from there -
The odd bits and pieces can be added to my "Crumb" collection -
Triangles and strings - are great "Crumb" block finishers - ;))
I'll always have jelly rolls and FQ and yardage for other projects -
It's the SCRAPS that I need to make work for me -
Maybe THIS time I can do it - LOL - ;))
I changed my approach a little as I went along - die cutting some pieces into 1" - 1-1/2" - and 2" strips - and sorting the rest into "crumbs" - "strings" - and larger chunks to be cut later - but keeping in mind some of the "projects" listed above -
So now - after all of my pressing and sorting and putting away of the various scrap strips and bits and pieces - I have this bunch of neutrals - "crumbs" and "strings" -
And these multi-colored "crumbs" and "strings" -
The pressing and sorting was the easy part -
The hard part is deciding what I'm going to DO with what I have - ;))
Because I already have the "crumbs" and "strings" out - I might as well start with them - start with the smaller pieces and work my way up to the larger chunks -
So - here's my list - subject to change due to Squirrel sightings - LOL -
- DEEP RED Crumb Squares - 56 more "crumb" blocks -
Use the "crumbs" - bits and pieces - triangles and short strips -
- NEUTRALS Crumb Squares - 120 blocks -
There are plenty of scraps to make a NEUTRAL version of the "crumb" pattern - use the "crumbs" - bits and pieces - triangles and short strips -
- NEUTRALS - STRING blocks
Use neutral strips not used in "crumb" blocks - longer and wider -
- BLUE - STRING blocks
Use Blue strings in separate bin in closet
- UPSTAIRS/DOWNSTAIRS blocks -
Use 2" die cut strips that are 12-13" or longer - any color -
- KITE STRING blocks - use die for paper foundation
Use any strip shorter than 12"
- ORANGE PEEL blocks - use die and larger chunks - color/neutral
Use 1-1/2" die cut strips for sashing and cornerstones - any length
That should use up a lot of what I have -
And keep me busy for a while - LOL - ;))
Talk to you later - gotta go - gotta sew -
I emptied the basket this afternoon -
I still have to die cut one pile - and put some "away" -
But the basket is EMPTY!! - ;))
I started by pulling out a big bag of muslin scraps that I'm not even going to bother to go through - and some oddball bits - that will all hit the trash -
I did pull these out and pressed them and added them to the SOLID basket -
Then rummaged through for the larger chunks -
Which left me with this -
The larger chunks sorted out nicely -
And I eventually got it down to one last box full of scraps to sort through -
Tomorrow I'll put them "away" in the various piles - and run the ones in the basket in front on the left though the strip die cutter - ;))
I had to smile when I pulled this one out - it's a scrap from a dress I made our daughter when she was in grade school - over forty years ago - ;))
I have a lot of NEUTRAL scraps - but they are not "standard" sizes - so I can't just use them in any old block - so the plan is to use them up like so -
- smaller bits and pieces - and shorter strips - perfect for "crumb" blocks -
- longer/wider strips - wonky and otherwise - perfect for "string" blocks -
Then I have some decisions to make -
- what blocks do I want to make
- what size do I want to make them
- what dies do I need to cut the strips/pieces
- what colors do I want to use for which blocks
Then the FUN part - going through the larger chunks - choosing the pieces to cut - and cutting them - and kitting them -
For the past week or so - I've been in pressing/sorting mode -
Now I can switch to cutting/kitting mode -
And then get those scraps into some pretty blocks -
And those blocks into some SCRAPPY quilts - ;))
Talk to you later - gotta go - gotta sew -