Is definitely in order - ;))
I don't remember the last time I updated my listing of UFOs/Projects/Squirrels -
Or updated my Scrapbook -
And checked to see if I had made all of my Hearts and Scrap Cards -
But I tend to do it sporadically -
In the meantime -
I put the remnants of projects in my little boxes for "later" -
And I think "later" is going to be this weekend -
Because it sure looks like I have a bunch of some sorting to do - LOL - ;))
Talk to you later - gotta go - gotta sew -
Ta Dah! - ;))
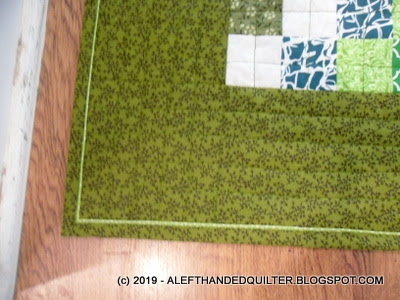
Christmas Blocks - 6x6 - Table Topper -

Close-up of the binding with the flange -
The scrappy back -
Oddball fat quarters and 1/4 yard cuts that don't really "go" with anything else were great for the scrappy back - now they have a home - LOL -
The narrow flange is a real nice touch -
And the label is on - ;))
I took the photo above before I added the label -
I like to sew around the outside edge of my labels using a blanket stitch and around the inside white area using a straight stitch - extra insurance so it doesn't come loose - and to flatten it out a bit -
And - since I used the same gold-colored thread in the bobbin that I used for the quilting - the label looks like another bit of quilting with a fancy decorative stitch - and isn't really that noticeable on the front - unless you're looking for it -
For a comparison of the two flange widths -
The one on the left is the Table Topper with the narrow flange cut at 1-3/4" -
The one on the right is the Table Runner with the wider flange cut at 2" -
The green on both is cut at 1-1/2" -
EDIT UPDATE -
I originally posted this at 1-1/4" - it was a typo - it SHOULD BE 1-1/2" - sorry - ;))
I thought at first that the narrow binding was TOO narrow so cut the wider one -
But I have since changed my mind - and now prefer the narrow one - ;))
Construction-wise - the flanged binding takes longer to make than plain binding - since you have two different colors cut at two different widths - and the join is separate for each - but it is MUCH easier to fold to the front and stitch in the ditch - you can see what you are doing -
The plain binding is faster to make - especially if you use straight seams - but it is more difficult for me to fold it to the back and HOPE that I catch it when I stitch in the ditch from the front - because I don't quite have the technique down yet - and I miss a lot of some spots - LOL -
Tomorrow I may try some "testing" to see if I can figure out what settings I need to make that plain binding - front to back - work for me - or not -
I may just go back to plain binding stitched to the back - folded to the front - and stitched down with a decorative blanket stitch - which is a combination of both - and much easier to see - LOL -
And continue to make the binding with the flange -
If I want something fancy - ;))
Talk to you later - gotta go - gotta sew -
I was looking forward to the long week-end with thoughts of going on a binding spree - now that I found a nifty new way to do it - HERE - ;))
I had three to play with and was going to start with the Christmas Blocks - 6x6 - Table Topper -
Friday -
I laid out the binding that I had already prepared -
And was short THIS much - LOL -
So I found the plastic bin with the left-over fabric -
And cut another strip of each color -
And decided - while I was at it -
To un-sew both sets - and add half a strip of each color to each set -
And re-cut the gold at 1-3/4" instead of 2" for the narrower flange - then re-sew them back together - using a diagonal seam instead of my usual straight one -
The second set is in the same colors for O Happy Christmas- which needs more quilting before it's ready to be bound - but getting the binding ready can't hurt -
And I have learned through the years to NEVER put fabric back in my stash until I am totally DONE with something - so the bin had exactly what I needed - ;))
And I found another use for my LEFT-EZE Rule™ -
It was perfect for trimming the binding where I joined the two strips -
I lined up the 1/4" line on the diagonal seam line from corner to corner - and trimmed at 1/4" -
Saturday -
I finished the binding for four projects -
And chose my thread colors to match -
Sunday -
I bound the FMQ Practice Piece -
The back -
The front -
The colors aren't true in this one -
The colors are more true in this one - and the binding looks pretty good -
It was a fun practice piece - with lots of not-so-good stitching - but it does have a certain "primitive" charm to it - LOL - and I can always look back at this one to see how much I have improved -
Monday -
I decided to try another method - with NO flange - HERE - and had trouble holding the folded edge under while I stitched in the ditch from the top - seems I can't walk and chew gum at the same time any more - so I decided to "cheat" and glue that sucker down on the back so that I didn't have to worry about it - LOL -
It worked especially well in the corners -
Five Stars Plus 5 is bound! -
The totally scrappy back -
Which is one my FAVORITE backs - almost as pretty as the front -
And the front -
I used straight seams when I pieced the scrappy binding - and the join at the end was also a straight seam - so unless I told you - it would be hard to tell which one was the final join - they all look alike - which is a nice effect -
The stitching from the front is in white and "in-the-ditch" - so it's hard to see - which is the whole point - LOL -
From the back - it's not my best work - but it's a learning curve - and I will definitely be trying it again -
I want to find the "sweet spot" where the binding should be sewn so it will fold over "just right" to make a uniform size on the back - so I can catch it with the stitching from the top - without having to glue it down - maybe next time - LOL -
Which leaves me with this one -
It's all trimmed and ready to go -
And it's the one I was going to do in the first place -
Before I got side-tracked -
How do I DO that? - LOL - ;))
Talk to you later - gotta go - gotta sew -
Yesterday I told some of my commenters that it was -
so nice to find another way to do something. I suppose I should check that pile to see which ones need binding - now that I have a nifty new way to do it - LOL - ;))
I checked the pile - and there were three that are ready for binding -
The others are not that far along - ;))
Of the three - binding with a flange is already made for this one -
Christmas Blocks - 6x6 - Table Topper -
A scrappy plain binding is made for the second -
Five Stars Plus 5 -
And no binding can be found for the third one -
So I'm guessing that I didn't make any - ;))
This one is/was a practice piece from years ago -
I tried some Free-Motion Quilting -
And I tried to follow the lines of a "wreath" stencil - poorly - but I tried - LOL -
A FMQ "feather" - a "stipple" stencil - and another one that will fit in a square -
I know it's only a practice piece - but it's full and might as well be bound and finished - if only to serve as proof that I HAVE improved - LOL - ;))
I found the plastic bin with the left-overs -
With a baggie with the Heart and Scrap Card -
And the label that I made when I thought I would get it quilted quickly -
As you can see - it's dated 2011 - so I guess I wasn't that quick - LOL -
In the bin were some left-over solid fabrics that I could use for binding -
The two on the left are not large enough unless I want to make a scrappy binding -
The two on the right are large enough to make a flanged binding like I did on the GREEN top -
The one on the left in the photo below is the same fabric as in the quilt -
The purple is not in the quilt - but it would give a little pop of color and separate the mauve/pink from the quilt itself -
So that's what I think I'll do -
Cut the new binding -
Try the new method a second time on this one -
Then bind the Christmas one with the flanged binding the same way -
After that one - I can decide whether or not I want to re-cut and re-sew the binding for Five Stars Plus 5 to include a flange -
Or try one of the other methods without the flange -
Lots of options -
And lots of PLAYTIME - LOL - ;))
Talk to you later - gotta go - gotta sew -
And DONE!! -
Ta Dah!! -;))
The colors are more "true" in this one -
And I really like that little touch of lime green -
Last time I told you that I found a YouTube channel by Jordan Fabrics - HERE - that shows a variety of binding methods. So I tried their version - #4 - Flange Binding -
I used this quilt as my "test piece" to see whether or not I liked the method -
And I DID - a LOT!! - ;))
The backing is pretty straight considering I couldn't see it when I layered it -
I used left-over fabric of the lime green dot fabric on the right for the "flange" and matched the top thread to that - per her suggestion -
And the corners mitered nicely -
But I didn't fold the corner the way she did -
I find it easier to fold the "bottom up" with my left hand - using my left index finger to make the miter fold in the corner - then fold the side of the binding over on top of it - and hold it all down with my right index finger as it goes under the needle - stop with the needle down in the corner - and pivot - the presser foot doesn't get caught in the fold because it is on TOP of it - if that makes sense - and continue down the next side -
And there was not a binding clip in sight - didn't need any - LOL -
I used the same thread color in the bobbin as I did with the quilting - so the line that doesn't quite match the "ditch" looks like another line of quilting -
And I won't tell if you won't - LOL -
As a test piece - I REALLY like this binding method -
It took me a while to join the ends - because I'm slow - but her technique resulted in the flattest join I have EVER done - so the time it took me to do it was time well spent - and you have to make the join anyway whether you stitch it by machine or by hand - so "flat" is more important to me than the time it takes -
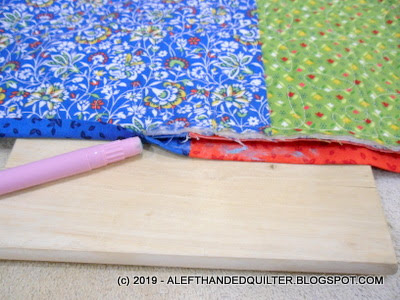
And the time she takes to flatten the seam with her fingernail (I used my wooden "pressing" stick) was also "worth it" - it made the fold-over to the top VERY easy - very smooth - and very flat -
All in all - I HIGHLY recommend this method -
If you want to do a binding entirely by machine -
And avoid all of the "hand-stitching" to the back -
For whatever reason -
Now I may actually bind those quilts in that pile over there - LOL - ;))
Talk to you later - gotta go - gotta sew -