The other day I had an email in my inbox from the Quilting Company with a link to an article about overcoming fuzzy quilt math - HERE -
It's a "sponsored" post -
January 28, 2019
Author: Guest Blogger -
The "Guest Blogger" turned out to be John Brady of Guidelines4Quilting™
===
He explains the "fuzzy math" problem very well -
The built-in error occurs when you’re cutting a square diagonally to make triangles.
And he explains how he designed some "extension bars" to solve the problem - ;))
I'm a math geek - so I thought it was a VERY interesting article -
And he makes some good points -
But I noticed a few things as I was reading along -
And I have a totally DIFFERENT solution to the problem - ;))
If your quilt pattern includes a quilt block with triangles, it also includes a built-in error. And it’s all because of your rotary cutter.
Hmmm - Not necessarily - the built-in error part - because of your rotary cutter.
I think it has more to do with the method used than the rotary cutter itself - ;))
You probably thought that if your triangles didn’t match perfectly with your squares, there must be something else going on—maybe you didn’t cut as accurately as you thought, or the problem was sewing them together on the bias.
Then he goes on to say -
As you may probably know, we are told to add 7/8″ to a square that will be cut in half for Half-Square Triangles, and 1¼” to a square that will be cut in quarters for Quarter-Square Triangles.
I agree that we are told to add 7/8" and 1-1/4" -
BUT -
Who says we all cut a square and then cut it in half for a HST? -
What if you cut a strip and want to cut a HST from that? -
Before rotary cutters, quilters just made templates (some of you may remember cutting shapes from empty cereal boxes). The only seam allowance measurement a quilter ever needed to know was a quarter inch. Making templates and cutting with scissors was tedious, but there was no complicated seam allowance math. You simply drew your triangle, and add(ed) a quarter inch all around.
Haha - that's EXACTLY what I did when I designed the LEFT-EZE™ Rule -
I drew a triangle and added a quarter inch all around - ;))
It was much faster to use a rotary cutter and ruler to cut squares and then cut them diagonally into Half- or Quarter-Square Triangles. But if you did that, you would obviously need to add more than the standard half-inch, because you needed the extra quarter inch on the diagonal edges as well.
Is it really faster to cut squares and then cut them diagonally into HST and QST? -
I know I do that when I'm cutting Side Triangles and Corners - but that's because they are so big - and I usually cut them oversized and trim them down later -
Sometimes I just have a bunch of strips that I want to use - and I want to cut HST and QST from them -
But I agree with the "you needed the extra quarter inch on the diagonal edges as well." -
The built-in error occurs when you’re cutting a square diagonally to make triangles.
So - don't cut squares diagonally to make triangles - problem solved - LOL - ;))
And - last but not least -
finished-size math.
I know pattern designers use "finished" size math - but I don't really care what the "finished" size is to start with. If I have some strips or "units" already sewn - all I want/need to know is what size cut square I can match to it - and if I subtract 1/2" for the seam allowances - that tells me the "finished" size -
What I really want to know is the "unfinished" unit size - OR -
Which bag of pre-cut strips do I pull for this project? - LOL - ;))
The built-in error occurs when you’re cutting a square diagonally to make triangles.
So - yes - there is fuzzy math if you cut a square first and then cut HST and QST -
Because of the rounding of the additional 7/8" and 1-1/4" -
BUT -
I said that I have a totally DIFFERENT solution to the problem - ;))
First - I don't cut a square diagonally to make triangles - I cut them from strips -
Second - I use a triangle ruler/template with the seam allowances built in -
And Third - I forget about the "finished" size - ;))
If you're trying to follow a pattern that gives "finished" size -
You can use the FREE SIZE CHART to figure out what size strip you need -
It even has columns for patterns that say to cut a square -
LEFT-EZE™ RULE - SIZE CHART - NO MATH REQUIRED
Easily find the STRIP WIDTH needed to make the size you want -;))
***NOTE - IF THE PATTERN SAYS TO CUT A SQUARE -
USE THIS COLUMN TO FIND THE STRIP SIZE YOU NEED
Or you can make something from the strips that you have already cut - ;))
In the olden days -
No fuzzy math -
You simply drew your triangle, and added a quarter inch all around.
Yep - that's what I did when I designed the LEFT-EZE™ Rule -
I did it the "old-fashioned" way - and it works quite well - ;))
I take two strips - right sides together - line up the ruler -
With the black tip on the top -
You can SEE the 1/4" seam allowance on the diagonal -
The same 1/4" is "built-in" on the side and bottom -
So you don't need to worry about it -
Make the second cut -
You can see the SAME 1/4" seam allowance on the diagonal -
And - sometimes - for some reason - my second cuts are a "smidge" too big -
So when that happens - I trim it now -
It saves me from having to trim the HST after it is sewn -
Sew it from the flat top side - 1/4" seam allowance -
The flat top is the dog-ear that is automatically cut off because I used a strip -
Press it open - and I have a perfect 2-1/2" HST -
That will match a 2-1/2" Square -
With NO Fuzzy Math - ;))
Doesn't get much easier than that -
And the same goes for - QST -
I use the same ruler to make perfect QST -
With NO Fuzzy Math - ;))
Talk to you later - gotta go - gotta sew -
I could stop right here -
And fill in some of the Side Triangles and Corners that I have cut -
But I had planned to make 25 Sampler Blocks -
So I think that I'll keep going - LOL - ;))
Block #26 - Two by Three -
Block #27 - 4-Patch Chain -
Block #28 - Rocky Road to California - Except that it isn't - LOL - ;))
I didn't notice until I linked to the other block -
That I have all of the 4-patches going the "wrong" way - oops -
Does that make it an original block - or a twisted variation? - ;))
Block #29 - Road to California -
Block #30 - Blue Chains -
So many ways to arrange the same units - just mix and match - ;))
I have easier blocks that I COULD make -
And I have more complicated blocks that I probably WILL make -
Or maybe I'll make a combination of both - don't know yet -
Lots of choices - ;))
This quilt is another version of the one already posted on the page/tab at the top -
LHQSQ - LHQ Sampler Quilt -
This is Version 2.0 - with only 25 blocks planned (not 99) -
And in a different colorway -
So -
Do you want/need the cutting/assembly instructions for these as I go along? -
Sometimes I make them in batches like this rather than one at a time -
And I could post how I do that - if you're interested -
Or do you want to follow the links to the original posts - and let it go at that? -
You can probably tell the units and sizes from the photos -
But if you want/need more information -
Let me know in the comments how much detail you would like to see - ;))
Talk to you later - gotta go - gotta sew -
For those of you who are anxious to see some blocks -
I have some units cut -
And I have them sorted for the blocks -
But they aren't sewn together yet -
I'll show you some photos -
When they are done - ;))
And for those eagle-eyes out there -
Yes - I DID say that I was going to make 25 Sampler Blocks -
These are some "Bonus" blocks that I was going to present at the end -
As alternatives to some of the other ones that you may not want to make -
And since I like to do things "backwards" -
I'm sewing them first - LOL - ;))
Talk to you later - gotta go - gotta sew -
Of my Quilt-Along LHQSQ 2.0 -
Left-Handed Quilter Sampler Quilt - Version 2.0 - ;))
Here are some of my sashed Border Blocks on the wall -
All of the Border Shell pieces are cut -
And all of the various "units" are made -
I didn't have room on this wall to put them ALL up there -
But this should give you an idea of what the Border Shell will look like -
These "units" will surround the Sampler Blocks in the middle -
For now - I took them off the wall and set them aside for later -
The ones in the basket will be used to "sash" the Sampler Blocks -
Friday I'll post Part 1 -
If you want to follow along -
Have you chosen your colors yet? - ;))
Talk to you later - gotta go - gotta sew -
In yet another pile - ;))
Talk to you later - gotta go - gotta sew -
Were added to the piles today - ;))
And - before you ask -
Yes - they are sashing strips - ;))
I'm playing with my Quilt-Along LHQSQ 2.0 -
But I can't show you yet -
It's not ready -
Right now -
It's a bunch of pieces -
In a bunch of piles - ;))
Talk to you later - gotta go - gotta sew -
Bit and pieces to play with -
I'll tell you more about them later -
But they're BLUE so that should give you a clue - LOL - ;))
Talk to you later - gotta go - gotta sew -
Of rows "stitched in the ditch" on Basic Math -
And a couple of letters stitched on O Happy Christmas -
And that's about all the sewing that I got done today - ;))
I spent most of my time writing up the cutting sequence and instructions for the Border Shell of my Quilt-Along LHQSQ 2.0 -
And that's not as easy as it sounds -
I'm so used to making it up as I go along -
And posting as I go -
I hope my explanation of "What I do" and "How I do it" makes sense to anyone who wants to "Quilt-Along" with me -
I certainly don't want to insult anyone's intelligence by "over-explaining" -
But on the other hand -
I don't want it to be confusing, either -
It has to be clear - concise - and concrete - LOL - ;))
Talk to you later - gotta go - gotta sew -
In EQ7 is a great way to waste spend a whole day - LOL - ;))
I played around with the layout and the yardage requirements -
And worked out a cutting sequence for my Quilt-Along LHQSQ 2.0 -
And then decided to write up ONE set of instructions for ONE size -
The 60" square version -
LHQSQ2-Version B
59.4" square - rounded up to 60"
6x6 on-point layout - 4x4 blocks with two rounds of border blocks
25 Sampler Blocks - 6" finished
36 Border Blocks - 6" finished
Yardage for the Gray areas - 3-1/4 - 3-1/2 yd
Yardage for the Beige/Sashes - 1-1/4 - 1-1/2 yd
If you want to make a smaller size - you can omit the outer row of border blocks -
If you want to make a larger size - you can add rows and/or columns and adjust accordingly - ;))
For this one -
I got some of the pieces cut -
And will give you all the details later when I write up the pattern/instructions -
But for now -
Here's part of the "Shell" up on the wall - ;))
Talk to you later - gotta go - gotta sew -
Basic Math is basted -
Finally - ;))
Talk to you later - gotta go - gotta sew -
Do I want to use in my Quilt-Along LHQSQ 2.0 - ? -
Hmmm - decisions - decisions - ;))
I started with this beautiful Cornflower Blue that I had in my stash -
For the Border Blocks - Side Triangles - and Corners -
Then found this Light Gray -
For the Sashing - Cornerstones -
The Sampler Blocks will need a variety of light/medium/dark -
In two or three color families -
So I added a Scrap Bag pack of 12 - 1/4 yd cuts -
The values range from light to medium -
Some blues and grays - with a couple of greens - yellows - lavenders - mixed in -
But that looked a little boring -
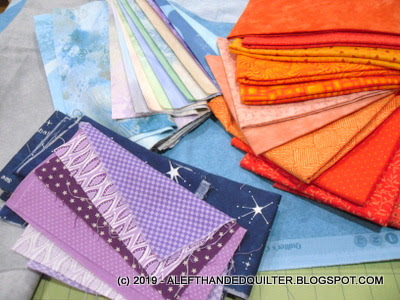
So I added some ORANGE - light/medium/dark -
And then some scraps of PURPLE - light/medium/dark - just because - ;))
And some NAVY BLUE - because I want/need some more darks in the mix -
Then I realized that I had an ORANGE jelly roll -.
With some light/medium/dark -
So I substituted that for my yardage -
And then I found a GRAY jelly roll - light/medium/dark -
And one with a variety of NEUTRALS -
Almost forgot about the NEUTRALS -
Added them to my box - and now I have this -
And that should get me started - LOL - ;))
This is WAAAAY more fabric than I need - but I want to use my LEFT-EZE™ Rule and 2-1/2" strips for most of the "units" - and the jelly rolls are already cut - LOL.
I may find scraps that I want to use, too - and I reserve the right to make changes as I go along - so anything is fair game - ;))
First I'll play with the Border Blocks - Side Triangles - and Corners -
Get them cut - and up on the wall -
Then play with the Sashing - Cornerstones -
I'll post the piece count - cutting sizes - and other details later -
So - while I play with that -
You can be thinking about the colors you want to use in your Sampler Quilt - ;))
By the way - I added a tab at the top of my blog - Quilt-Along LHQSQ 2.0 -
All of the posts for this Quilt-Along will be listed there so that you can find them easily -
And so that those of you who are doing this "slow" can do the parts you miss along the way -
This will be a VERY leisurely Quilt-Along - with NO pressure - NO stress - ;))
And - before you ask -
When am I going to post the next part? -
I don't know yet -
I have to DO it first -
And I'm a S-L-O-W P-O-K-E Quilter -
So take your time thinking about your colors and/or choosing your fabrics -
It may not be until late February or early March -
Depending on how quickly I can get my taxes out to my accountant -
And how long it takes me to get some of this put together - LOL - ;))
Talk to you later - gotta go - gotta sew -