Today I decided to sort and cut one set of strips -
For my Biggie Size Interweave -
And I took a bunch of photos as I went along -
So hopefully it will help those of you who want to make a larger version -
Of the pattern - Interweave - 48" x 56" -
Designed by Marlous Carter -
Timeless Treasures - Free Pattern - HERE - ===
The larger version should come out to about 52" x 72" -
My center strip came out to about 72" long -
So I think my math is "close
enough" - LOL - ;))
You will need to print out the pattern as written -
Since I don't want to plagiarize her instructions -
And the construction method is exactly the same -
Only the fabric requirements -
And cutting sizes and quantities are a bit different -
So -
Let's start at the beginning -
And I will recap it all at the end -
FABRIC REQUIREMENTS -
One 40-strip jelly roll with 40 different fabrics -
One MATCHING 40-square charm square pack with 40 different fabrics -
VERY IMPORTANT -
Make sure that each strip has a MATCHING charm square -
MATCHING -
Take one strip at a time and match it to its charm square -
I folded the strip over onto itself a couple of times -
And put it "inside" the charm square -
And made little piles -
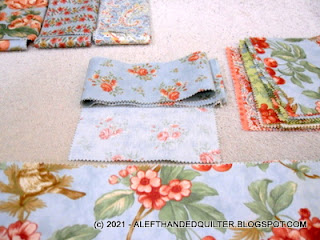
And laid them out - staggered - in two rows of 20 -
PAIRINGS -
I didn't "overthink" the pairings -
And separated the rows into two groups of ten -
One from the top row -
One from the bottom row -
Should work fine -
Same with this group on the right -
The only two that looked too "matchy-matchy" pattern-wise -
Were these two GREENS and BROWNS -
But it was an easy fix -
I just swapped the BROWN ones -
And put them back where they belonged -
Then picked up one from the top row -
And one from the bottom row -
For the "set" -
And made some piles -
Alternating "sets" horizontally and vertically -
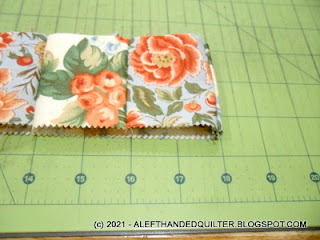
CUTTING -
Then I chose one pair as my "test" set -
I wanted to make sure that the charm square was "oriented" -
The same way the strip was -
So I found a "match" in the print -
To tell me which way the charm square should go -
You can see the group of flowers in the lower right of the charm square -
Are "oriented" the same way as the group of flowers in the strip -
Same with this one -
I found a flower and some leaves in the strip to match to the charm square -
And turned the charm square around to face the same direction -
These two strips are lined up at this end -
But the top one is shorter than the bottom one -
I took them to my cutting mat -
And BLUE one is 22-1/2" doubled - so 45" BEFORE I trim the selvage -
The WHITE one is 22" doubled - so 44" BEFORE I trim the selvage -
BOB thinks that the strips in a jelly roll should ALL be the same length -
But then again - it's probably just me - LOL -
Anyway -
And stacked them "right sides together" -
And cut FIVE squares at 2-1/2" x 2-1/2" -
Then I cut ONE section - 2-1/2" x 18-1/2" - to be used for the "ends" -
Which left me with two extra pieces that will be used for "borders" later -
Set those aside for now -
Then I put the charm squares "right sides together" -
And made a vertical cut down the middle - at 2-1/2" -
And another cut - horizontally - down the middle - at 2-1/2" -
Giving me FOUR more squares for the "checkerboard" center -
I stacked them up -
They are already matched -
And ready to sew -
NINE sets of squares -
SEWING -
Chain-piece the sets of squares -
I clipped them apart -
And laid out the ones cut from the charm pack - on the top row -
And the ones cut from the strips - in the middle row -
And put the "end" pieces in the bottom row -
My CDO said that the end piece would match nicely -
But it forgot that the BLUE end needs to be sewn to a WHITE square -
To make the "checkerboard" -
And has to go on the other end - LOL -
And the WHITE end goes next to a BLUE square at the beginning of the "strip" -
So I opened them all out -
And made sure that the WHITE patch was top -
As I ran them through the sewing machine -
So I wouldn't accidentally sew two of the same color together -
Laid them out as they were sewn -
And kept sewing the parts together -
Until I got one looooooooooooooooong strip -
Which I folded over -
So there are four layers -
And it measures about 72" -
The strip isn't pressed yet -
So the 72" is approximate -
===
RECAP -
===
FABRIC REQUIREMENTS - for a 52" x 72" top
One 40-strip jelly roll
One MATCHING - 40 piece charm pack
Sort the strips per the pattern - WITH the matching charm squares -
Keep the sets together throughout construction.
===
CUTTING -
HINT - You can stack one pair of strips together right sides together -
And cut two strips at a time -
From each strip (or matched pair) -
Cut FIVE - 2-1/2" squares (matched and ready to sew)
Cut ONE section 2-1/2" x 18-1/2" (separate them and use them for the "ends")
Set aside the remaining length of strip(s) - for the borders (mine were 12" & 13")
From each charm square (or matched pair) -
Cut FOUR - 2-1/2" squares -
OR - Stack the pair of charm squares together right sides together -
And make a vertical cut down the middle - @ 2-1/2" -
And then make a horizontal cut down the middle - @ 2-1/2" -
You will have FOUR squares matched and ready to sew -
===
SEWING -
Follow the pattern for block construction -
But sew NINE 2-1/2" squares alternately -
To make a checkerboard strip 2-1/2" x 36-1/2"
Add the end strips for a LONG strip 2-1/2" x 72-1/2"
Do not press the seams
Make the center portion per the pattern
===
BORDERS -
Sort the border strips into SIX piles of SIX strips - using 36 strips -
You will have FOUR left over -
They may be cut in half for EIGHT "extra" pieces -
To be added to the SIX piles of strips to make the borders longer if needed -
Sew each pile of strips - end to end - to make SIX long strips about 72" -
Sew THREE border strips together - make TWO sets -
Then sew ONE set to each side - per the pattern - and trim as needed -
The top should measure about 52" x 72" - give or take - LOL - ;))
===
If you have ANY questions about my "tweaks" -
Please don't hesitate to ask -
I think my math is correct -
Bu I could be wrong - LOL - ;))
Talk to you later - gotta go - gotta sew -