Well - I got as far as cutting the binding strips -
I really like the Susie's Magic Binding method that I mentioned in previous posts - little flange detail and sewn TOTALLY by machine - which is a HUGE plus since hand work is getting more difficult for me as time goes by - ;))
The "gold" will be the "accent" color - the backing fabric will be the outer binding color. I thought that it might be a "waste" of all that pretty gold fabric because you'll just see a tiny bit of it - but it didn't look quite right as the outer border color. That little bit of "gold" should be just enough to keep the border/binding from looking too plain - besides - it's been my stash for years - and it goes perfectly with this quilt top - might as well use - what else am I going to do with it? - ;))
Then I tried to find the instructions for Fast Finish Triangles - as an alternative to the traditional hanging sleeve - and I could have sworn that I found them originally on Ami Sims - Alzheimer's Quilt Initiative - website but I couldn't find a link - so I checked out YouTube and found these two videos -
#1 - How to Hang Small Quilts - It's Easy! - Heirloom Creations - HERE -
#2 - How to Hang Your Quilts with 3 Hand Stitches - HERE -
The first one is similar to the one I was looking for - and the second one is very clever - I might try that on some of my larger quilts -
And maybe tomorrow I'll get the binding strips sewn together -
And actually attached TO my quilt - ;))
Talk to you later - gotta go - gotta sew -
OK - so I changed my mind on how I wanted to quilt the border -
I decided against trying to free-motion a design that had to be all matchy-matchy - and evenly spaced - and all the same scale. Then I thumbed through some of my books on Free-Motion Quilting looking for ideas - I have hundreds of books - ;))
I found what I was looking for in Leah Day's book "365 Free-Motion Quilting Designs" -
Day #272 - Heart Confetti -
So I went to her site to watch her video tutorial - HERE -
Tried it out on the border -
And I LOVE it!! - ;))
I'm obviously not as good at it as she is - and I got a little carried away and started moving my fabric a little too fast so some of my stitches got longer that I like - and some of my "hearts" are not shaped very well - but I'm happy with it and will try to do better next time - ;))
Tomorrow I plan to make the binding - get that attached - and start playing with something else - ;))
Talk to you later - gotta go - gotta sew -
Didn't get any sewing done today - but I did play a bit with some stencils - trying to come up with a plan for quilting the border. I decided to try to free-motion quilt it - you won't be able to see the quilting much anyway - and I need the practice - but now I can't decide between "spirals" - like in the purple wedge here -
Or "lazy eights" - like in the purple logs here - ;))
Both will work going around the corners with minimal marking -
And both are VERY forgiving in size and shape and general allover "quiltiness" - ;))
What do you think? -
Any opinions? - ;))
Talk to you later - gotta go - gotta sew -
My June Wedding Sudoku seemed perfectly suited for some "Orange Peels" in the 9-patches - so I played with that today - and just love those curves -
The late afternoon sunlight shows the texture a little better -
And from the back -
It's not really as "orange" as it appears - but I suppose it would be sort of appropriate if it was -
A close-up -
And even closer -
My spacing definitely needs work - but overall you tend to see the texture first and not the uneven spacing and crooked lines. Since I gave it my best shot - I am going to ENJOY the imperfections and move on. It is not perfect - but it IS quilted - ;))
One thing I don't like about quilting the "white-on-white" fabrics that I used is that my needle (Topstitch - size 14) made little holes in the "paint" which are unsightly if you look close. I broke one needle and changed the needle twice when it started to skip stitches - they really didn't like the bulk in those corners - ;))
The borders are next - and should be fairly straight-forward - no "white-on-white" fabric or bulky corners to deal with - I just have to decide whether I want to try to find/use a stencil or if I want to try to do it free-motion - ;))
Stay tuned - ;))
Talk to you later - gotta go - gotta sew -
Because mine wasn't - ;((
The Blue Batik Placemats seemed to want just a "little bit more" quilting - so today I added some to the outer borders on the top and right side of each - and got less than an inch away from the corner with my "lazy eights" when I ran out of bobbin thread on the very first one. I usually check the bobbin before I start sewing/quilting - but for some reason I totally forgot this time. I put the seam ripper next to the last stitch so you could see how close I was - all I needed to do was make ONE more loop in that corner - and Murphy said "No" - "Not today" - ;))
The late afternoon sunlight streaming through the window shows off the texture in the top border of all eight placemats when I layered them on my cutting table -
I put some "pebbles" in the corners -
And continued down the right side - with some back and forth lines - and "lazy eights" in the last section -
All in all - they look pretty good to me - considering I'm just beginning - ;))
Tomorrow I want to play with my June Wedding Sudoku - try to quilt some "orange peel" curves in each little square. They finish at 1-1/2" - so it should be easy enough to eyeball the curves - but it probably wouldn't hurt to use white thread to hide my bloopers, huh? - ;))
Talk to you later - gotta go - gotta sew -
DESIGN WALL MONDAY -
Check out all of us who link up with Judy L. -
At Patchwork Times on Mondays.
We have some awesome stuff on our walls!
Well, THEY do - ME - not so much sometimes - ;))
===
On my wall today -
A few more "units" -
Not a lot to write home about - but even though there wasn't a lot of sewing going on this week - I DO have a few more than I had last week - so I am making SOME progress. Some new "color" arc pieces filled a few of the outer spots - now I need to make a few more "muslin" arc pieces to fill in more holes. If I switch back and forth - I should be able to stay on track. But before I actually sew them together - I want to make a whole bunch more so that I can really play with the layout and get the colors and prints mixed up nicely - ;))
In the meantime - practicing my Free-Motion quilting is going to be my top priority this week -
I need to get back to that - those quilt tops don't seem to be quilting themselves while I play with improving my curved-seam piecing skills -
Rats!! - ;))
Talk to you later - gotta go - gotta sew -
One little itsy-bitsy-teeny-weeny problem with having my design wall next to an open window -
Is that sometimes a little itsy-bitsy-teeny-weeny breeze will blow some of my carefully laid out "units" off the wall -
Good thing they didn't go too far - and landed on the table below it -
And good thing I have a super-duper blog photo to check to see how it was laid out before the breeze played with them -
But then again -
Maybe they were trying to tell me that they didn't want to go together that way -
Maybe - ;))
Talk to you later - gotta go - gotta sew -
A comment on my Design Wall Monday - 9/19/16 post mentioned that my changes might mess up the secondary design - and I wanted to show you that changes to the "inner" design don't really affect the secondary design because it only comes into play when the three "corner" units meet three more "corner" units in adjacent blocks - ;))
I took some extra units and three from the top corner of the one on the wall and filled in where four blocks would meet -
And then set the "inner" design back to the original layout -
So - as long as the three "corner" units stay in place -
The secondary design will work - ;))
Don't you just love those little "surprise" blocks when several blocks come together? - ;))
Talk to you later - gotta go - gotta sew -
DESIGN WALL MONDAY -
Check out all of us who link up with Judy L. -
At Patchwork Times on Mondays.
We have some awesome stuff on our walls!
Well, THEY do - ME - not so much sometimes - ;))
===
On my wall today -
Enough "units" to make a whole potential Drunkard's Path "block" - ;))
On my last post, Gene left a comment -
I see that one segment that is the wrong direction. But what if....(squirrel) .....what if you put all of the ones like it so the point is toward the circle? Would it make the center look more like a flower?
So - I tried his suggestion - and got this -
Then I went back to the "oops" one - and turned all of the same ones the same "wrong" way - and got this -
Oooh, the possibilities -
I'm sure there are many more -
But I think I'll stick with the original layout that has been on my "To Do" list for ages. It also has a little secondary block that comes together when you join several big blocks - you'll see that later when I get that far - or you can go back a couple of posts and check out the link to the "Quilt Index" where I found a similar quilt - ;))
I have realized/learned a lot playing with these little gems -
1. It actually takes me longer to "pin" them than it does to "sew" them - but it is time well spent because the pins keep the end part of the seam from skewing away from the presser foot - and that makes for a nicer seam and a "unit" closer to the size it's supposed to be. They're not all perfect but the majority of them are pretty dang close - and I'm good with that.
2. Because it seems like I can no longer walk and chew gum at the same time - it's easier for me to sew all of one "type" in one sewing session and the other "type" in another session. The two "types" being (1) the "color" quarter circle and the muslin arc piece and (2) the muslin quarter circle and the "color" arc piece. It's easier to get the correct one on "top" if I don't switch between the "types" - and just have to remember "color" or muslin. For some reason it's easier to tell color/muslin than it is shape - quarter circle/arc - probably less "thinking" involved - just "color" or not.
3. I need a LOT more variety - there are three of the same "pink" in this set - and some of the "colors" don't have much contrast with the muslin. I have to decide whether or not I'm OK with that and if I want to let some areas "blend".
4. It might be easier to sew them as sub-sets of 9-patches - then take four of them and rotate them so that they make a complete "center circle". That might save me from accidentally getting one or more going the wrong way. It should be easier to get 9 units oriented correctly than trying to get all 36 going the "correct" way.
5. I need to come up with a "pressing plan". I think I have one but I don't have enough "units" yet to see if it will work when I join two blocks. It seems to work on paper and in my head - but we all know that doesn't mean a thing - I need to try it in "real life" - on actual blocks.
6. This is not something that I can do "every" day. Some days my left-hand acts a little funky and doesn't have the fine motor coordination it takes for me to get pins where I want them - and other days it works just fine. Getting old is not for wimps! Anyway - along with my little "crumb" blocks - it should be a good project to play with while I get back to practicing my Free-Motion quilting. Since there is no deadline and I need over 500 "units" - it should keep me busy for a while.
What else? -
Oh, yeah - by the time I get done making over 500 of these -
I should be pretty good at it - ;))
Talk to you later - gotta go - gotta sew -
Some spots still need to be filled in -
But I'm working on it -
Here's a sneak peek of what I have so far -
The basic layout of one block - ;))
And now that I'm looking at this photo - I think the second one in the fourth row is going the wrong way - oops - gotta fix that - ;))
I found a bunch of scraps large enough for the "quarter circle" piece -
But it was slow going trying to find scraps big enough for the "arc" piece -
So I decided to raid my stash of 10" squares -
And cut a bunch more of each shape -
And now I have even more scraps for my "crumb" blocks -
Told you there was no danger of me ever running out of crumbs - ;))
Talk to you later - gotta go - gotta sew -
DESIGN WALL MONDAY -
Check out all of us who link up with Judy L. -
At Patchwork Times on Mondays.
We have some awesome stuff on our walls!
Well, THEY do - ME - not so much sometimes - ;))
===
On my wall today -
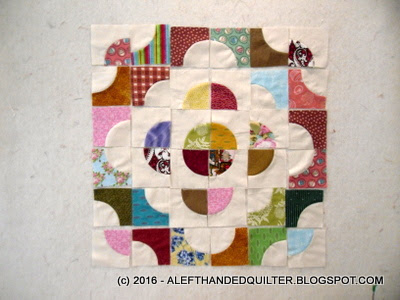
One quarter of a potential Drunkard's Path "block" - ;))

I don't have enough "units" yet to make a full "block" - and I don't have much variety at this stage - but I thought I would show you guys part of a "block". Each "block" has 36 "units" and will finish at 24" square. I won't need many "blocks" - but I will need a couple hundred "units" - ;))
The pattern is from an old book/magazine and I have NO idea which one. I have several hundred books and over 40 years worth of magazines - so who knows where I found it. All I have is a black/white copy of Page #48 with a picture of the "Around the World Quilt" - that tells me that "Step-by-step instructions for making this classic block design quilt begin on page 47." It doesn't tell me which book/magazine - so that doesn't help me locate the instructions or the pattern -
But who needs a pattern? -
I took the copy and counted the blocks - and the number of "units" in each block - and went from there -
And since I know that my die cut "units" will finish at 4" -
I can figure out how big it's going to be -
Easy, peasey - ;))
Then it dawned on me that I could do what any self-respecting computer owner would do - I could "Google" it - so I did - ;))
Most of what I found was about the "TRIP Around the World" Quilt - which is not the same thing. This quilt is a variation of the Drunkard's Path block with an unusual configuration. I finally found a similar one at The Quilt Index - HERE - made and quilted by -
Crowl, Bertha T. Clark. Drunkard's Path. 1976-1999. From Indiana State Museum, Indiana Quilt Registry Project. Published in The Quilt Index, http://www.quiltindex.org/basicdisplay.php?kid=68-104-1D1. Accessed: 09/12/2016
No pattern is given - and I'm not sure it's the same one - but it's close enough - and the year is about right. I've had that pattern on my "To Do List" for a LOOOOONG time - and that "Access" info is probably me - ;))
Oh, and I made another Scrap Card and Scrap Heart for
Bandit - The One-Eyed Cat -
I know it's not a quilt - but it's something that I made - so I'm adding it to my Memory Quilt anyway. And one of these days I have to figure out just what I'm going to do with all of those hearts that I have been accumulating -
I have a couple of ideas - but I need to settle on one - and just DO it - ;))
Talk to you later - gotta go - gotta sew -
Besides working on the Drunkard's Path blocks/units -
I've been busy making some Scrap Hearts for my Memory Quilt -
And Scrap Cards for my Scrapbook -
The Scrap Cards were already done on the Sudoku Quilts as my "cheat sheets" to make sure the Sudoku puzzle/solution had each of the nine fabrics in each block - so it was just a matter of making the Scrap Hearts to match -
June Wedding Sudoku -
July Americana Sudoku -
Halloween Sudoku -
Thanksgiving Sudoku -
But neither the Scrap Card nor the Scrap Heart had been made for these -
I Spy Quilt - DONE - the quilt was a "cheater panel print" - so the fabric samples are of those that I used for the backing - just enough to jog my memory so that I know which quilt they represent -
Christmas Embroidered Blocks - Table Runner & Table Topper - DONE -
Blue Batik Placemats - DONE -
Ladies -
Turkey Day -
I still have to make the backing - binding - sleeve - and label - for most of them -
And I still have to actually QUILT them -
But I got the Scrap Hearts and Scrap Cards DONE -
So I'm counting that as progress - ;))
Talk to you later - gotta go - gotta sew -
A couple more Drunkard's Path "units" made it to my design wall -
The "test" block/unit is set off to the side since the "quarter circle" piece is a white-on-white and not the soft muslin that I used in the others. And I took down all of the Gold/Muslin HST. I used a different muslin in the HST and after I made the rest of them - I set them all aside because I don't like the feel it - too stiff - so maybe they'll work in another project another day - ;))
Anyway, after I had cut all of the Drunkard's Path muslin pieces, I used my die to cut some pieces from scraps - all with that handy little notch in the middle -
I am NOT really that much of a pinner - one or two here and there - but unless I'm doing a long border - I usually just eyeball it. BUT this block is a little more fiddly and I'm not particularly fond of curved seams. And I know there's an AccuQuilt video of Eleanor Burns sewing this block without pins - but she's using the 7" die and mine is the 4-1/2" one (4" finished block). So - I decided that - for this project -
Pins are my friends - ;))
I layer the "quarter circle" piece on top of the "arc" piece - right sides together -
And pin the middle notch first -
Then I pin the top edge - both ways - horizontally and vertically - and because I'm Left-Handed - they look like this. (When I sew it - the vertical pin comes out of the top edge just to the left of the presser foot. I need that starting corner to be SQUARE for the first three or four stitches - then I pull those two pins out.)
The bottom edge gets the same treatment - pinned both ways - horizontally and vertically - and because I'm Left-Handed - they look like this.
The head of the vertical pin comes out at the bottom edge just to the left of where the presser foot will be. I need that bottom corner to be SQUARE for the last three or four stitches - and those two pins help me have something to "grab onto" when I get to the very end. I can press down on them and push the fabric a little to the right so that it is under the presser foot all the way to the end of the seam. I have tried a stiletto - and my cuticle stick - but the fabric always seems to slip out from under the presser foot and it messes up my pretty seam.
It takes a bit more time - since I'm doing them one at a time and not "chain piecing" them - although I probably could. The finished block/unit comes out pretty well -
It's supposed to measure 4-1/2" to finish at 4" - and it does - Yay, me!! - ;))
The non-muslin pieces are being cut from scraps - and one of my all-time favorites is Mrs. Clause sitting at her sewing machine. I'll have to make sure she's sitting up straight in her "block" - when I get there - ;))
Talk to you later - gotta go - gotta sew -
DESIGN WALL MONDAY -
Check out all of us who link up with Judy L. -
At Patchwork Times on Mondays.
We have some awesome stuff on our walls!
Well, THEY do - ME - not so much sometimes - ;))
===
On my wall today -
A Drunkard's Path block - from last week -
And some new Gold/Muslin HST -
They're not sewn together in "pinwheels" -
They're just up on the design wall that way - ;))
These are for another scrap quilt that I have wanted to make for quite a while. I like scrap quilts that have one CONSTANT to play against all of the scraps - and these HST will be the CONSTANT. I used one of my dies and it would have gone much more quickly if I had clean cuts - but as you can see - there were some threads that had to be clipped -
So I tried fewer layers (4 instead of 6) - and that didn't help -
But I figure I still saved some time because I layered the Gold and muslin - right sides together - and got 4 HST with each layer set - AND the accuracy is great - AND the dogears are clipped for me - ;))
A little time spent clipping threads sure beats having to rotary cut 120 pairs -
AND then having to trim the dogears - ;))
Oh, and I finished deconstructing a bunch of Ties -
I have to apply some fusible interfacing to stabilize them -
Then I think I'll make some String Blocks -
Those are easy and should turn out nicely - ;))
And I spent some time adding photos to my Quilt Journal page/tab and my UFOs/Projects/Squirrels page/tab. Go take a look and check them out when you get a chance - I still have quite a few more to go - but first I have to find them in the "Archives" and although they are in "date" order - I didn't take the photos in any particular order - so I'm adding them as I find them - ;))
They do make the pages prettier, though -
I think photos always make pages and posts pretty -
Don't you? - ;))
Talk to you later - gotta go - gotta sew -