Monday, November 30, 2020

First off -


I have to say that I finished sewing - 
 
All of the "units" for my Pink/Orange Squirrel -

 
And I WON a little game of "Bobbin Thread Chicken" -
 
That little bit was all I had left on the bobbin - 
 
When I finished the last HST -  YAY - ;))
 
 
This Squirrel isn't going to be anything fancy -
 
Just a Missouri Star Quilt Co. version of a Churn Dash - HERE
 
The white combined with the bright colors should calm them down -
 
Plus it also helps the charm packs make more blocks - LOL - ;))

Jenny uses a layer cake -
 
But it works with charm packs, too -
 
If you can get 4 squares of the same or similar print - 

So the next step was to trim all of the HST down to 4-1/2" - 

Trimming is not my favorite pasttime - 

I much prefer to use my LEFT-EZE™ Rule to cut HST - then trim ONE dog-ear - 

And I don't like drawing lines and sewing to the left and right of the lines - 
 
But to each his/her own - 

Anyway - 

I trimmed up a couple - 
 
And liked getting the chance to get rid of some of those "pinked" edges - 

But I wondered if there was an easier way than to cut each one twice - 

Up the left side and across the top - 
 
Rotate the HST and do it again up the other side and across the top -
 
 
I wondered if I could trim BOTH sides at the same time - 

Maybe if I folded it back up the way it was sewn? - 

But what do I use for the "line" to line up with the HST? -

 
What if I could use my LEFT-EZE™ Rule to do it?

That would be cool - 

So I tried it - 
 
I used a HST that I had trimmed already - 

Lined up my LEFT-EZE™ Rule with the HST - 
 
And used another ruler and a Sharpie to mark my "guideline"- 

A "smidge" to the outside of the HST to allow for the width of the line -
 

The mark can be removed very easily with an alcohol wipe - 
But I should have put it on the TOP of the ruler -
So I wouldn't accidentally remove any of the "real" lines - LOL - 


Tried it on another one -
 
Putting the NEW LINE - ON the edge of the HST - so I don't come up short -


Trimmed UP and ACROSS - ONCE -
 
 
And it worked - 

Except for the two dog-ears that still need to be trimmed - 

But those just need to be snipped - so no biggie - 

 
And - YES - I realize that I could have marked the same line on the Square ruler - 

But that wouldn't have been nearly as much fun -
 
Because I like trying to find new uses for my nifty little ruler - LOL -

So - after a while - I had them all trimmed - 

 
And I put the "units" for a couple of them up on the design wall - 
 
One "positive" with the WHITE as background - 
 
And one "negative" with the WHITE as the Churn Dash - 
 
I haven't decided yet if I want to make one version or the other or both - 

 
And then I added a "center" to each one - 
 

The "centers" are really colorful - 
 
So I'm leaning toward making the "positive" version - 
 
I think I need that WHITE background in each block to tone them down a bit - 

What do you think? - 

Let me know in the comments - 

Thanks!! - ;))


Talk to you later - gotta go - gotta sew - 


Sunday, November 29, 2020

Moving along -


Slowly - but I'm still moving - ;))


There are only a few Pink/Orange Squirrel parts - 
 
Left on the cookie sheet - 
 
So - I'm getting there - LOL - ;))


Talk to you later - gotta go - gotta sew - 


Saturday, November 28, 2020

And a few more -


 Of these - 


To add to the ones from a couple of weeks ago - HERE -
 
Is making a nice dent in the ones that were on the cookie sheet - 

 
These guys are going to be the "centers" - 
 
When I get that far - 

 
This one doesn't have a "real" name yet - 

I just think of it as my Pink/Orange Squirrel - LOL - ;))


Talk to you later - gotta go - gotta sew - 


Friday, November 27, 2020

Happy Accident -


This post will consolidate a bunch of other ones - 
 
And try to show/explain my "layout formula" - 
 
For my Upstairs/Downstairs quilt tops - 
 
Using Upstairs/Downstairs - Meredith as my example - 
 
The original post for this one is - HERE
 
And I'm going to "borrow" parts of it - 
 
So that I don't have to "reinvent the wheel" - LOL - 

===
 
The "inspiration" for this top comes from a video/tutorial I saw on YouTube -  
 
Missouri Star Quilt Company - calls it - Crossing Paths - HERE -

but I never remember that name until I go to add the link - LOL -


It's one of my favorite - no-brainer patterns -

I'm going to tweak it to use one jelly roll - 40 strips -

Since there are two each of 20 different prints -

And I need sets of 5 -

It was easy enough to peel them off 8 at a time -

And make 5 piles -

The top two in each stack will make the first two strata -


The next two in each stack will be the next two strata -


The next two -


And the last two -


I'm playing with the first sets of strata -


And the rest are waiting their turn -


If my MATH is correct -

Each 5-strip strata should give me three 10" blocks -

So -

One jelly roll - 40 strips -
Strata in sets of 5 = 8 strata -
8 strata x 3 blocks/strata = 24 blocks total -
4 x 6 layout -
Approximately 40" x 60" -

Or I could use both jelly rolls - 80 strips -
Strata in sets of 5 = 16 strata -
16 strata x 3 blocks/strata = 48 blocks total -
6 x 8 layout -
Approximately 60" x 80" - 
 
===
 
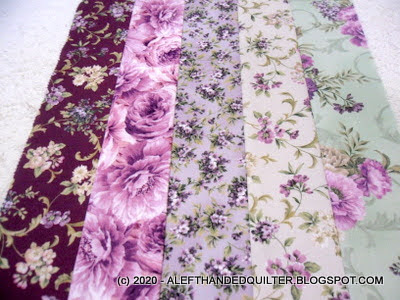
I wound up using 2 identical jelly rolls - with 40 strips in each one -
All of the fabrics were "doubles" - so 2 each of 20 fabrics in each roll -
 
I split the first roll like I showed above - 
 
The second roll was also split into five piles of 8 strips each -
But the strips in each pile were mixed up a little to give me some variety -
 
ALL of the strata were sewn in the same order - 
PURPLE #1 - PURPLE #2 - Strip #3 - Strip #4 - Strip #5 - 
 
The PURPLE top strip will be the MAIN DIAGONAL in ALL of the blocks -
And ALL of the strata should shade from dark to light - 
Those are key to making this whole thing work -
I broke my own "rule" with the dark green being Strip #5 in the last strata -
But it worked out - so don't stress about it too much - it will be fine - LOL -
 
 
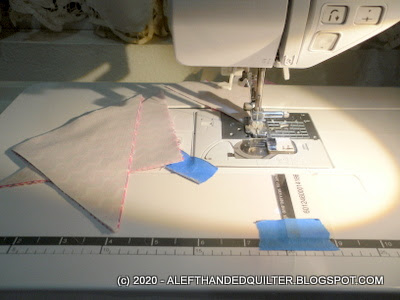
I sewed all 16 strata - and cut the segments - 


And made the blocks - 6 identical blocks in 8 different variations - 


I put the blocks up on the design wall in DIAGONAL rows as I finished each "set" of 6 blocks - in a stair-step sequence - just like the blocks - with the blocks in each row oriented in the same direction - going either UP or DOWN - because it was easy - and I could see the pretty colors -

When I finished all of the blocks - I rearranged them for what seemed like f.o.r.e.v.e.r. playing with the layout - trying to get the colors/value balanced -
 
I could have kept futzing with it - but I didn't like what I was seeing - and I was getting frustrated - there HAD to be an easier way -
 
So - I took them all down - and started over -  
 
Then I put them back up on the design wall -
 
Pretty much the same way I had them in the first place - stair-stepped -
 
Because I thought they looked "pretty" that way -
 
Which is kind of funny to me now that I think about it -
 
I "accidentally" had it right in the first place - LOL - 
 
One of those "Happy Accidents" that make life so much fun!! -
 
So - my "layout formula" is to use a stair-step sequence - just like in the blocks - 
 
And alternate one diagonal row UP - and the next one DOWN - 
 
It's so simple - it makes me wonder why it took me so long to figure it out - LOL - ;))

Anyway -

The top is made using 48 blocks - 6 rows across and 8 down - 
So ALL 6 blocks in the first THREE diagonal rows fit across the top in ONE diagonal row -
Rows #4-5-6-7-8 will be split up - you'll see later - ;))  

In the photo below - the first "column" has two blocks - alternating UP and DOWN -

Step 1 - Choose the SECOND Block in Column One -
Decide which block(s) you want for the SECOND DIAGONAL row -
That row is the MOST DOMINANT one in the whole top - and the most critical -
So I chose the "prettiest" PURPLE print for that row - and it goes DOWNstairs -


Step 2 - Choose the TOP LEFT Block -
Decide which block(s) you want for the FIRST DIAGONAL row -
The row ABOVE the one you did in Step 1 - 
The dominant diagonal in this row goes in the other direction - UPstairs -
So it's effect is a tad bit different - and all 6 blocks fit across the width of the top -
I chose the next "prettiest" PURPLE for that one -

Step 3 - Choose the First Block in the Second Column - 
Because of the stair-step nature of this pattern - 
This will also be the last block in the first column -
It goes DOWNstairs like Row #2 - so I chose a pretty one for that, too - 


Then I chose the blocks for the rest of the rows -
Remembering to alternate them UP and DOWN -
And paying attention to where I put the dark GREENS -
I didn't want them too close together -


Once the blocks are chosen for the first column -
I number them - 1-2-3-4-5-6-7-8- 
And take them down off the wall - one set at a time - keeping all 6 blocks together - 

Then I lay them all out - and double check the block orientation -
#1 - 3 - 5 - 7 go UPstairs - so they should be turned a quarter-turn to the right -
#2 - 4 - 6 - 8 go DOWNstairs - so the diagonal goes from top left to bottom right -


NOTE - 
This top is designed in DIAGONAL rows - 
But is constructed in HORIZONTAL/VERTICAL rows - 
 
Because of the way I "web" it - HERE
I can lay out my eight piles of numbered blocks - 
And pick up the ones I need - in order - for each HORIZONTAL row -
 
The HORIZONTAL block sequence  is -
 
Row #1 - left to right - 1-8-7-6-5-4 -
Row #2 - left to right - 2-1-8-7-6-5 - 
Row #3 - left to right - 3-2-1-8-7-6 - 
Row #4 - left to right - 4-3-2-1-8-7 - 
Row #5 - left to right - 5-4-3-2-1-8 - 
Row #6 - left to right - 6-5-4-3-2-1 - 
Row #7 - left to right - 7-6-5-4-3-2
Row #8 - left to right - 8-7-6-5-4-3 - 
 
Of course, you can also web it in columns - just follow the chart - 
 
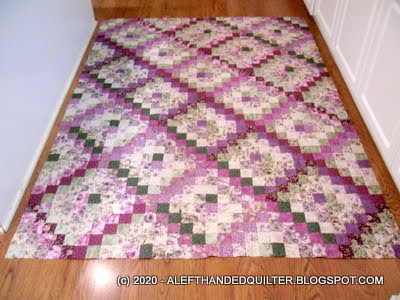
Sew it together - and get this -
 
 
The dominant diagonals give it structure - 
 
And the six matching blocks in each set give it a nice balance of colors/values -
 
Three of the diagonal rows are complete - and the other rows are split -
 
Part in the bottom left corner - and part in the top right corner -
 
Automatically balancing the colors/values throughout the quilt top - 
 
Lots of "bang" for very little "buck" - LOL -  
 
So - the "formula" worked on this one - 
 
And it worked on Gleaned
 
I chose the prettiest ORANGE for the SECOND diagonal row - 
And put the second ORANGE in Row #6 - 
The light WHITE patches really stood out to me - so to balance them out -
I had one WHITE block go UP - in the FIRST diagonal row - 
And one WHITE block go DOWN - in Row #4 - 


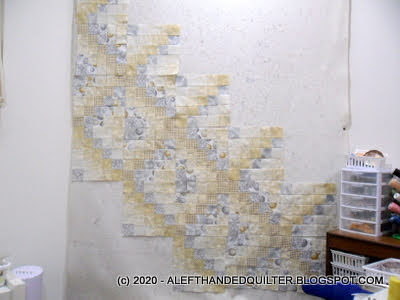
And it worked on Winter's Graudeur
 
I used the "medium gold" in Rows #1 - 4 - 7 -
The rest had the "checkered" print as the MAIN diagonal -  
And because they "all looked alike" it didn't matter which set went where - LOL - 


The layout is a stair-step sequence - just like in the blocks - 
 
And it works like "magic" -  LOL - ;))


Talk to you later - gotta go - gotta sew - 


Thursday, November 26, 2020

Happy Thanksgiving - 2020 -


 Happy Thanksgiving!! - ;))


Today is Turkey Day in the U.S.A. -

And a day to Give Thanks! -

And I DO! - ;))

I'm thankful for SO many things -

My family - my friends - my neighbors - my readers/followers/fans -

My stash - my sewing machines - my toys -

And SO much more! - ;))

Here's hoping that you have a very nice Turkey Day with your family! -

And have plenty of leftovers! - ;))


Talk to you later - gotta go - gotta sew -


Wednesday, November 25, 2020

More strata sorting -


The other day - Linda - asked me to show how I sort the strips -
 
For my Upstairs/Downstairs tops - 
 
So I did a post on how I sorted a basic roll of 20 strips - 
 
And said that I'd give you more examples of strata sorting - 
 
From some of my recent projects -
 
Before I showed/explained the "layout formula" I use - ;))
 
===
 
The "inspiration" for these quilts comes from - 
 
Missouri Star Quilt Company - Crossing Paths - HERE
 
I took their basic idea and tweaked it a little to suit me -
 
I made a couple of tops - using their 5 x 6 layout - HERE - and HERE
 
But I like my 6 x 8 layout better -

It's slightly larger - and much more symmetrical -
 
With the EVEN number of rows and column -  
 
So - for a 6 x 8 layout - 48 blocks - 60" x 80" - 
 
I need 80 strips - 2 identical 40-strip rolls - or 4 identical 20-strip rolls - ;))
 
===
 
My first example is my most recent one - Winter's Grandeur
 
These two identical jelly rolls had 40 strips each -
 
But only 9 different fabrics - 
 
One "Christmas ball" print - 
Two different "silver" prints - but VERY similar in color/value - 
One "white" one -
Three "light gold" fabrics that were VERY similar in color/value/pattern -
One "medium gold" print - 
One "checkered" print - 

Not a lot of variety -


But I had 5 "checkered" strips and 3 "medium gold" ones in each roll -
 
So I used those for my MAIN DIAGONAL - 
 
For my 8 DIFFERENT block combinations - 

And mixed the rest of the fabrics up the best I could - 


And when I sewed the strata and made the blocks - 
 
They all looked alike to me - 


There were differences - but they were VERY subtle - 
 
And I thought - for sure - this was going to be a disaster - 

So I grit my teeth - and numbered the block sets 1-2-3-4-5-6-7-8 - 

I wanted to try to space out the 5 "checkered" block sets - 

And mix in the 3 "gold" ones - here and there - 
 
So I numbered the "gold" sets - #1 - #4 - and #7 - 
 
The rest were the "checkered" ones - 
 
And since all of those looked alike - LOL - 
 
I just put them up on the wall -

According to my "formula" - which I will explain later -


And it worked -
 
Much to my surprise - 
 
This was the THIRD time my "formula" worked -
 
I think I might be on to something - LOL - ;))


My second example is Gleaned -
 
The one I made before Winter's Grandeur
 
I had a similar experience where I loved the colors in the jelly roll - 

But I had no idea whether or not it would work -

I had two identical jelly rolls - 40 strips each - 

Most of the fabrics were "doubles" but a few were "singles" 

Since I had two rolls - the "singles" quickly became "doubles" - LOL - 


Anyway - I wasn't sure -
 
But I thought I could/would sort them similar to the way I did when I made my Meredith quilt top - just to see what happened - 

I needed EIGHT DIFFERENT block combinations -
 
Each with a DOMINANT MAIN diagonal - 
 
So I chose the darkest strips for those - 
 
Two ORANGE - 
Two GRAY/ORANGE - 
Two BROWN - 
Two GREEN - 
 
But later swapped out the GRAY/ORANGE for the BLACK/WHITE -
the last one on the right in the top row - 


I sorted the strips for the strata - 
 
More or less so they looked "pretty" -
 
And tried to shade them from dark to light - 


Then sewed two sets of each - 


The blocks came out OK - 
 
I had 6 matching blocks in 8 different combinations - 
 
But I wasn't that thrilled with any of them - 
 
And I had NO IDEA what the end result would look like - 


I showed/explained how I laid out the blocks in this post - HERE

And I can honestly say - 

I was pleasantly surprised that it turned out so well -

And began to think that my "formula" was kind of cool - ;))


I was going to explain the "formula" - 
 
Step-by-step - using Meredith as the example - 


I have photos of most of the steps on that one - 
 
But this post is getting a little too long - 
 
And I'm getting tired - 
 
So - I'll do a "layout" one tomorrow or the next day - 
 
Depending on how long it takes me to write it up - 
 
I know you don't like "cliff-hangers" - 
 
But hopefully - it will be worth the wait -
 
Or maybe - it will be too much information -
 
Either way - it will help me "document" how I do it - LOL - ;))


Talk to you later - gotta go - gotta sew - 


LinkWithin

Related Posts Plugin for WordPress, Blogger...