Friday, September 30, 2022

Before -


I loaded the batting and the top of the quilt - 
 
For my Upstairs/Downstairs - Wild Things
 
I thought I would make something to hang under the frame - 
 
To help keep everything off the floor - 
 
And to help me not accidentally roll my chair over it - LOL - 
 
Something similar to the "basket" that I saw in the video - HERE -  
 
So I found some muslin in my stash - 
 
And laid it out on the table inserts - 
 
To see how long I needed to make it - 
 
I'll try to rig up something tomorrow - 


In other news - 

Buja is a thief - LOL - 
 
My daughter found this outside by the patio - 

 
And Buja stole it from the vase full of pot pourri on the buffet - 
 
After she knocked it over - 


Some of you might recognize the picture as being this puzzle -
 
That my Grandson #1 helped me mount with some backing - 


And Buja may be a thief - 

But she's cute -


And she likes my new frame - LOL - ;))


Talk to you later - gotta go - gotta sew -

Thursday, September 29, 2022

Loading -


A quilt backing on a longarm - 
 
For the first time - 
 
Is an adventure! - LOL -
 
And that's as far as I got today - 

We did a "quick and dirty" attachment of the leader cloths and the backing - 

Last night before the dealer left - 

So today I tweaked it a little - 

Starting with re-centering the leader cloths with the center of the frame - 

Since the frame can be configured in either the Crib size or Queen size - 
 
Both rails connect in the middle - 
 
So I used the space/gap between the two rails as my center marking - 

And tried to line up the center-most straight line of the leader cloth with it - 
(BOB thinks that would be easier to do -
If the line extended to the edge of the leader cloth - 
and if it matched up to one of the dots -
but then again - it's probably just me - LOL - ;))


I re-attached the leader cloths to the rails using the velcro that came with it - 
(BOB thinks that the velcro on the leader cloths AND on the rails - 
Is an AWESOME feature -
And it beats trying to stick some tubing in a groove - just sayin' - ;))

Starting in the center and working my way out to the end on each side - 
Pressing down as I went - SO EASY!! - 
If it got a little crooked - I peeled it off - and stuck it down straighter - LOL - 
 
I had already zippered the backing in place last night - 
But I didn't get a chance to take photos - 
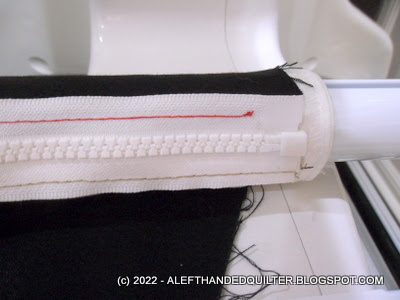
So here is the LEFT end - of the TOP of my BACKING - 
 
 
I was going to link to the videos on how to use the zippers - 
But then I realized that you could find those on your own - 
And that they would just be confusing anyway - 
Because I did mine BACKWARDS - 
 
I had a hard time wrapping my head around which half went where - 
So I had to sketch it out - 
Then I had my "DUH" moment - 
 
I put the sketch at the bottom of this post -
And will explain it there - if you're interested - 
If not - you can skip that part - 
 
Basically I did not want to pay for the expensive "stamped" zippers - 
Or pay the price for "longarm" zippers - HERE -
So I got some separating "tent" zippers instead - HERE
And I got two for the price of one -
 
Then I basted one half to the leader -
And the other half to the top of the backing - wrong side up - 
With the zipper pull at the LEFT end -
 
 
And the zipper STOP at the RIGHT end - 
Which is the BACKWARDS part - 
 
To zip it ON -
I run the zipper pull all the way to the RIGHT end - stick in the end -
And zip it up with my LEFT hand - pulling to the LEFT - 
 
I figured I needed more control zipping it ON -
Than I did zipping it OFF - that I can do RIGHT-handed -
 
 
Anyway -
This is what it looks like from the backside - 
As it gets rolled up on the take-up bar - 


I also had basted one half to the leader on the front rail -
And the other half to the bottom of the backing - wrong side up - 
With the zipper pull at the LEFT end -
 
 
And the zipper STOP at the RIGHT end - 

 
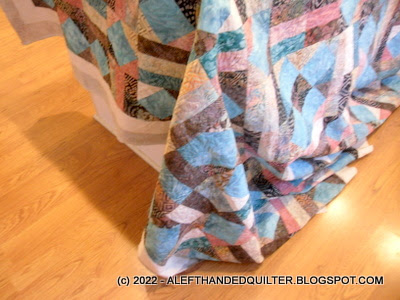
Then I rolled my first backing on a longarm - YAY!! - 

 
Mostly I rolled it all onto the take-up rail first - 
To try to get it semi-straight - 


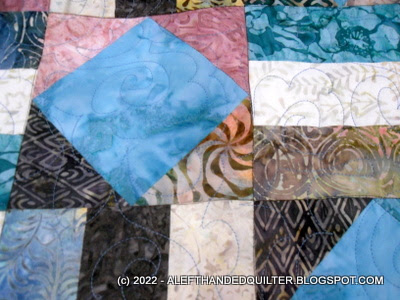
Because I knew that I had stitched a vertical panel in -
A little off-center - 
To see if I could get it straight when I loaded it sideways - 
As sort of a "newbie" challenge to myself - 
 

Then I rolled it all onto the "backing bar" in the front -
 
And I think - for a newbie - that I got it pretty straight -


Now here's the part about the zippers that you can skip - 
If you're not interested - 
 
You can watch the videos - 
And buy the fancy "stamped" zippers that tell you where to sew what - 
 
Or you can follow my little sketch - 
 
It doesn't really matter - 
Whether you have the zipper pulls on the LEFT or on the RIGHT - 
You just have to be consistent - or they won't work - 
 
Anyway -
 
THIS IS HOW I DID IT -
 
You need "separating" zippers - like these - HERE -
#5 - Molded Plastic Zippers - Separating - Tent in-Outside Reversible Slide -
The "Tent" ones are cheaper than the "Longarm" ones -
And they look the same to me - 
 
You need TWO zippers - 
 
Mark the CENTER on each one - both sides of the "teeth" - 
Matching the "STOP" with the end of the "PULL" on each - 
So the center is in the same spot on both zippers -
 
Separate them - into 4 halves -
2 WITHOUT pulls - let's call them "A" - the TOP half -
2 WITH pulls - let's call them "B" - the BOTTOM half -
 
Baste an "A" to the bottom of the top leader -
Baste a "B" to the top of the backing - wrong side up - 
 
Baste an "A" to the bottom of the backing - wrong side up - 
Baste a "B" to the top of the bottom leader -
 

I basted mine to the leaders - for the time being - 
Later I may actually SEW them on - to make them permanent -
If I like them - and so far - I DO - 
 
You want zippers as long as your leader cloths -
I got mine 2" longer - accidentally - but it worked out for me - 
Because they were still shorter than my rails - 

And you want to BASTE them in place -
Starting at the CENTER of the zipper - 
Matching the CENTER of the leaders and backing - 
And stitching to each end -
 
That way the centers will line up -
No matter what size backing you have - 
The excess will just hang off the end -
But be careful that it doesn't get in your way - 
Or interfere with your machine quilt "space" - 
 
I BASTED mine to the backing - temporarily -
In a color that I can SEE -  

Because - when I'm done -
I want to take them OFF - 
And use them again on another backing -
 
And removing basting stitches - 
Is a whole lot easier than UNSEWING the dang things - ;))


Talk to you later - gotta go - gotta sew - 

Wednesday, September 28, 2022

Christmas in September -


Ever since I decided to "exchange" - 
 
My Q-Zone Hoop Frame - HERE
 
With the dual track upgrade and table inserts - 


For the larger Q-Zone Queen frame - HERE -
 
I've been like a kid waiting for Christmas - 
 
And today was Christmas - in September - 
 
My new frame came today! - 
 
YAY!! -

While the dealer was dismantling the old one - 
 
And setting up the new one for me - 

I sewed the other half of some zippers on the leader cloths - 

So that I could load the backing -

For my Upstairs/Downstairs - Wild Things - 
 

And when he got it all together - 

He helped me attach the leader cloths to the rails - 
 
And we zipped the backing on - 
 
Easy peasy!! -

 
I was afraid that I had messed up when I ordered 90" zippers - 
Because the leader cloths are only 88" - 
But the zippers worked nicely - 
I have plenty of room at the end of each rail - 
 
The 88" is the maximum reach before the leg of the machine hits the side rail - 
So I was able to load the quilt backing on sideways - 
Just like I wanted - 
 
By the time he was finished it was about 7:00 PM - 
So I took a quick photo after he left - 
And wrote up this post - 
 
Tomorrow I'll do some tidying up and put some stuff away - 
And re-roll the backing nice and neat - 
Then add the batting and the top - 
And take some more photos - 
 
So far - I LOVE IT!! -  

It's doubled the size of top that I can quilt in one pass -
 
And I can still SIT DOWN down while I quilt -
 
I'm going to have LOTS of FUN playing with my new toy -
 
I still have a closet full of tops - 
 
Just waiting to be made into "real" quilts - LOL - ;))


Talk to you later - gotta go - gotta sew - 
 

Tuesday, September 27, 2022

Same -


As yesterday - 
 

The day got away from me again - 
 
And I didn't get a chance to prepare that other backing - 
 
But I'm not sure the frame is coming tomorrow anyway - 
 
The guy hasn't called me to confirm yet - 
 
So I think that he might just be getting back from vacation - 

And that should give me more time to get ready - ;))


Talk to you later - gotta go - gotta sew -

Monday, September 26, 2022

Texture -


Was all I was going for when I quilted - 
 
My Antique Squirrel - BIG BROTHER version
 
I'm still learning how to control my new machine - 
 
And my quilting is not that great yet - 
 
But I think I nailed the "texture" part - LOL - 

It should look awesome when it's washed -


Today I got it trimmed - 

 
Then I cut the strips for the binding - 
 
The BROWN was cut from the backing trimmings - 
 And will be the main color - 
 
The TURQUOISE was cut from the same yardage as the "squares on point" - 
And will be the flange color - 

 
I'll set all of this aside tomorrow - 
 
Because I want to prepare another backing - 
 
In case my "zipper" one doesn't work - 
 
I plan to baste the other halves of the zippers to the leader cloths -
 
While the guy is dismantling the old frame and building the new one - 

But that might not be possible - 
 
So I should probably have another backing ready to pin -
 
And another piece of batting - and another quilt top ready to go - 
 
Just in case - 
 
I like to have "options" - LOL - ;))


Talk to you later - gotta go - gotta sew - 

Sunday, September 25, 2022

Trimming -


My Antique Squirrel - BIG BROTHER version
 
Was on the agenda for today -
 
But I haven't even started - 
 
And this sucker is HUGE - 


I spent too much time on the computer today - 

So maybe I'll make some progress tomorrow - ;))


Talk to you later - gotta go - gotta sew - 

Saturday, September 24, 2022

Quilted -


My Antique Squirrel - BIG BROTHER version is quilted - 
 
Yay!! -
 
 
I opted to turn it around and pin it to a leader cloth - 
 
To finish the last two rows -
 
And that worked out just fine - 


It won't win any awards - 
 
Because the stitching is pretty wonky in areas - 
My machine kept "snagging" on something - 
Who knows what - maybe the bungee clips in the back - 
 
But the texture will be really nice when it gets washed - 
 
It still needs to be trimmed and bound - 
 
So tomorrow I can play with making some binding - 

And finishing it up -
 
My new frame should be here on Tuesday - 
 
And I can hardly wait - ;))


Talk to you later - gotta go - gotta sew - 
 

Friday, September 23, 2022

Almost there -


I have the rest of this pass - 
 
And two more rows to quilt - 
 
On my Antique Squirrel - BIG BROTHER version
 
I didn't put the front clamps on so you could see the last two rows - 
 
 
I'm able to get about 1-1/2 rows quilted in one pass - 
 
So after the next pass - 
 
I'll be 1/2 row short -
 
And have to make another pass -
 
So I might just do one row at a time - 
 
Then it won't look like I did a 1/2 row at the end -
 
Or turn it all around - 
 
Do the "top" row and 1/2 - 
 
Then fill in the "missing" 1/2 row - 
 
Haven't decided yet - ;))


Talk to you later - gotta go - gotta sew - 

Thursday, September 22, 2022

My mojo -


Came back this afternoon - 
 
And I made one more pass across the rows -
 
On my Antique Squirrel - BIG BROTHER version
 
I only have 7 more rows to go - 
 
 
I could have started sooner - 
 
But - well - you know - 
 
Someone was taking a nap -

 
And she looked so comfy - 

That I couldn't bring myself to make her move - ;)) 


Talk to you later - gotta go - gotta sew - 

Wednesday, September 21, 2022

More -


Of the same -
 
Same as yesterday - 
 
 
The progress on my Antique Squirrel - BIG BROTHER version

Came to another screeching halt today - 
 
When those dang "chores" came to visit again - 
 
As soon as they showed up - 
 
My mojo took off for parts unknown - LOL - ;))


Talk to you later - gotta go - gotta sew - 
 

Tuesday, September 20, 2022

Same -


As yesterday - 
 
 
My progress on my Antique Squirrel - BIG BROTHER version

Came to a screeching halt today - 
 
When those dang "chores" showed up again - 
 
Guess it's a Monday thing - LOL - ;))


Talk to you later - gotta go - gotta sew - 
 

Monday, September 19, 2022

Moving right along -


With the quilting - 
 
On my Antique Squirrel - BIG BROTHER version
 
 
I realized that I had another project called Antique Squirrel
That had 3" units and 9" blocks - 
 
So this one is actually the BIG BROTHER version - 
With 6" units and 18" blocks - 
 
Hopefully I can get it quilted by the end of the week - 
 
The design is very forgiving - if I miss a spot -
Because the thread blends in so well -
And sometimes I can't see where I already stitched -
I just echo around until I get to where I need to be -
 
Thread that blends is both good and bad - 
Good - it hides the boo-boos - 
Bad - sometimes I can't see where I stitched - 
And leave gaps that I have to go fill in later -
Or stitch too closely to what I already did - 
 
Good thing it isn't going to be judged -
Just washed to get the texture and to be napped under - LOL -
 
It IS moving right along now -
So I should have it done before I get the new frame -

It still takes me longer to re-hoop for the next "zone" - 
Than it does to actually quilt the design - 
 
I'm looking forward to being able to do one complete pass - 
 
Before having to "advance" the quilt - ;))


Talk to you later - gotta go - gotta sew - 
 

Sunday, September 18, 2022

First pass -


Is quilted -
 
On my Antique Squirrel
 
With a little help from my friends - 
 
I opted for an all-over design - 
 
It should go fairly quickly - 
 
And not show my starts and stops - 
 
 
It's kind of a flower - 
 
And shows up nicely on the TURQUOISE - 

 
And pretty much disappears on the rest of the fabrics - 

 
It even looks OK from the back -
 
It doesn't really show this much - 
 
But I lightened the photo so that you could see the quilting - 

 
So - the first row - and a half - is done - 
 
And I only had to re-hoop it once to get across the row - 
 
Only 13 - and a half - more rows to go - LOL - ;))


Talk to you later - gotta go - gotta sew - 

Saturday, September 17, 2022

Ready to go -

 
My Antique Squirrel is "hooped" and ready to go - 

 
With 12 (6") blocks in a row -

And 15 rows -
 
I was hoping that my "workspace" was large enough - 

To quilt 6 blocks across and two complete rows -
 
Before I had to re-hoop it - 
 
But I can only reach 5 blocks across -
 
And I'm short a couple of inches on the second row - 
 
So I guess I'll just settle in -
 
This is going to take me a while - LOL -
 
And - before you ask - 
 
The new frame will allow me to quilt an entire row across in one pass - 
 
But - to get a larger throat space - 
 
I would need to upgrade the machine - 
 
And that is not in the budget right now - ;))


Talk to you later - gotta go - gotta sew - 
 

Friday, September 16, 2022

Decided -


To play with my Antique Squirrel next -
 
A friend (Gene) suggested that I could get it quilted - 
 
Before my new frame is delivered in two weeks - 
 
So I pulled out some cones of thread to audition - 
 
That weren't BROWN or too LIGHT -
 
I don't want to have to change colors - 
 
And I don't have a cone of TURQUOISE thread - 
 
So I got it down to these two - 
 
The BLUE is called CHICORY - 
 
And the WINE is called RED CURRAN - 
 
 
I "puddled" both colors on the TURQUOISE - 
 
And the BLUE disappears -  
There's a big blob of it in the top corner that you can hardly see - 
 
So the BLUE wins! - LOL - 


My stitching isn't that great yet - 

So I will feel more comfortable with a thread color that "blends" - 

And that will let the quilting be more "texture" than design - 

It should also hide my boo-boos - 
 
Tomorrow I'll try to decide what I want to quilt where - 
 
There are SO many options - 
 
I need to narrow them down a bit - ;))


Talk to you later - gotta go - gotta sew - 
 

LinkWithin

Related Posts Plugin for WordPress, Blogger...