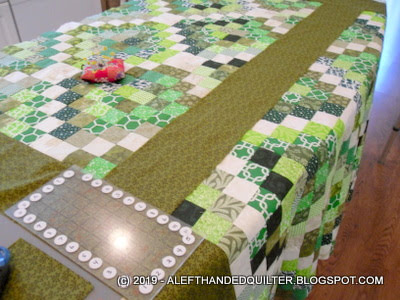
For the GREEN top -
Finally - LOL - ;))
It's just chunks of green but I like it -
Then I fuse/basted the top -
And added some pins and pinmoors to stabilize it until I get some lines stitched -
This one is for a special friend -
She likes GREEN -
And it's got some of that - LOL - ;))
Talk to you later - gotta go - gotta sew -
For the GREEN top is in progress -
But I don't have anything photo-worthy yet -
So this will have to do - LOL - ;))
I AM playing with it -
S - L - O - W - L - Y -
LOL - ;))
Talk to you later - gotta go - gotta sew -
Have been added -
Ta Dah!! - ;))
I think that I have mentioned before that I don't "measure" my borders -
I tore length-wise strips and laid the two side border strips out in the middle of the quilt top -
Pinned one (straightened/trimmed) end to the top -
And smoothed them both out down the length of the quilt top to the other end -
Then trimmed them to the length of the quilt top - ;))
The torn strips have "fringe" where the edges raveled after being torn -
Some people choose to trim the "fringe" - which I probably would do if I were entering this quilt in a competition - but since that is not the case here - I didn't bother -
I simply flipped the quilt top over so that I could see which way the seams were going -
And lined up the edge of the quilt top right next to where the "fringe" ended - pinned it - and followed the edge of the quilt top with my 1/4" foot -
After easing in the slight difference in length -
And pinning generously to keep the corner square -
Sewed and pressed open both side borders -
Then did the same thing with the top and bottom borders -
Pinned one (straightened/trimmed) end to the border on the right hand side -
And smoothed them both out across the width of the quilt top to the other end -
Then trimmed them to the new width of the quilt top -
With both of the side borders added -
And sewed/pressed them - ;))
Here's a shot of the "fringe" showing past the 1/4" seam that was sewn - ;))
I'm playing with the backing now -
But haven't made much progress yet - ;))
Talk to you later - gotta go - gotta sew -
Lately -
With my Spring Cleaning using the KonMaxi method -
Not to be confused with the KonMari method - LOL -
But I did play with the borders for the GREEN top -
And tore the strips that I need - ;))
I like to tear long border strips length-wise if possible -
It's faster and more accurate than trying to cut really long strips -
And this one worked out well -
I needed 60" lengths and had two yards of this Green -
So I was able to tear my 4 border strips -
And have a nice chunk left over that I can use on the back -
When I get that far - LOL - ;))
Talk to you later - gotta go - gotta sew -
I've been doing a little Spring Cleaning -
But - just so you know -
My version of Spring Cleaning -
Is sorting through stuff -
And shredding some old files - ;))
I am NOT into the "Marie Kondo" thing -
Side note - BOB thinks it's funny that people have just discovered it now that it has been on Netflix - when her book has been out for years - LOL - ;))
Anyway -
I'm much more into another method described by
Hannah Martin in her article -
A Maximalist's Response to Marie Kondo's Minimalist Mandate
Architectural Digest - January 29, 2019 - HERE -
Her article is terrific -
Especially the last part -
Emphasis added by me -
Those big piles of garbage might add to the before-and-after, reality show appeal, but so much of Marie's approach goes beyond purging: it's about appreciating your objects and living with things you love. Perhaps the lesson for maximalists is this: take your possessions, hold them in your hands, thank them for all they've done for you and then put them right back on the shelf where they belong.
I call it the KonMaxi method.
Hannah is a lady after my own heart -
I think we could be friends - LOL - ;))
Talk to you later - gotta go - gotta sew -
That Blue/Green jelly roll is all "cut and kitted" -
And in the plastic bin with the rest of the ones in Autumn Colors -
All ready to go - ;))
I have had those sets of strips sewn into strata for about a month -
And finally got around to getting them cut -
I forgot they were there until I had to move them to get to something else - LOL - ;))
I guess that's one advantage of having a bunch of things going at the same time -
Sometimes I get nice surprises - ;))
Talk to you later - gotta go - gotta sew -
Blocks in Autumn colors -
Was sewn together -
After being 'un-sewn" yesterday - ;))
Then I switched gears -
And ran this bunch through the strip cutter -
For the "cut" part -
Now I can sort and "kit" them in sets of three for the next top -
I put the baggies in a plastic bin next to the sewing machine -
Then when I want/need to sew a little something -
I can grab a bag -
Sort them out -
"Un-sew" them in stair-step fashion -
And make three at a time -
It's a pretty FUN way to make a 50" x 60" top -
With little to no fuss - ;))
Talk to you later - gotta go - gotta sew -
Of another "cut and kitted" set of blocks in Autumn colors -
Was - again - about all I have managed to do in the past couple of days - ;))
I have been "spring cleaning" and sorting through stuff -
Which is not necessarily difficult or complex -
But it sure is time-consuming - LOL -
And I would much rather SEW - ;))
Talk to you later - gotta go - gotta sew -
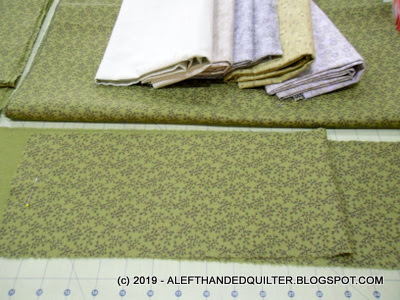
Was needed for the borders and backing for the GREEN top -
So I pulled these from my stash - ;))
I have the MOST of the one on the right -
So that will be my best bet for the borders -
And I have the LEAST of the white/green diagonal stripe -
I had thought of using that for the binding - but I only have 1/4 yard of it - which isn't enough to cut it on the bias - besides - if I DID cut it on the bias - the stripes would come out straight - LOL -
I usually like to cut my binding on the straight of grain if it won't get a lot of heavy use - like a table topper that just sits there on the table - or a wall hanging that just hangs there on the wall - LOL - but this one will be a lap quilt - so I want/need to cut it on the bias -
I may even make it scrappy - ;))
After I play with the borders -
I'll play with the backing -
And make that scrappy, too - ;))
Talk to you later - gotta go - gotta sew -
Of the "cut and kitted" blocks in the Autumn colors - ;))
These are great for times when I need to sew something to post -
But my life is getting in the way and I don't have a lot of time -
They're all ready to go - ;))
Now the GREEN top is asking for some borders -
So I'll show you the GREEN fabrics that I pulled for that tomorrow - ;))
Talk to you later - gotta go - gotta sew -
Of the "cut and kitted" blocks in the Autumn colors - ;))
THANKS to all of you who checked on me when I didn't post for a couple of days -
I'm feeling MUCH better -
But I got sidetracked with my dang paperwork again -
I've been sorting through stuff now that my brain is working again -
But not sewing much -
Then I realized this morning that I should sew something to post -
So I finished three more Autumn blocks - ;))
Talk to you later - gotta go - gotta sew -
And sewing together -
The three "cut and kitted" blocks in the Autumn colors -
That I had "un-sewn" the other day -
Was about all my still fuzzy brain could handle today -
I'm not quite out of chicken soup yet -
But I should probably stock up again -
Before I run out completely - LOL - ;))
Talk to you later - gotta go - gotta sew -
With a fuzzy head probably wasn't the best idea -
But I did it anyway -
And called it PLAYTIME - LOL - ;))
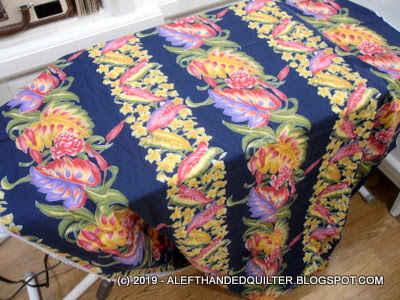
I got out the fabric that I had set aside the other day -
That I had originally intended to use for borders because of the wonderful stripes -
And counted the lengthwise repeats in the far right column - 8 and a half -
And I wanted/needed 8 - so I ripped off a strip -
That will leave me four stripes to use for borders some other day -
Now - where to cut it for the repeat? -
This seemed like a logical spot -
So I did - to make 8 repeats -
Actually I snipped it - and tore it - but the effect is the same -
Stacked them - and did the "pin" thing again -
But this time I "stapled" them together instead of using fabric glue -
I think that the fabric glue works better than the staples -
But that's what experiments are for - right? -
To find out what works and what doesn't -
Smoothed them out - used a "flower pin" under the plastic sheet -
And ran them through the die cutter -
Don't tell the guys at AQ - but I figured that if it would take 8-10 layers of fabric - it should be able to take 8 layers and a flat pin - as long as I made sure to keep the pin AWAY from the die blades - and UNDER the plastic - and it worked -
But using a HST die for a 45-degree triangle - didn't work exactly the way I thought it would -
I have a hole in the middle -
And the tips need to be trimmed off to make an octagon -
Or I could sew a strip to every other triangle - and then square it off -
Here I spun it the other direction -
Then - just because - I put them in HST formation -
Interesting -
But not spinning because I don't have mirror images -
All of the fabrics were right side UP on the die -
So - I cut three more -
For a total of 4 - to play with -
Because - why not? -
I'm just playing -
Thought I might as well sew one together to see if the "sewn" piece still had the hole in the middle - and my fuzzy brain must have shorted out for a second or two or ten because that bottom one ain't right - LOL - ;))
I stitched it all together - and since I'm not a fan of pressing seams "open" - I pressed them in a circle and then tried to spin the seam - it's a little bulky - but not that bad considering how many seams are coming together at the same spot - so maybe that hole in the middle eliminated some of the bulk -
And from the front -
Up close -
The more I looked at it -
The more it gave me a headache - and I already had one - LOL -
So I laid out the last three in a QST configuration - figured they would have the dog-ear notches on the outside corners - but they would be a whole lot easier to put together -
Then I thought -
Why bother using HST to make QST -
When I did that with 4 repeats using the BLUE??? -
So I repeat -
A little experimenting -
With a fuzzy head probably wasn't the best idea -
But I did it anyway -
And called it PLAYTIME - LOL - ;))
Talk to you later - gotta go - gotta sew -