After I finished some chores -
Was very relaxing -
I LIKE petting my fabric - LOL -
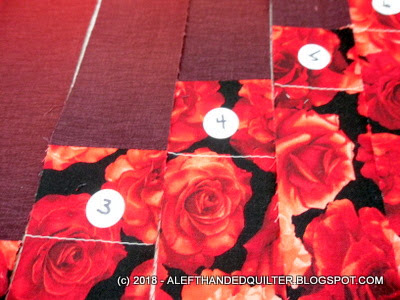
And I was able to sort the 5" squares and match them to the paired strips - ;))
One square was folded when it was originally cut -
But it should be OK if I press it before I cut it -
And there were a couple that look a little crooked -
But they should be OK if I trim the one side first -
Then there were these two -
The top one isn't the same size as the bottom one -
And they are both crooked -
The bottoms look OK -
But the top left corner is "short" -
And the top right corner is "over" -
But I think it will be OK -
The pattern calls for some 2-1/2" squares to be cut from the strips -
And I was going to substitute 4 of the needed squares from the 5" squares instead -
So I'll have longer strips left for the "ends" -
Which should make for a longer quilt - ;))
The pattern only uses 36 of the 40 cut "border" strips - so 4 are not used -
TWO of the four can be the ones I need to compensate for the wonky 5" squares -
I'll try to cut as many 2-1/2" squares from the 5" squares as I can - and then cut the rest of the squares from the part of the strip that will be an "unused" border piece -
Does that make sense? - ;))
My version should result in a longer quilt - but not wider -
But it should be easy enough to add an extra border or two to the left and right sides when I get to that point and can see if I want/need to make it wider -
At least that's the plan - LOL - ;))
Talk to you later - gotta go - gotta sew -
While I play with getting the borders on the RED Squirrel -
And while I figure out whether I should try to make a Coins Quilt with the limited number of batiks left over from the Squirrel's Batik Siblings - or whether I should try to do something else with them -
Is this FREE pattern from Timeless Treasures - HERE -
Called Interweave Quilt - designed by Marlous Carter
I'm going to use a set of Tonga Topaz 2-1/2" strips and 5" squares -
And have the strips already paired up -
I think that if I cut the 5" squares into four squares to use in the center section - I wouldn't have to cut so much off each strip and that would leave the "ends" longer - making a larger quilt -
So I'm going to match the squares to the strip pairs next - double check my MATH - then cut them -
This new Squirrel - once I get it cut - should be one of those "pedal to the metal" types - that I can mess with and post about while I attend to "other" business -
And catch up on some of the "chores" that I have been letting slide lately -
They seem to multiply faster than my scraps -
And I didn't think that was possible - LOL - ;))
Talk to you later - gotta go - gotta sew -
Was included in the kit - ;))
I was asked in the comments yesterday if the kit came with enough of the
RED Rose fabric to use as borders as the sample shows -
And the answer is YES -
It comes with the pattern - of course -
And 1-3/4 yards of the ombre stripe -
And 1-3/4 yards of the RED Roses fabric -
for both the insert and the borders -
And another 3/4 yard of the RED Roses fabric -
for the binding -
There is a Peacock version available - HERE -
But I liked the RED one - HERE -
And I was stocking up on needles so I added it to my order.
Free shipping is offered sometimes - but usually on very specific items.
The kit comes with 1-3/4 yd of the ombre stripe -
A 1-3/4 yd cut of the RED Roses -
And another 3/4 yd cut of the RED Roses for binding -
So a total of 4-1/4 yards plus the pattern -
I figured that good quality fabric runs at least $12/yd these days -
And the pattern alone would cost about $10 - HERE-
And it was worth it to me not to have to go shopping -
Especially knowing that I probably wouldn't find anything that I'd like as much -
And would be "settling" for something else - ;))
When I ordered it - the supplier suddenly was out of stock and I had to wait several months for it - but I finally got it - and I think it was worth it -
It's absolutely GORGEOUS in "real" life -
The website photos are pretty accurate as far as color goes -
And NO - I don't have any affiliation with Nancy's Notions -
I just like their stuff - LOL -
And this book might accidentally find its way into my shopping cart next time -
There are some pretty awesome patterns in that book -
Especially now that I know how to do it -
AND how to compensate for being LEFT-Handed - LOL - ;))
Talk to you later - gotta go - gotta sew -
Ta Dah!! - ;))
It still needs borders - but the center section is done -
This is a Two Fabric Bargello Quilt Top Kit -
By Susie Weaver - that I got at Nancy's Notions - HERE -
===
This has been a busy week -
7/22/18 - Sunday -
I dug out the fabrics for the backing for the Blue Floral Crumb Squares - and played with that - because I needed something to post for Monday. After that was done - I played with the RED Squirrel - and used the backing to stall until I had the RED one cut out - then tried to put it together in the "background" while I posted progress on the coin quilt - hoping that would work. I REALLY didn't want to show the RED Squirrel yet - LOL - ;))
Now you can see why I had to make sure it got cut out correctly the FIRST time -
Using a chart written by a Right-Handed person.
She did have separate instructions for lefties -
Which involved rotating/turning/inverting stuff -
But I thought that I could just use the chart as-is and start from the right side of her chart and work my way to the left side - cutting the strips from #33 to #1 instead of from #1 to #33. Same difference - just start at the other end of the tube - ;))
I emailed her to thank her for thinking of us lefties and to check to see if I could do it MY way or if I was missing something. She said as long as the strips are in the correct order from left to right - that I should be OK - and that I was the first one to have an issue with it. BOB replied that that may be - but it could also be possible that I was just the first one to ask about it. We had a really nice chat - she's a nice lady and IS trying to help the lefties whereas quite a few designers don't bother. So IF my way worked - and I didn't see any reason why it wouldn't - it would be one VERY pretty top - ;))
I have never done a "bargello" before - but I have read up on them - and have several patterns. The fabric is absolutely gorgeous - and only TWO of them. She has 9 pages of instructions - and one photo that told me all I needed to know - ;))
7/23/18 - Monday -
I finished the backing for the Blue Floral Crumb Squares and posted that Tuesday morning.
7/24/18 - Tuesday -
Even though I had it all worked out in my head -
How to "compensate" for my LEFT-Handedness -
I inadvertently inverted what I was doing before I even started -
I had sewn the "tube" and pressed the seams "down" so they would be in the proper position as I was sewing the strips together. When I cut strips from "tubes" - I like the seams to show because it's easier for me to line up the ruler and keep my cuts straight - so I did NOT turn it right side out like the instructions said - I also laid it out so the seams were pointing AWAY from me as I cut - so they would "go with the flow" when I rotary cut them. All of this inverted everything to the point where I had no idea when I cut the first strip - if I was cutting #1 or #33 - LOL - ;))
And then I realized that the pattern I wanted to make - the Lightning Bolt - was symmetrical and #1 was the same as #33. So after I cut it - I STILL wouldn't know which one it was - I needed to cut the SECOND strip to see if that puppy was #2 or #32 - depending on which way the "roses" went.
Which is why I said that I knew it was cut properly when the pattern of the roses still worked -
How do I know that it worked? -
And that I kept everything in the correct order? -
Notice I didn't say the "right" order -
LEFT and RIGHT were part of my problem - LOL - ;))
Because you can still see the pattern in the roses AFTER I cut it -
Sorry about the lighting - they really are RED - not Orange -
And sorry for another "tease" - (Gene - LOL) -
But - be patient - the "reveal" will be totally worth it - trust me - ;))
As it turned out - I WAS cutting #33 - 32 - 31 - just like I thought I would be -
Guess a double inversion comes out correctly - LOL - ;))
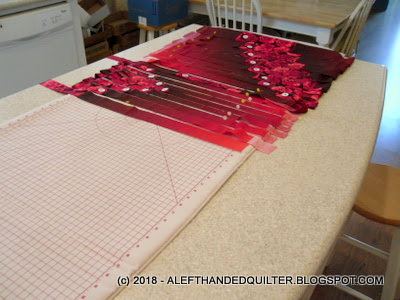
Anyway - that day I got them ALL cut out and laid out - in order on my ironing pad on the kitchen island - it was easier to pin them to the pad than to try to pin them to the design wall and then walk back and forth and back and forth - sometimes I'm lazy that way - LOL - ;))
7/25/18 - Wednesday -
Puzzle with my friend - and then I re-read the instructions AGAIN - because there was ONE more tricky part - where to mark the cutting lines ON the tubes -
7/26/18 - Thursday -
I marked each strip with white chalk and put a pin in the end with the mark as a visual reminder that I was supposed to cut THAT end - not the OTHER one - ;))
I had it all laid out - labeled - marked - and pinned - and still didn't have the nerve to actually cut it - so I left it there until the next morning -
7/27/18- Friday -
I checked it ONE more time - took a deep breath - and cut the tubes -
And sewed them together -
Transferring one section at a time to my ironing board next to my sewing machine -
The "basting line" of the one strip is supposed to line up with the seam line on the next strip - and the instructions said to pin from that point to each end of the strips - but I didn't bother - at that point - if they were "off" - so be it - I lined up the top of the strips and stitched my 1/4" seam -
This is the next section transferred from the kitchen island to my cutting table -
Last two sections still in the kitchen -
And - the Gods were smiling - I ran out of bobbin thread at the end of a strip - ;))
One of the middle sections -
With the first section back on the kitchen island - waiting for the rest of it to get sewn together -
Two sections - ready to be sewn together -
The last section -
Last seam -
And you can see some of the "lines" don't quite match -
But I don't care - it's together and I think it looks just fine - ;))
It still needs borders - and I'll play with those tomorrow -
Having never done a "bargello" before I thought that the "Two Fabric" version would be easier - but I'm not sure that it was -
There's a lot going on at the same time -
The strips are cut different widths according to a chart -
The design "shifts" up and down as it goes from left to right -
And some strips were measured from the top of the "insert" fabric -
And some were measured from the bottom -
There were several key areas where I could have REALLY messed up -
And I needed to TOTALLY concentrate on what I was doing -
Because I only had enough fabric to cut it ONCE - ;))
But I think it worked -
And I LIKE it - ;))
Talk to you later - gotta go - gotta sew -
But a WHOLE LOT of prep work - ;))
I prepared the package for Frog Quilter -
Sending her the Squirrel's Batik Sibling tops -
Squirrel's Batik Brother -
Squirrel's Batik Sister -
And the Pinwheel Polka Dot -
For her Quilty Hugs and Heart Builders- ;))
Then I did some prep work on a couple of Squirrels -
And played with the "Coins" for a while -
I pulled the yellow/gold batik on the right as a possible maybe for the "alternate" columns. I may switch it out for something else if it "blends" too much - but it's a piece from my stash that looks long enough to work -
Then I got tired and decided it was time to fix something to eat -
So tomorrow -
AFTER my chores in the morning -
I plan to SEW the REST OF THE DAY!!!!!!!!!!!!!!!! -
Because I have some very impatient people giving me a hard time -
Even though they KNOW that I am a
S-L-O-W P-O-K-E Q-U-I-L-T-E-R - ;))
Do you hear God laughing at my plans? -
Me neither - LOL - ;))
Talk to you later - gotta go - gotta sew -
Just a little "puzzling" with my friend -
We finished putting this together from last time -
And started another - that we'll finish next time - ;))
CEACO - Americana - 500 piece -
Talk to you later - gotta go - gotta sew -
On my Batik Coin Quilt will be shown in a minute -
But first - I want to thank all of you for your kind thoughts -
Because I finished cutting the RED Squirrel -
And it came out exactly like it was supposed to -
Even though I had it all worked out in my head -
How to "compensate" for my LEFT-Handedness -
And inadvertently inverted what I was doing before I even started -
See what I did there? - LOL - ;))
How do I know that it worked? -
And that I kept everything in the correct order? -
Notice I didn't say the "right" order -
LEFT and RIGHT were part of my problem - LOL - ;))
Because you can still see the pattern in the roses AFTER I cut it -
Sorry about the lighting - they really are RED - not Orange -
And sorry for another "tease" - (Gene - LOL) -
But - be patient - the "reveal" will be totally worth it - trust me - ;))

So - after I got that cut out -
And BOB patted me on the back for a job well done - LOL -
I moved on to the easy stuff -
The Batik Coin Quilt -
And decided that I would cut the Coins at 2" high - to finish at 1-1/2" -
Because a finished Coin of 1-1/2" x 3" seemed like a good proportion -
Some of them will be shorter - just because -
And I'm going to mix them in as I go along -
I think I'm going to re-sort these by color before I cut any more -
That way I can tell which ones are plentiful and which ones are scarce -
And it might be easier to get a better variety in the strips when I sew them -
At least that what BOB keeps telling me - ;))
When I get to the stacks of longer pieces -
I can decide if I want to cut other column sizes -
But for now - these will be 3-1/2" wide - to finish at 3" wide - ;))
Talk to you later - gotta go - gotta sew -
After arranging the bits and pieces to fill in the space in the top right corner -

And the bottom left corner -
And a longer one to cover the bit at the top -
Adding the extra from the right corner to fill in the top section on the left side -
This one needed straightening - don't you hate that? - when you don't get a straight cut and need to trim it? - I do - and I want it to at least LOOK straight when I sew it in - so I centered the 1" line in the middle of the little gold squares in the Red and Blue medallions -
Not off by much at the bottom - but off by almost an inch at the top -
And the other side needed straightening, too -
And the Green geometric needed trimming - but not much -
Then I got them all sewn together -
And had the gap at the top - like I knew I would -
So I added the white/gold and got my points looking GOOD -
So - all together - on the floor for it's "glamour shot" -
It's not wonderful - but it's done -
And it used up some odd ball stuff in my stash - so it's all good -
And some close-ups - for your viewing pleasure - LOL - ;))
It's all ready to baste and quilt -
And will be - one of these days - LOL - ;))
Tomorrow I'm going to cut out the RED Squirrel -
And play with the Coins Quilt - ;))
I can show you the progress on the Coins Quilt -
But I want to play with the RED Squirrel "behind the scenes" -
Until I can show you the finished top -
I don't want to "give it away" just yet -
But if my "left-handed" cutting works out -
And I think it will -
It's going to be really pretty -
So wish me luck - ;))
Talk to you later - gotta go - gotta sew -