Ta Dah!! - ;))
It still needs borders - but the center section is done -

This is a Two Fabric Bargello Quilt Top Kit -
By Susie Weaver - that I got at Nancy's Notions - HERE -
===
This has been a busy week -
7/22/18 - Sunday -
I dug out the fabrics for the backing for the Blue Floral Crumb Squares - and played with that - because I needed something to post for Monday. After that was done - I played with the RED Squirrel - and used the backing to stall until I had the RED one cut out - then tried to put it together in the "background" while I posted progress on the coin quilt - hoping that would work. I REALLY didn't want to show the RED Squirrel yet - LOL - ;))
Now you can see why I had to make sure it got cut out correctly the FIRST time -
Using a chart written by a Right-Handed person.
She did have separate instructions for lefties -
Which involved rotating/turning/inverting stuff -
But I thought that I could just use the chart as-is and start from the right side of her chart and work my way to the left side - cutting the strips from #33 to #1 instead of from #1 to #33. Same difference - just start at the other end of the tube - ;))
I emailed her to thank her for thinking of us lefties and to check to see if I could do it MY way or if I was missing something. She said as long as the strips are in the correct order from left to right - that I should be OK - and that I was the first one to have an issue with it. BOB replied that that may be - but it could also be possible that I was just the first one to ask about it. We had a really nice chat - she's a nice lady and IS trying to help the lefties whereas quite a few designers don't bother. So IF my way worked - and I didn't see any reason why it wouldn't - it would be one VERY pretty top - ;))
I have never done a "bargello" before - but I have read up on them - and have several patterns. The fabric is absolutely gorgeous - and only TWO of them. She has 9 pages of instructions - and one photo that told me all I needed to know - ;))
7/23/18 - Monday -
I finished the backing for the Blue Floral Crumb Squares and posted that Tuesday morning.
7/24/18 - Tuesday -
Even though I had it all worked out in my head -
How to "compensate" for my LEFT-Handedness -
I inadvertently inverted what I was doing before I even started -
I had sewn the "tube" and pressed the seams "down" so they would be in the proper position as I was sewing the strips together. When I cut strips from "tubes" - I like the seams to show because it's easier for me to line up the ruler and keep my cuts straight - so I did NOT turn it right side out like the instructions said - I also laid it out so the seams were pointing AWAY from me as I cut - so they would "go with the flow" when I rotary cut them. All of this inverted everything to the point where I had no idea when I cut the first strip - if I was cutting #1 or #33 - LOL - ;))
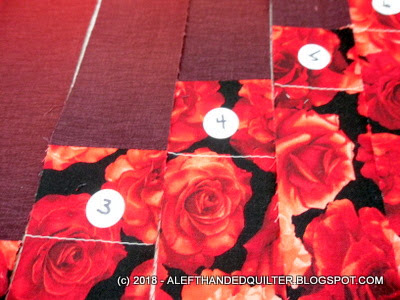
And then I realized that the pattern I wanted to make - the Lightning Bolt - was symmetrical and #1 was the same as #33. So after I cut it - I STILL wouldn't know which one it was - I needed to cut the SECOND strip to see if that puppy was #2 or #32 - depending on which way the "roses" went.

Which is why I said that I knew it was cut properly when the pattern of the roses still worked -
How do I know that it worked? -
And that I kept everything in the correct order? -
Notice I didn't say the "right" order -
LEFT and RIGHT were part of my problem - LOL - ;))
Because you can still see the pattern in the roses AFTER I cut it -
Sorry about the lighting - they really are RED - not Orange -
And sorry for another "tease" - (Gene - LOL) -
But - be patient - the "reveal" will be totally worth it - trust me - ;))

As it turned out - I WAS cutting #33 - 32 - 31 - just like I thought I would be -
Guess a double inversion comes out correctly - LOL - ;))

Anyway - that day I got them ALL cut out and laid out - in order on my ironing pad on the kitchen island - it was easier to pin them to the pad than to try to pin them to the design wall and then walk back and forth and back and forth - sometimes I'm lazy that way - LOL - ;))

7/25/18 - Wednesday -
Puzzle with my friend - and then I re-read the instructions AGAIN - because there was ONE more tricky part - where to mark the cutting lines ON the tubes -
7/26/18 - Thursday -
I marked each strip with white chalk and put a pin in the end with the mark as a visual reminder that I was supposed to cut THAT end - not the OTHER one - ;))

I had it all laid out - labeled - marked - and pinned - and still didn't have the nerve to actually cut it - so I left it there until the next morning -

7/27/18- Friday -
I checked it ONE more time - took a deep breath - and cut the tubes -

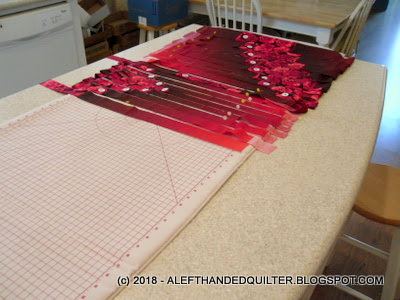
And sewed them together -
Transferring one section at a time to my ironing board next to my sewing machine -

The "basting line" of the one strip is supposed to line up with the seam line on the next strip - and the instructions said to pin from that point to each end of the strips - but I didn't bother - at that point - if they were "off" - so be it - I lined up the top of the strips and stitched my 1/4" seam -
This is the next section transferred from the kitchen island to my cutting table -

Last two sections still in the kitchen -
And - the Gods were smiling - I ran out of bobbin thread at the end of a strip - ;))

One of the middle sections -

With the first section back on the kitchen island - waiting for the rest of it to get sewn together -

Two sections - ready to be sewn together -

The last section -

Last seam -

And you can see some of the "lines" don't quite match -
But I don't care - it's together and I think it looks just fine - ;))

It still needs borders - and I'll play with those tomorrow -
Having never done a "bargello" before I thought that the "Two Fabric" version would be easier - but I'm not sure that it was -
There's a lot going on at the same time -
The strips are cut different widths according to a chart -
The design "shifts" up and down as it goes from left to right -
And some strips were measured from the top of the "insert" fabric -
And some were measured from the bottom -
There were several key areas where I could have REALLY messed up -
And I needed to TOTALLY concentrate on what I was doing -
Because I only had enough fabric to cut it ONCE - ;))
But I think it worked -
And I LIKE it - ;))
Talk to you later - gotta go - gotta sew -

7 comments:
Great results. I can see why it takes an extra bit of concentration. I have never tried a bargello as most of those need machine work. I'm sure a machine would get the pot stirred before I got two strips together.
Fabulous finish (almost). I have never done a Bargello quilt. Looks very interesting.
Wow!! It turned out wonderfully impactful.....just stunning! I agree with you about cutting with the seams showing....much easier to keep it lined up for cutting. Not one of those projects where you can just put the pedal to the medal ;-)
Yes, it was worth the wait. I think yours looks every bit as good as the sample on Nancy's Notions. Did the kit come with enough of the rose fabric to use as borders like the sample shows? If not, what fabric will you be using?
I really think this would be more difficult in some ways- such as knowing just where to cut the tube - than a standard bargello.
Wow...just Wow! That is a beautiful bargello. I'm glad you were able to make it work for LEFTIES. Can't wait to see your borders.
Beautiful! Worth the wait! And I'm not sure being right handed would have made that whole process any easier! Now comes the easy part...quilting it! (Well, after borders.)
It's beautiful! I have that pattern with different fabric. You have inspired me to move it up on my list of projects. I also have a heart bargello I started years ago, but found I wasn't able to give it the attention it needed at the time. I need to get that back out and finish it! Thanks for sharing your projects. You are a busy lady!
Post a Comment