Wednesday, January 31, 2018

Lost - found - funny noise - and then some -

Lost -

Tuesday, my friend, Gene Black, posted about binding his quilt and re-posted a video he did showing how to cut bias binding - HERE - . I remembered that video - and I remembered asking him if he would mind if I did a tutorial on Cutting bias binding - LEFT-Handed - and he graciously said that I could. I wanted to do a follow-up post and then link back to his blog post (like now) - but do you think I could find my tutorial?!?!? NO. It SHOULD have been the first one listed on my LHQ - Binding page/tab - but it wasn't there. Well, if "I" can't find it - other lefties can't find it either - so I did what I tell other people to do - I did a "search" of my own blog to find an old post - ;))

Found -

Have you ever noticed that at the top of Blogger blogs in the top LEFT-Hand corner - above the blog header and the blog itself - is an "ORANGE box" with a WHITE "B" in it? (You're scrolling back to the top of this page right now to check - aren't you? - LOL - ;)) To the RIGHT of that is a "white box" where you can enter a couple of "search words" to search ANY blog for ANY thing. So that's what I did - I entered "cutting bias binding" - and got THIS - then I did what I should have done way back then - I added the link to the LHQ - Binding page/tab - ;))

I stopped labeling my posts when I discovered this little "lost and found" trick - it saves me time that I would rather spend sewing - and I can find old posts in no time at all. You don't need labels on the blog posts that you read either - you can do a simple "search" the same way I did - ;))

Funny noise -

Then I started to put the binding on Do You See What I See? - after cleaning out the lint and loading a couple of bobbins. Got down one side - turned the corner - and my sewing machine sounded a little funny but I ignored it and got almost to the end of the second side - took a look - and had a "thread mess" on the bottom. I should have stopped when I first noticed it NOT "humming" - so my ripper friend, Jack, and I had a date last night - ;))


And then some -

Finishes -


After my date with Jack, I finished the binding, added the label, and washed it before I took the "glamor" shots -  


I love the crinkly texture after it's washed -


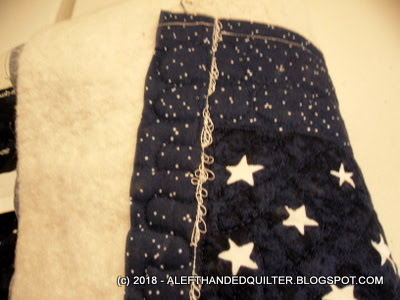
But I had forgotten that I had the "curling" problem when I used the wider "flange" width and had to stitch it down when I made Lavender Lovely - the baby quilt. So I re-cut the binding for Pinwheel Polka Dot - cutting 1/4" off the inner white flange - before attaching that and the label -


And stitched this one down with a decorative stitch while Pinwheel Polka Dot was in the wash -


Pinwheel Polka Dot - before washing -


I had to laugh - I was looking through my "greens" for something to cut down to 10" squares for the corner triangles when I realized that I have a bunch of green 10" squares ALREADY cut - DUH!! So I pulled a stack and sorted through them to find some that probably wouldn't look that good cut into smaller pieces - these two seemed to be just what I wanted - and now they have a new "home" - ;))


So I guess that is "technically" three finishes by the end of this month - ;))

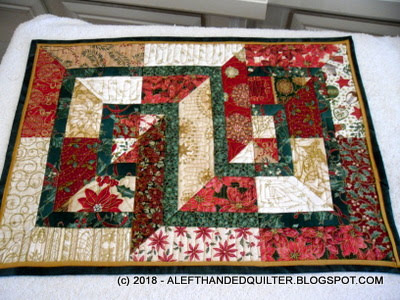
The little Christmas Block 3x2 - Table Runner is really so small it probably shouldn't count -

But 3 sounds better than 2 - ;))


Talk to you later - gotta go - gotta sew -


Sunday, January 28, 2018

Been busy -


Sunday - the "ribbon" Squirrel was set aside - to be finished - whenever - ;))

Monday - I played with my California State, Local, and District Sales and Use Tax Return . I don't know about where you live, but in California Out-of-state sales are not taxable - and those In-state are - with different rates applicable to the various counties and cities. Not only are "Sales" taxed - but certain purchases that are "Used" are also taxed. Keeping track of stuff like that is what I used to do - so that part was easy. "E-filing" for the first time as an "owner" was fun. I made it harder than it actually was when it "self-populated" the "District" sales that had to be allocated. I expected that number to be the amount AFTER deducting the sales not subject to tax - silly me. I decided to call them for a little help and clarification - sat back for the ten minute wait - and figured it out just as the "representative" picked up the phone. He verified that I did it correctly - YAY!! Bottom line - I owe them $4.00 - sure hope they don't spend it all in one place - ;))

Tuesday - I had a locksmith replace the lock on my mailbox because one of the keys was stolen. I had gone online and placed a "hold" on my mail until I could have the lock changed. I wasn't sure if I could have it changed myself or if I had to have the USPS do it - and the website said to call the local branch for assistance. I tried calling and couldn't get anyone to answer the phone. So after a couple of weeks, I tried it from the "other" side. I called the locksmith on Monday - worst that could happen was that they said they couldn't do it and that I had to contact the USPS - but they said they could - so I said OK - do it - ;))

After I realized my key had been stolen and placed the "hold" - I had asked my mail carrier to see if she could find out who was responsible for changing the lock - she couldn't get an answer either. The last time we talked - I told her - "You watch - this is what's going to happen - I'm going to find out that I could have changed the lock myself three weeks ago - and I'm going to do it - and then - within a week - the Post Office is going to replace the whole thing and give everybody new keys (because someone has stolen mail probably with a stolen master key) - and I will have wasted my money." And we both laughed - knowing that I was probably right - ;))

Wednesday - A friend came over and we put together one of her jigsaw puzzles - a CEACO 550-piece Puzzle Poster (24" x 18") by Marjolein Bastin. It usually makes for a very relaxing afternoon - but we both agreed that this one was harder than it looks and one that we never want to do again - ;))


Thursday - I was worn out. I only have so much energy these days - and I used most of it on Monday, Tuesday, and Wednesday - so I spent most of the day on the computer "surfing" - ;))

Friday - I updated some of my quilt labels to read 2018 instead of 2017 and reprinted a batch. Funny thing - I have used a particular brand of "sew-in" fabric sheets for inkjet printers for years. I have a package that says it had 10 in it - another with 7 - and another with 3. Same size of package - probably the same price - but fewer and fewer sheets included for the price. I'm sure the price per package didn't go up significantly - but the number of sheets IN the package for the same "price" has decreased - so, yeah - the price DID go up - A LOT - ;))

Saturday - I cut the labels apart and worked up a few of them - then the mail carrier delivered the mail that I had put on "hold" - and said "Good news - they're going to replace your lock on Wednesday." I told her - "That's great - but it's too late, I already did." Then I laughed and said - "I TOLD you that was going to happen!"- and we both cracked up. I should have waited ONE more week - ;))

Sunday - Today - and I was ready to SEW!!! - FINALLY!! -

I sewed the binding and label on the Christmas Blocks - 3x2 -


And cut the triangle corners for Pinwheel Polka Dot -


And Do You See What I See? -


I found the binding that I made for Five Stars Plus 5 - so added it to the basket with the bindings for Christmas Blocks - 6x6 and O Happy Christmas - those three need corner triangles cut and pressed - after I get them quilted -


Maybe this week I can actually get some of these bound and labeled -

And DONE - ;))

One last thing -

BOB keeps saying "But then again - it's probably just me - ;))"

And she found this blurb in the February 2018 issue of Reader's Digest
by (at)REBRAFSIM (DROPPED MIKE) -

A Personal Question -

Are there a lot of first-person singular objective pronouns,
or is it just me?

Too funny!! - ;))


Talk to you later - gotta go - gotta sew -


Sunday, January 21, 2018

Yesterday's Squirrel -

Isn't what you think - ;))


I forgot to mention that it measures 6-1/2" square -


And that it is NOT fabric - and it's NOT pieced -

It's ribbon - and it's woven - ;))


I saw a video on the technique - HERE - and thought that it was VERY clever and wanted to try it - then when I mentioned it to Gene Black - my bloggy buddy and sometime cohort in Squirrel Chasing - he sent me a link to another video - HERE - it's not in English - but it does show STEP #3 in more detail.

Go ahead and follow the links - watch the videos - I'll wait - ;))

===

So - after watching those two videos -

I cut some strips and started chasing that dang Squirrel - ;))


I understood the strips to be pressed like bias tape - fold the strips in half - press the fold - open it up and fold in each raw edge to the middle - so the sides are "turned under" - like bias tape. Made sense to me - no raw edges on the sides to fray - but that prep work took a looooooooong time and when my strips didn't want to stay pressed, I decided to check my bin of ribbon for something else to use. Something that didn't have raw edges. Something that wouldn't fray -


The pretty colors are only 1/8" wide - a bit too narrow for what I needed - but I figured the 5/8" wide ribbon would work. For the 3-D effect I chose a dark green - a pale/light "shiny" green - and a white grosgrain.   I didn't have much dark green so decided to "downsize" the project  a little and cut the long ribbon in half - then half again - and again - until I got about 15 sections about 7" long.  I thought that a 7" square should/would let me try the technique without a huge commitment in time - HAHA - silly me - ;))


Anyway -

STEP #1 - I only used 11 of the dark green strips -
Laid them all out vertically on a piece of fusible interfacing - on a padded surface - next to each other with sides touching - pinned the tops and bottom to keep them in place - and forgot to take a photo of that step.  You should get the idea from the next photo -

STEP #2 - I did it LEFT-HANDED - (I'll explain WHY it's LEFT-HANDED in a minute.)
I marked a 30-degree line from the BOTTOM LEFT corner to the TOP RIGHT corner with some yellow chalk.  Then using the "shiny" light green - I started in the BOTTOM LEFT corner and wove my may UP to the TOP RIGHT corner - following the chalk line to get the correct angle - just like in the first video - ONE OVER - two under - ONE OVER - two under - all the way to the other corner.  Next row - above the first one - and right next to it - with the sides touching - but the ONE OVER is offset by one.  To see it - take look at the BOTTOM LEFT corner and follow the light green ribbon to the other side - then the row above it - follow the light green ribbon to the other side.  The dark green will be the bottom LEFT side of my tumbling block - and the light green will be the bottom RIGHT side of my block.  I did the same pattern to cover the whole area - and it was beginning to look really cool - ;))


Then I got confused - and this dang squirrel had me up a tree for a couple of days until I figured out how to do STEP #3 - ;))

When I couldn't get it to "work" - I re-watched the second video - the one that showed the third step in more detail. I watched it and re-watched it several times UNTIL I finally realized that the reason that I couldn't get it to work was that I was LEFT-HANDED - and the lady in the video was doing hers RIGHT-HANDED!!

I said that I would explain in a minute - here goes -

The first video by Rami Kim is LEFT-HANDED - she starts her STEP #2 in the BOTTOM LEFT corner - like I did - so I had no trouble following that part - my light green goes diagonally the same way hers does -

BUT the SECOND video is by a lady who is RIGHT-HANDED. Her "pink" is her STEP #2 and it starts in the BOTTOM RIGHT corner and goes to the TOP LEFT.

No wonder I couldn't get the weave to work - the diagonals were in the opposite direction and the "gaps" for the weave weren't where they were supposed to be - ;))

So I went back to the first video - and she kind of skims over STEP #3 - except to say that the weave is THE SAME and goes in the OPPOSITE direction.

ONE OVER and two under - OK - but WHERE do I start?!?!?

After I stared at it for a while - the "light bulb" finally went ON - not OFF - LOL - ;))

And I realized that since the dark green was the BOTTOM LEFT of my tumbling block and the light green was the BOTTOM RIGHT of my tumbling block - I needed to figure out where I wanted/needed the "top" of the block to be - and that THAT spot was where I wanted/needed the ONE OVER to be - so that the WHITE would show on TOP of the other strips.


I started in the middle of the piece and put the white on TOP of the dark green between two light greens that were next to each other on the diagonal - then tucked the ends UNDER in both directions. Then the question was WHERE to come back OUT for the next TOP.


That part is tricky - BUT - follow the white ribbon from the TOP LEFT to BOTTOM RIGHT - it goes IN in the top of one light green and comes OUT from the bottom of the next light green one over to the right - and then back IN at the top of the next one to the right and below.  The ONE OVER is actually OVER TWO dark greens and the TWO UNDER actually comes out THREE UNDER - the light green and next dark green AND the next light green. Once you get that first row - the rest is a piece of cake - (and by that time I wanted a big piece of CHOCOLATE cake - but I settled for a brownie - LOL - ;))

Each of the following rows sits right next to the last one with the sides touching - and is offset by one -


When you get to the corners - you have the pattern in place to get the over/under worked out - 


All of the white "tops" extend past the top and are next to each other -


The same on the LEFT side - the white strips all come out side by side -


On the RIGHT side - the light greens come out next to each other -


I put the extra dark green strips on it to see what it would look like when it was trimmed -


And I thought of making it into a potholder - but it didn't want to cooperate - so that's about as far as I got - ;))


If you are RIGHT-HANDED - you will want to weave from RIGHT to LEFT - so you can REVERSE it by starting in the BOTTOM RIGHT corner and working your way up to the TOP LEFT corner.  The over/under stays the same - the only thing that changes is the direction of your diagonal weave.  Your vertical strips will be the BOTTOM RIGHT side of your tumbling block - and your STEP #2 will be the BOTTOM LEFT sides of your block.  Your STEP #3 - TOPS will be woven from BOTTOM LEFT to TOP RIGHT. I hope that helps - if not - take another look at the second video - see if you can figure out what she's trying to show you - LOL - ;))

All in all - it was a FUN Squirrel to chase -

And it wasn't a complete waste of time - since I did finally figure it out - ;))

Now that I did a "test" piece and I know what NOT to do -

I might try it on a larger scale - like a wall hanging -

It might be easier than trying piece a bunch of 60-degree diamonds - ;))

And there are some things that I forgot to mention. The fusible interfacing sounded like a great way to keep it all "stuck" together - but mine didn't want to "stick". It may have been because the ribbon is/was polyester - but I'll have to think of some other way to stabilize it. The padded surface was great for the pins - but the pins themselves got in my way at times - like when I needed to mark the 30-degree lines. And I wound up hand-basting it around the edges to a piece of muslin then machine basting it to keep all of the ribbon "tails" from coming loose.

Trail and error -

And learning new things -

That's the FUN of chasing Squirrels - ;))


Talk to you later - gotta go - gotta sew -


Saturday, January 20, 2018

Chasing this little squirrel -


Has had me up a tree for a couple of days now - ;))

I wanted to post a "finished" project - but it's not cooperating with me right now - and I didn't want to tease you guys any more - so here's what I have so far - ;))


The optical illusion and 3-D effect of Tumbling Blocks has always fascinated me - and I want to share a couple of tips and tricks that I learned the HARD way - but it's getting to be dinner time and I'm hungry and I'm tired - so my "explanation" post will have to wait until tomorrow or the next day - ;))

The 3-D effect is even prettier in "real life" - ;))

What do you think? - ;))


Talk to you later - gotta go - gotta sew -


Thursday, January 18, 2018

Prep work -


Like having the binding ready to go -

May not save me any time later -

Since it has to be done eventually -

Sew me now or sew me later - LOL -

But it makes my life easier if I have it "prepped" beforehand - ;))

Like "Dug" - the dog in the movie "UP" - I often get distracted by "Squirrels" -

But before I chased my latest "Squirrel" - I made sure I finished the binding prep work. I made another set of green/gold binding for my O Happy Christmas and finished up the pink/white binding - and then found that I didn't like how the pink polka dots were showing on the little flange -


So I "un-sewed" it and substituted a solid white - saving the white with pink polka dots for something else - someday - ;))


Then I did some prep work on my "Squirrel" -


And that's as far as I got today -

Stay tuned -

Tomorrow is a PLAY day!! - ;))


Talk to you later - gotta go - gotta sew -


Wednesday, January 17, 2018

Today I saw another Squirrel -


With a capital "S" -

And pulled these three fabrics from my stash to play with -


I'll show you tomorrow -

Unless I see another Squirrel between now and then - ;))


Talk to you later - gotta go - gotta sew -


Tuesday, January 16, 2018

Moving along -


At a snail's pace - but still moving along - ;))

The binding strips are all sewn end to end -


And the navy blue/white set is sewn together -


After dinner I'll finish the pink/white set -


Which will leave the green/gold set -

But before I sew that -

I think I'll measure my O Happy Christmas and cut more strips to make the binding for that one as well. The green and gold fabrics work for that, too -
and if I cut/make it now - it will be one less set that I will have to make later - ;))


Then I think I'll check the rest of the sandwiches in the "to be quilted" pile to see if I can find something suitable to use for binding. Might as well get the whole pile ready to go - I have to do it eventually and it will be one less "chore" to do after I do the FUN Free-Motion Quilting part.

When I get to the binding stage, I still have the corner triangles/hanging sleeve, the label, and the scrapbook page to do. That stuff takes as much if not more time than it takes to "quilt" it. I usually stall out when I get to making the backing - then again when I get to the binding.

Piecing the quilt top and Free-Motion Quilting tie for my favorite part - the other parts of making a quilt are more like "chores" that I have to do before I can "play" -

And the fewer "chores" I have to do -

The more time I have to PLAY - ;))


Talk to you later - gotta go - gotta sew -


LinkWithin

Related Posts Plugin for WordPress, Blogger...