On my Interweave Quilt II have been sewn - ;))
Slowly but surely -
The second section is ready to be sewn to the first section -
I'll wait until the entire center is sewn before I press the whole thing -
And then come these four - ;))
We all know to press the seams in alternating directions - one row up and the next row down - so that the seams "nest" properly -
But since every other row is pressed "up" - that row will be on the bottom at some point -
And when the "up" row is on the bottom - I have to "flip" all of the seams -
Which is hard to do when it gets big and bulky -
SO I do it MY WAY - ;))
It's easier for me to "flip" the seams when I'm sewing the "twosies" -
So when I press a pair of rows - I press the seams on the LEFT one UP -
And the seams on the RIGHT one DOWN -
So that they alternate like they should -
Then I flip the LEFT one in each pair right side up -
And put the RIGHT one on top of the LEFT one - ;))
The top row has the seams going DOWN -
And the bottom row has the seams going UP - ;))
It may sound counter-intuitive to start with the "flippy" row on the bottom -
But if I do it that way with the "twosies" - I get it over with -
The one on the RIGHT will be the one on the bottom for the next set - and the one after that - and the one after that -
ALL of the rest of the seams on the bottom rows will be going DOWN -
So I don't have to mess with "flipping" any more seams - ;))
Like I said - I get it over with -
So then all I have to worry about is matching the seams - LOL - ;))
Talk to you later - gotta go - gotta sew -
But I did re-arrange some of the rows as I walked by - ;))
Chores took up most of the day -
So maybe I'll get some sewing done tomorrow -
But I've let the chores pile up lately -
So maybe not - ;))
Talk to you later - gotta go - gotta sew -
Can be a challenge sometimes -
Trying to keep the same fabrics separated - similar designs separated - similar colors spaced out - until it finally gets to the "OK - I'm DONE." stage - aka - "This is about as good as it's going to get - and I have other Squirrels to chase - so I'm stopping right here." - LOL - ;))
The rows still need to be sewn together -
And I may wind up switching some of them as I go long -
Accidentally and/or on purpose - LOL - ;))
And I almost forgot that I still have to sew and add the borders, too -
The strips for those are sitting in a pile minding their own business -
But I'm sure they would be hollering at me soon enough -
To let them join the party - LOL - ;))
Talk to you later - gotta go - gotta sew -
Of my Interweave Quilt II didn't take any time at all - ;))
You can find the FREE pattern from Timeless Treasures - HERE -
Interweave Quilt - 48" x 56" - designed by Marlous Carter
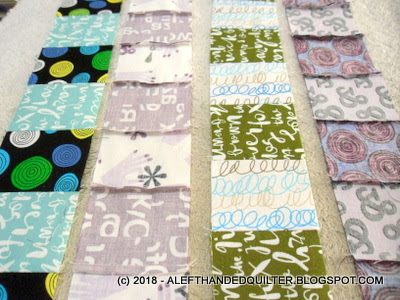
When I finished the last four rows - I paired up the "same" dominant strips -
So I can make sure to alternate and space them out a bit when I lay them out - ;))
I got a kick out of the strips that say -
"The quick brown fox jumps over the lazy dog." -
And the hands with lavender nail polish holding the symbols -
Maybe we can find a Quilty Hug recipient who used to "type" for a living -
I - for one - got several of my first jobs because I knew how to "type" -
You know - way back in the dark ages - before computers -
When we had typewriters - and took typing lessons -
To learn how to type - using all ten fingers - by touch - LOL - ;))
Talk to you later - gotta go - gotta sew -
Are sewn on my second Interweave Quilt - ;))
You can find the FREE pattern from Timeless Treasures - HERE -
Interweave Quilt - 48" x 56" - designed by Marlous Carter
The last four rows will have some more of the purple/lavender in them -
And they should look pretty good when I get them all laid out - ;))
Unfortunately - with Monday comes another round of weekly chores -
And since they don't seem to do themselves -
We'll see how much sewing I can get done - LOL - ;))
Talk to you later - gotta go - gotta sew -
By the time I read yesterday's comments -
I had already changed my mind - ;))
I didn't think the Quarter Log Cabin pattern was right for these strips -
It looked like the GREEN was TOO strong and would detract from the rest of them -
So I "un-sewed" the sets and took the GREEN strips out -
And put them back with the rest of my jelly rolls - for later - ;))
I decided to make another Interweave Quilt - the short version - instead -
Using the two jelly rolls that I originally chose - thinking it might look a lot better -
And I'll save the green for a GREEN Quarter Log Cabin or something - LOL - ;))
So - I "re-paired" the strips -
And decided to cut and sew them two sets at a time -
I'm not sure if this one was printed off-grain or simply cut crookedly -
It's even more obvious from the wrong side of the fabric strip - UGH!! -
And it is REALLY annoying considering how much these dang strips cost -
You'd think they could BE straight - even if they were on sale -
Sorry - BOB said that - LOL - ;))
Anyway - today I got eight (8) rows sewn together -
And they're in no particular order -
But I think it's already looking better without the GREEN - LOL - ;))
Talk to you later - gotta go - gotta sew -
Is about all I got sewn today -
Got a feeling this is going to be very GREEN quilt -
Even with the purple/lavender - turquoise - and black -
Sure hope someone likes GREEN - LOL - ;))
Talk to you later - gotta go - gotta sew -
Can be fun sometimes if I don't have a set plan - ;))
For my next project -
I thought that I would make another Quarter Log Cabin Quilt -
Like the big blue/green one that I sent to Frog Quilter - HERE -
Only this time - the shorter "Lap" version - 64" x 64" -
It's a FREE Pattern - from Jelly Roll Fabric - dot - net - HERE -
When you sign up for her email - you get access to her FREE patterns - AND get email notifications of her daily specials/sales - which is where I got these jelly rolls ON SALE one day -
Benartex Urban Oasis - 10 fabrics - 20 strips -
and Cloud 9 Organic Fabrics - Typography - 20 strips -
Anyway - I decided to "mix and match" these two so they're not as matchey-matchey as they would be if they were both the same brand/fabric/roll -
But I need 57 total strips - so I found another roll of 20 GREEN - and it should work to help tie all of the colors together - I hope - ;))
I split them into piles of "main" and "contrast" - according to the pattern -
The pile of really dark ones on the left will be used for the last row on each block -
The rest of them were then paired up for the strip sets -
We'll see how far I get with this tomorrow after I do my chores - ;))
Talk to you later - gotta go - gotta sew -
The Interweave Quilt - ;))
You can find the FREE pattern from Timeless Treasures - HERE -
Interweave Quilt - 48" x 56" - designed by Marlous Carter
I tweaked the pattern a little and made it wider and longer - 52" x 72" -
Those of you with "eagle eyes" have probably already noticed that I "reversed" the left and right borders from yesterday. The seams weren't nesting the way they should - so I switched them. The colors are so YUMMY - I don't really think it makes that much difference - and it was a LOT easier to sew the borders on when the seams went the way I wanted them to - LOL - ;))
Now it's ready to send to Frog Quilter to be one of her "Quilty Hugs" -
And I can decide what I want to play with next - ;))
Talk to you later - gotta go - gotta sew -
Is AWESOME!! -
All I have to do is ask -
And you guys deliver -
So - THANKS, guys!! - ;))
After reading all of your comments - I had pretty much decided to stick with my original plan and to go for the "long" version - but I wanted to run it by Frog Quilter first. I want to send this to her for a "Quilty Hug" - and wanted to make sure that it wouldn't be TOO long if I did that -
I told her that I have plenty of THIS fabric to make a long version - I have the "border strips" that I cut as I went along - plus a pack of 20 - 6" strips and a pack of 12 FQ - to use for "extra" borders if I need them. I loved the colors AND they were on sale - so I stocked up - LOL - ;))
And I think we might need another "tall man" quilt -
And if we do - this is the one it should be -
I can always make a shorter one with one of my other "jelly roll" packs -
And she agreed - so the "long" version is what it will be - ;))
Once that was decided -
I sorted the "border strips" into 6 piles of 6 in no particular order -
And made 6 very long strips -
Then sewed 3 long strips together - lengthwise - for the left side -
And the other 3 long strips together - lengthwise - for the right side -
They aren't sewn to the center section yet -
But when I do - it will be around 52" x 72" -
And I think it will be just fine - ;))
And YES - I'm glad I asked you guys -
You always give me great feedback -
So THANKS, again!! - ;))
Talk to you later - gotta go - gotta sew -
But still not quite done - ;))
I forgot that I had chores to do -
And that didn't leave me much time to sew -
So it still needs borders -
I LOVE these colors!! -
But the more I look at it - the more I think it's too long. I should have stayed with the pattern size - 48" x 56" - but I wanted it a bit larger. So far - this is 40" x 72" (plus seam allowances) - and I'll have to add several border rows to the sides to make it the "planned" 60" x 72" - unless I shorten it -
I could take off 6-1/2" from both the top and the bottom -
Or I could do a 1/3 - 2/3 split -
And take 8-1/2" off the top and 4-1/2" off the bottom -
Leaving the longer "ends" at the bottom -
Either way would get me closer to 60" in length - which is a better/shorter size -
And then I could add the extra to the sides - to get that up to 52" wide -
52" x 60" sounds like a better size to me -
So that might work - ;))
What do you think? -
Go with the "original plan" - 60" x 72"? -
Or shorten it - to 52" x 60"? - ;))
Talk to you later - gotta go - gotta sew -
The center of the Interweave Quilt is 20 rows wide -
You can find the FREE pattern from Timeless Treasures - HERE -
Interweave Quilt - designed by Marlous Carter
And - you can't see all of them in this photo -
But I have a two sets of 8 and one of 4 -
So just a couple more seams and the center will be done -
Then I'll play with the borders -
And hopefully have it ready for it's "glamour shot" tomorrow - ;))
Talk to you later - gotta go - gotta sew -
Today the rows were sewn for the Interweave Quilt -
The FREE pattern from Timeless Treasures - HERE -
Interweave Quilt - designed by Marlous Carter
Then I played with arranging them for the final layout - ;))
These colors are so YUMMY -
I think I could play with arranging the rows for a couple of weeks -
But I have other Squirrels to chase -
So this will have to do - LOL - ;))
Talk to you later - gotta go - gotta sew -
Is the title of a very cool book -
That I bought way back when - when I got my Husqvarna Lily 555 -
I love to sew with my feet -
Exploring your sewing machine presser feet -
(c) 2005 - Sewing Information Resources and VSM Sewing Inc.
The back cover says -
I love to sew with my feet - Every sewing machine has numerous specialty presser feet and accessories that offer the sewer unlimited possibilities to expand their knowledge of sewing as well as their sewing machine. The creative opportunities are limitless just by using all these feet. We have attempted through this book and CD-ROM to broaden your view of sewing, enhance your sewing skills, and expose you to the many presser feet and accessories available.
When was the last time you used all of the presser feet that came with your sewing machine? Do you even know what they're for? I admit - I had to dig out the owner's manual for my sewing machine to refresh my memory on which foot to use for the "blind-hem" and how to do the "recommended" fold.
Here's a quick refresher on "the fold" - for those who may not know how to do it -
Like my Dad was fond of saying - "Anything is easy - if you know how." -
So - let me show you - it's easy - once you "get it" - LOL - ;))
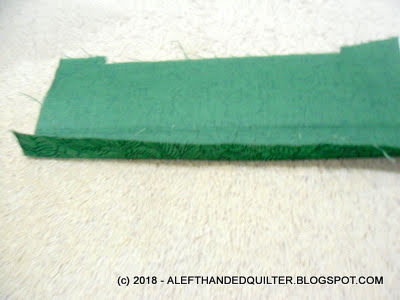
I'm going to use this green scrap as a "demo" piece -
Press it up at the "hem fold line" -
Open it up -
Press the cut edge to the fold line - and then fold it again on the fold line -
For a "double-fold" hem - and press it -
And baste it - with a very long stitch that will be easy to remove later -
about 1/4" away from the top edge -
Now - if I was going to sew it by hand - I'd use an "invisible" stitch so that it wouldn't show on the "front" side -
The machine version of that is shown by the RED dashed lines -
the "V" is the bite of the "front" side that is caught when you sew the hem -
But we can't sew it like that because all of the stitches would show on the "front" -
So here's the trick -
We're going to sew it on the INSIDE of the top fold that we basted down -
So turn it upside-down -
And fold it back down on itself so you can expose the top edge that you basted -
Now - if we take it to the sewing machine and find the "blind-stitch" -
The one that goes stitch-stitch-stitch-V - then we're good to go -
Select the stitch and put on the "blind-hem" foot -
And stitch it down -
Press it open -
Then take out the basting stitches - and all you see is the "V" bite on the front - ;))
===
And - in case you're wondering -
I did get another couple of rows done on the Interweave Quilt -
And I cut the rest of the strip sets - so they're ready to sew - ;))
Talk to you later - gotta go - gotta sew -