For the Deep Red Crumb Squares are done -
There are four more that go on the top row - but it's too high for me to reach - and you get the idea. The larger size will be 5 Crumb Blocks across the top and 6 down - so I have a few more Crumb Blocks yet to make - ;))
This past week I handed off two of my UFOs to Frog Quilter as a donation to her Quilty Hugs passion -
Go take a look at the FABULOUS quilting she did on Jelly Beans - HERE -
It's been a UFO of mine for years - it was all boxed up but never quite made it to the longarmer. I posted about the top HERE - and the back HERE -
I am sooooooooooo glad that she is going to finish it and find it a good home - ;))
Talk to you later - gotta go - gotta sew -
For 11 more alternate blocks for my Deep Red Crumb Squares -
On the right are the RED squares - 11 sets of 4 @ 3-1/2" x 3-1/2" -
And the RED center squares - 11 @ 1-1/2" x 1-1/2" -
On the left are the "three-sies" - 44 sets of 3 - 1-1/2" x 1-1/2" squares -
For the sash strips - ;))
Tomorrow I'll sort them into 11 sets of 4 -
And play with getting all of the parts together into actual blocks - ;))
Talk to you later - gotta go - gotta sew -
So - while I was in a "cutting" mood -
I got a head start on the next one that I have planned -
Dug out some 10" squares -
Which are more like 9" squares now after pre-washing - LOL -
And - YES - I do pre-wash my 10" squares - but not jelly rolls or charm packs -
Ran them through my strip cutter die -
Then cut the rest of what I needed from some yardage -
We'll see if it looks as good "in real life" as it does in my head -
There are a couple more "projects" that I need to sort out -
Then I can get going on making more Crumb blocks - ;))
Talk to you later - gotta go - gotta sew -
After I figured out how many more units I need to get my 4x4 Deep Red Crumb Squares up to a 5x6 layout - which should make it a pretty good sized lap quilt -
But I didn't realize that it would require -
14 more Crumb BIG blocks with 4 little ones each - so another 56 Crumb blocks
14 more sets of 4 RED sashes - so another 56 of those
14 more GREEN centers
11 more Alternate blocks with 4 sets of little RED ones - so 44 more of those
11 more RED centers
11 more sets of 4 Crumb sashes with 3 squares each - so another 132 of those
Good grief!! -
The original 4x4 only needed 16 Crumb Squares and 9 Alternate Blocks -
It's like a whole other quilt!! -
I also needed to cut 6 more side triangles - QST -
But surprisingly enough -
I didn't need any additional corners -
Just kidding - 4 corners is still 4 corners - no matter what -
I wanted to see if you were paying attention - LOL - ;))
So - while I'm in a "cutting" mood - I might try to get a head start on the next one that I have planned - see if it looks as good "in real life" as it does in my head. Then I can get going on making more Crumb blocks - ;))
These really are like potato chips -
I can't make just one - ;))
Talk to you later - gotta go - gotta sew -
For an "on-point" setting -
With NO MATH -
Is easy -
If you think about it for a minute -
Of course, you can always consult a "chart" for exact sizes -
But you can also "eyeball" it -
And go with an estimate -
Especially if you want your blocks to "float" -
Let me explain How I Do It - ;))
===
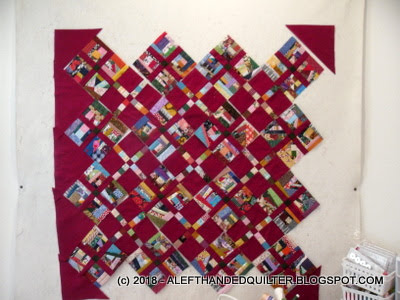
I finished up the rest of the Deep Red Crumb Squares blocks and put them all up on the design wall -
Now I need to fill it in with side triangles and the corners -
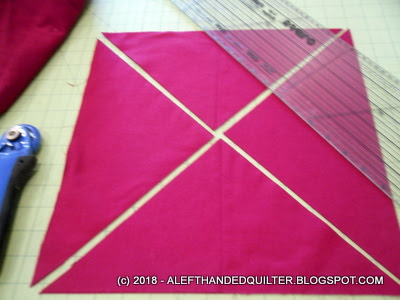
CORNER TRIANGLES - HST -
Here's the bottom left corner -
I know that I need a HST triangle about this big to fill in the corner -
It has to be a Half-Square Triangle (HST) -
Because I want/need the outside edges to be on the straight of grain -
The long diagonal side will be the one sewn to the block -
Because the ruler is RH - it's easier to show you in the top RH corner -
That a 6" square will probably work -
You can also count the squares on the mat -
Since I like to cut them oversize to let my blocks "float" -
I did the MATH and cut my Black and Cheddar ones at 7" -
But I don't have to do any MATH -
I just have to measure my block -
Shortcut - cut your corner squares the same size as your block -
The diagonal will be always be longer than the side of your block -
Your blocks will "float" and you can always trim the corners to size later -
My blocks measure 7-1/2" -
I said before that I cut my Black and Cheddar ones at 7" -
But for this one I want more "float" - so I'm going to cut them at 8" -
So for 4 HST - corner triangles -
I cut 2 squares at 8" and stacked them -
Then cut them on the DIAGONAL - ONCE -
SIDE TRIANGLES - QST -
The side triangles need to be Quarter-Square Triangles (QST) -
Because I want/need the outside edges to be on the straight of grain -
The shorter bias edges will be sewn to the blocks -
So - for a side triangle - I'll need a QST - about this big -
Shortcut - measure the diagonal of my block -
The outside edge is roughly the same size as the diagonal measurement -
An 11' square would probably work -
I cut my Black and Cheddar ones at 12" -
But for this one I want more "float" - so I'm going to cut them at 13" -
I can get 3 - 13" squares across the width of fabric - using 39" of 40"-42" WOF -
And 3 squares will give me 12 QST which is what I need -
For 12 QST - side triangles -
I cut 3 squares at 13" and stacked them -
Then cut them on the DIAGONAL - TWICE -
I always put the corners on the wall first so that I don't get them mixed up -
Once the four corners - HST - are accounted for -
The rest are QST side triangles -
I like this one so much I think I want to make it bigger -
There is plenty more red fabric -
And no shortage of crumbs -
So that's my new plan - ;))
Talk to you later - gotta go - gotta sew -
Ten more to go -
For the center of my Deep Red Crumb Squares -
Then it needs the setting triangles and corners cut -
While I'm already planning the next one - ;))
Talk to you later - gotta go - gotta sew -
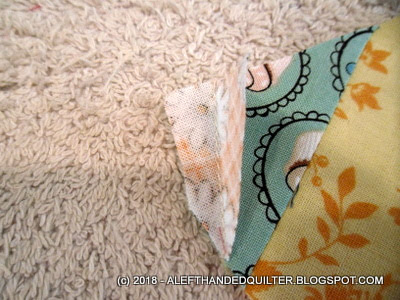
Can be sewn together a number of different ways - ;))
You can sew bit to bit - use strips - or not -
Only ONE piece needs a straight edge -
And even at that - you can "eyeball" a straight line if you want to -
There are NO RULES - ;))
I finished up the last four "Crumb" blocks that I needed for my Deep Red Crumb Squares - gotta love the little pink elephant -
And was going to sew the "Crumb" blocks together today -
But then thought that I would show how "I" sew odd-ball bits/pieces instead - ;))
This plastic bin is full of the "cut-offs" from previously made "crumb" blocks -
Anything less than 3/4" is really too small/narrow to use -
Since 1/2" is taken up with seam allowances -
But I found these little bits/pieces and they are still usable -
Although they may not look like it at first glance -
I also have some 1" squares in a basket that can be used -
Some "larger" crumbs in another basket -
And a bunch of bits/pieces sewn together in various shapes and sizes -
I'll take this bunch and sort them -
Into piles of similar shapes and sizes -
Here's one "almost up to size" - it goes in another pile -
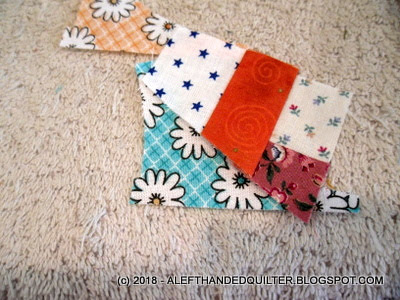
So - back to the bits/pieces - I'll show you how I use this stack of four -
They are mostly triangular shaped but have a curved edge - which makes them look unusable -
But they make great "corners" for some of my other bits/pieces -
Flip the top one over - and I can follow the "straight edge" of the top piece -
Same with this one -
And this one -
So I can sew these three - chain piecing - one right after the other -
And the fourth one can go with this bit/piece -
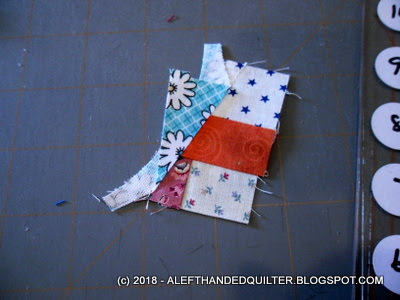
All four sewn -
And clipped apart - and pressed open -
Take them to my little cutting mat next to the sewing machine -
And trim the left side for a "straight edge" -
Then this one -
And the other side -
And this one - the left side first -
Then across at an angle because they don't quite line up -
And I like them wonky -
Then this one -
Left side -
Trim the other "tail" -
And there you go -
Four more little bits/pieces to go on the piles with their friends who are similar shape and size -
The seam allowance on this one was a little too big -
But a quick trim with the scissors fixed it -
Then there are these guys -
The brown one will make a good corner for this bit -
And the orange one seems to fit this one -
I may lose some of the smaller bits in the seam allowance -
And I may "un-stitch" some of them to re-sew to a larger piece -
But I'll decide that when I get there -
Because I pretty much make it all up as I go along -
So - for now - I'll just keep on keepin' on -
Sewing bits to bits - or to strips -
Whichever strikes my fancy - because there are NO RULES -
And I am in no danger of running out of "Crumbs" - ;))
Talk to you later - gotta go - gotta sew -