If you are right-handed - just reverse the directions.
============
The top measures 64” x 64” -
And is all folded up nice and neat -
Since I don’t feel like unfolding it -
I don’t have a photo this time -
But this might jog your memory -


The back needs to be at least 70” x 70” -
So I’ll start with 4 yards -
Up on the wall -

Two across at 40” (WOF) -
And two down at 36” (give or take) -
Should be roughly 80 across x 72 down -
After trimming the selvages and straightening the ends - ;))
I like them to run UP and DOWN -

The same way that they come off the bolt -
I think that they “hang” better that way -
My opinion only - I could be wrong - ;))
But -
Before I actually sew these together -
I want/need to make my “sleeve” and “header” -
And I don’t remember if I ever showed you -
How I do that -
So I’ll just show you now - ;))
===
By the way -
The JRRQ #1/2/3 didn’t have sleeves -
So I skipped this step on them -
And Wolf Song had it’s own “header” -
And a simple black sleeve -
Anyway -
I use this method on quilts up to about 80” wide -
Wider quilts would just need a longer “tube” -
You’ll see what I mean in a minute - ;))
#1 - Press the fabric
It’s already been pre-washed - ;))
#2 - Straighten the edges -
And trim the selvages -
If you lose an inch or two -
It doesn’t matter right now -
The actual size of the back will be adjusted later -
#3 - Sew the top two pieces together -
Using a 1/2” seam -
Along BOTH SHORT (36”) sides -
To form a “tube” -
(Here’s where you would add another panel -
Or two - if you needed a wider width - ;))
#4 - Press the seams open -
#5 - Fold in half - side to side -
Matching the seams -
#6 - Re-straighten the edge if you need to -
I did - ;))

#7 - Cut 9” off one end for the “sleeve” -

I used my O’Lipfa (r) Lip Edge Ruler -
Model 11111 - 5” x 24”
I did a REVIEW - here -
It is a VERY handy ruler -

The rest of the “tube” will be your “header” -
So while I still had it on the cutting mat -
I straightened the other end -
And then set it aside for the moment - ;))

===
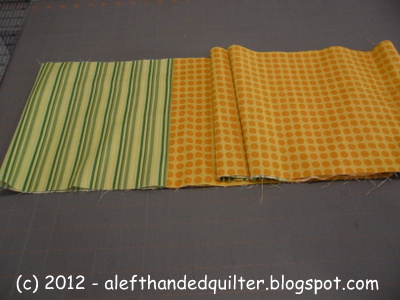
#8 - Sleeve -
Trim the 9” tube to the WIDTH OF THE TOP -
You could have one long panel in the middle -
With two shorter panels on each side -

Or -
You could have the sections offset -
Or -
You could have all of one fabric and a little of the other -
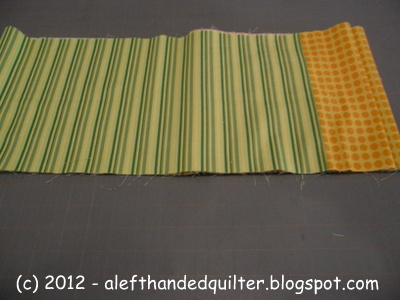
I decided to have the YELLOW in the middle -
With the GREEN STRIPE on both sides -
My scrap pile needs “STRIPES” more than it needs more “YELLOW” - ;))
So I measured from the YELLOW end -
And cut off part of the GREEN STRIPE end -
In my case - the top measures 64” -
So I cut the folded tube on the 32” mark of my cutting mat -

Hem both short sides with a double - 1/2” seam -
(Fold the ends over 1/2” - press -
And then fold over 1/2” again - press again -
Topstitch close to the folded edge)

That will ensure that the sleeve is 2” narrower than the top - ;))

Then -
To attach the sleeve to the quilt top -
Fold the sleeve in half - wrong sides together - lengthwise -
Offset by 1” - and press a nice, crisp fold in the fabric -

AFTER you quilt the top -
And BEFORE you bind it -
Match the raw edges and pin the sleeve to the quilted top -
The shorter side will be against the quilt top -
The longer side will be the “front” of the sleeve -
The “offset” will form a “pooch” in the front for the rod -

Bind the quilt - catching the sleeve in the top seam -
Hand stitch the binding down - covering the seam -
And hand stitch the bottom of the sleeve to the quilt -
Along the nice, crisp fold that you pressed earlier - ;))
Me? -
I just label it - and put it in a baggie - for my friend/quilter - ;))

===
#9 - Header -
Trim the tube to the WIDTH OF THE BACK -
I want mine to match the sleeve -
So I will have one long panel in the middle -
With two shorter panels on each side -
I cut mine to 72” wide -
8” wider than the top -
Just because I could - ;))
I started with two pieces of fabric 34-36” long -
Sewed them together -
And then cut off 9” for the sleeve -
That left me with a 25” “Header” -
After straightening - ;))
The rest of the back -
Is whatever I want it to be - ;))
And I decided to turn both the BLUE DOTS -
And the ORANGE STRIPE sideways -
So that they were 72” across -
And 40” down -
With the addition of a filler strip -
The back came out to 72” x 73” -

===
This method makes my “Sleeves” match -
The “Header” - top of the back -
And that makes the Sleeve -
Virtually invisible -
But I’m not sure whether or not -
That is a GOOD thing -
Because -
I have had several of my quilts -
Hung SIDEWAYS in a Quilt Show -
Because -
The Quilt Show staff -
Couldn’t SEE the sleeve -
And didn’t know it was there!! ;))
Talk to you later - gotta go - gotta sew -

No comments:
Post a Comment