Sewing today...
OK – this blogging thingy is beginning to SERIOUSLY interfere with my SEWING time!!!
(Do ya like the split infinitive?)
I want/need to post something Scrappy for tomorrow (Saturday) –
and a Quilt Journal entry for Sunday -
and Design Wall Monday will be here before I can blink three times -
and then there's Tuesday - 2 more questions - ??????????
So - today I want/need to work on my post for tomorrow -
BUT – before I can DO that –
I want/need to MAKE something Scrappy!
I want/need to get some SEWING stuff DONE!
Then I want/need to work on my posts for next week. I downloaded some photos last night - just have to "finish" them - which takes me "forever" these days. What used to take me an hour takes me a day now – SLOW is me. Oh, well…
I also want/need to work up something SPECIAL for August 13 - Left-Handers Day and the next official meeting of the International Left-Handed Quilters Anonymous. We have Julie/Japan - Mad about Craft/UK - and now Sue/Australia - so we are truly International!!
And I have SOOOOOOO many UFOs -
I want/need to do the B/W/R ones - the pattern goes together pretty fast - unless you're trying to make FIVE of them. Even though I have two of the tops done – I still have three more to go. They are all bagged up - just got to get TO them!
And the one-way block one
And the scrappy star block
And the Hawaiian Applique
And the FMQ practice stuff
And EVERYTHING ELSE!!
So – NEW RULE – Make time to SEW!!
Yeah - RULES - My blog - My rules - ;))
I try to say occasionally that my way is just The Way I Do It - not necessarily the fastest - the best - and for sure not the only way - just How I Do It. My rules work for me! Feel free to make your own. Or not.
Bottom line - I just want to SEW today.
This post is up - so "Scrappy Saturday" is next.
But I know me – I have every intention of sewing today –
and I’ll probably blow the whole day reading blogs –
So if you don’t see a post tomorrow – you’ll know why.
Talk to you later – gotta go – GOTTA SEW -
Showing posts with label RULES. Show all posts
Showing posts with label RULES. Show all posts
Friday, July 22, 2011

Wednesday, February 16, 2011
JELLY BEANS
DESIGN WALL WEDNESDAY - or -
WHAT AM I DOING WEDNESDAY?
JELLY BEANS -
So - do you want to know what's on my design wall today?? Here's hoping that you do. (If not, too bad - I'm going to tell you anyway...;)))
The Patchwork Times UFO Challenge for February is #10. My version of that is to work on my Stage 10 projects. (Check out my UFOs - 2011 tab above.)
I picked JELLY BEANS to work on first - a simple kit from Connecting Threads - Riviera Collection (no longer available - sorry).

The colored strips came pre-cut - 2-1/2" wide - with pinked edges. The white fabric was yardage included in the kit that I rotary cut myself. (It still needs a couple of borders - so don't judge it just yet.)
Mathematically - five 2-1/2" strips sewn together with 1/4" seams should come out to 10-1/2". In reality - mine did not!! Once again, I lost my 1/4" seam allowance!
Has anyone out there seen it? I thought I had it right here a minute ago! Where - oh, where - did it go? As you can see - my strip sets did NOT match the white strips that I cut to fit on the ends! They are all SHORT!

OH CRAP!!
I have my 1/4" presser foot. I have my perfect "scant" 1/4" seam allowance settings. I have everything I need. What happened this time? (I lose it every once in a while - but usually find it again soon enough.)
I was having such fun just chain piecing my little heart out - adding one strip right after the other - to twenty-five blocks.

This time I think the cutting was to blame - not the sewing.
I think that the pinked edges messed me up. If the 2-1/2" is measured from pinked tip to pinked tip - I think I may have lost a couple of threads on each tip - with handling, sewing, and such. Add up the lost threads on both sides of FIVE strips - and I think I found my 1/4".
At least that's what I think happened. Who knows?
And at this point - who cares? I had twenty-five blocks all sewn together.
(And - YES - I noticed it when I sewed the first side - but somehow it didn't register in my Swiss-cheese brain - and - YES - I did a test block before I sewed them ALL together - the test block came out OK - go figure!)
So - what to do now?
"Un-sew" all twenty-five blocks? No - I don't THINK so!
Figure out something else? Of course! This is where we quilters get CREATIVE! This is where I, for one, start having FUN!
Now - don't get me wrong - if this was any other pattern - or something that I was going to enter into a competition of some sort (the UFO Challenge doesn't count - it's not being JUDGED) - then I would have been a whole lot more careful and all of the blocks would have been tested at each and every step.
But, hey - this is JELLY BEANS - a fun, little, simple quilt - knock it out in no time at all, right?
Then I remembered something that I discovered many, many moons ago.
Rule #5 - Sometimes blocks don't have to be the RIGHT SIZE - they just have to be the SAME SIZE!
So - I trimmed them all down to 10" square. Who's going to know the difference? I'm not going to tell. (Well, I'm not going to tell everybody - just you..;)...and you're not going to tell, right??)

So now all the blocks will fit together nicely.
I have the first three columns (A/B/C) sewn together - and the last two (D/E) sewn together. I basted the match points before sewing them "for real" just so I would be sure that they matched, (The blocks have already come up short - I don't need mismatched corners, too. I'm sure that would push me right over the edge on this one - and JELLY BEANS right back into the UFO pile.)

All I have to do now is sew the two sections together - add the borders - and move this one up to Stage 5. Then I can choose another UFO from my Stage 10 list . Which one? - which one? Shut up, Kitty - you have to get the borders on JELLY BEANS first - before you get bored - then you can worry about the next one. (And you wonder why I have so many UFOs!)
Talk to you later - gotta go - gotta sew -
WHAT AM I DOING WEDNESDAY?
JELLY BEANS -
So - do you want to know what's on my design wall today?? Here's hoping that you do. (If not, too bad - I'm going to tell you anyway...;)))
The Patchwork Times UFO Challenge for February is #10. My version of that is to work on my Stage 10 projects. (Check out my UFOs - 2011 tab above.)
I picked JELLY BEANS to work on first - a simple kit from Connecting Threads - Riviera Collection (no longer available - sorry).

The colored strips came pre-cut - 2-1/2" wide - with pinked edges. The white fabric was yardage included in the kit that I rotary cut myself. (It still needs a couple of borders - so don't judge it just yet.)
Mathematically - five 2-1/2" strips sewn together with 1/4" seams should come out to 10-1/2". In reality - mine did not!! Once again, I lost my 1/4" seam allowance!
Has anyone out there seen it? I thought I had it right here a minute ago! Where - oh, where - did it go? As you can see - my strip sets did NOT match the white strips that I cut to fit on the ends! They are all SHORT!

OH CRAP!!
I have my 1/4" presser foot. I have my perfect "scant" 1/4" seam allowance settings. I have everything I need. What happened this time? (I lose it every once in a while - but usually find it again soon enough.)
I was having such fun just chain piecing my little heart out - adding one strip right after the other - to twenty-five blocks.

This time I think the cutting was to blame - not the sewing.
I think that the pinked edges messed me up. If the 2-1/2" is measured from pinked tip to pinked tip - I think I may have lost a couple of threads on each tip - with handling, sewing, and such. Add up the lost threads on both sides of FIVE strips - and I think I found my 1/4".
At least that's what I think happened. Who knows?
And at this point - who cares? I had twenty-five blocks all sewn together.
(And - YES - I noticed it when I sewed the first side - but somehow it didn't register in my Swiss-cheese brain - and - YES - I did a test block before I sewed them ALL together - the test block came out OK - go figure!)
So - what to do now?
"Un-sew" all twenty-five blocks? No - I don't THINK so!
Figure out something else? Of course! This is where we quilters get CREATIVE! This is where I, for one, start having FUN!
Now - don't get me wrong - if this was any other pattern - or something that I was going to enter into a competition of some sort (the UFO Challenge doesn't count - it's not being JUDGED) - then I would have been a whole lot more careful and all of the blocks would have been tested at each and every step.
But, hey - this is JELLY BEANS - a fun, little, simple quilt - knock it out in no time at all, right?
Then I remembered something that I discovered many, many moons ago.
Rule #5 - Sometimes blocks don't have to be the RIGHT SIZE - they just have to be the SAME SIZE!
So - I trimmed them all down to 10" square. Who's going to know the difference? I'm not going to tell. (Well, I'm not going to tell everybody - just you..;)...and you're not going to tell, right??)

So now all the blocks will fit together nicely.
I have the first three columns (A/B/C) sewn together - and the last two (D/E) sewn together. I basted the match points before sewing them "for real" just so I would be sure that they matched, (The blocks have already come up short - I don't need mismatched corners, too. I'm sure that would push me right over the edge on this one - and JELLY BEANS right back into the UFO pile.)

All I have to do now is sew the two sections together - add the borders - and move this one up to Stage 5. Then I can choose another UFO from my Stage 10 list . Which one? - which one? Shut up, Kitty - you have to get the borders on JELLY BEANS first - before you get bored - then you can worry about the next one. (And you wonder why I have so many UFOs!)
Talk to you later - gotta go - gotta sew -
Wednesday, January 26, 2011
LHQ - Attaching Quilt Labels
LEFT-HANDED QUILTING - Attaching Quilt Labels
============
Note - these instructions are written in LEFTISH. If you are right-handed - just reverse the directions. (I love saying that!!)
============
My last post was all about "How to Make a Quilt Label".
============
I also talked about "Where to Attach a Quilt Label".
When the labels are all done - I attach them to the lower back of the quilt.
The question is then - which "side" of the back - lower left side or lower right side?
As I look at the back of the quilt - my natural tendency is to want to attach the label to the lower right side. It just seems more visually pleasing to my eye.
However - my long-arm quilter/friend disagreed - and won!! She said it should be attached to the lower left side. Her reasoning was that - if the quilt were ever entered in a Quilt Show - the "white-glove ladies" usually stand at the right side of the quilt (as you face the quilt) - all ready to flip the quilt over to show you the label - if you ask. In order to do that - the label has to be on that side - which is the left side as you look at the back of the quilt!!
Is this a right-handed world or what?!
========
Then - Heather (A Passionate Quilter) asked me how I apply the label to the quilt.
Great Question!!
I told her that it depends.
I know that sounds like a crappy answer - but there are tons of ways to attach a label to a quilt - and I use a couple of different ones - depending on the effect I want - and depending on whether I want to sew the label on by hand or by machine.
Method #1 - Machine sew the label - topstitch about 1/4" in from the edge
If I don't care if the label stitching shows on the front of the quilt - or if I think I can disguise the stitching well enough to where it is virtually invisible -
I just topstitch the label down - about 1/4" in from the edge

This is a Miniature Watercolor Quilt I made a while back.
The front -

the back -

and the label (kinda crooked - but - hey - it's ON!)

And - as you can see - the label stitching barely shows on the front.

Or this label that I made "log-cabin" style

and as seen from the front

Method #2 - Machine sew the label - using a decorative stitch
If I think the stitching won't show on the front of the quilt -
I sometimes stitch the label down - using a decorative stitch.
Here I used a "blanket" stitch

And from the front - you can barely see the stitching.

Method #3 - Hand-stitch the label - using an "invisible applique" stitch
If I don't want the stitching to show on the front of the quilt - at all -
I will hand-stitch the label down - using an "invisible applique" stitch -
making sure that the stitching goes through the backing - catching a bit of the batting - but not all the way through to the front of the quilt.
(I'll tell you all about that stitch when I post my progress on my Stage 7 - Floral Applique UFO.)

In general - I prefer to hand-stitch my labels down. I just think that they look better and more professional that way. (And it is a MUST if you enter a quilt in a quilt show. I do believe that the Quilt Police frown on machine-sewn labels!)
But - when I make a quilt for my grandkids - I will machine-sew the label - for durability. (And I'm pretty good at making sure the stitching doesn't show much on the front of the quilt!)
The bottom line - how you apply your label to your quilt is personal preference.
Oh, and by the way - I'm making another rule -
Rule #4 - Don't be Afraid to Annoy the Quilt Police!
Talk to you later - gotta go - gotta sew -
============
Note - these instructions are written in LEFTISH. If you are right-handed - just reverse the directions. (I love saying that!!)
============
My last post was all about "How to Make a Quilt Label".
============
I also talked about "Where to Attach a Quilt Label".
When the labels are all done - I attach them to the lower back of the quilt.
The question is then - which "side" of the back - lower left side or lower right side?
As I look at the back of the quilt - my natural tendency is to want to attach the label to the lower right side. It just seems more visually pleasing to my eye.
However - my long-arm quilter/friend disagreed - and won!! She said it should be attached to the lower left side. Her reasoning was that - if the quilt were ever entered in a Quilt Show - the "white-glove ladies" usually stand at the right side of the quilt (as you face the quilt) - all ready to flip the quilt over to show you the label - if you ask. In order to do that - the label has to be on that side - which is the left side as you look at the back of the quilt!!
Is this a right-handed world or what?!
========
Then - Heather (A Passionate Quilter) asked me how I apply the label to the quilt.
Great Question!!
I told her that it depends.
I know that sounds like a crappy answer - but there are tons of ways to attach a label to a quilt - and I use a couple of different ones - depending on the effect I want - and depending on whether I want to sew the label on by hand or by machine.
Method #1 - Machine sew the label - topstitch about 1/4" in from the edge
If I don't care if the label stitching shows on the front of the quilt - or if I think I can disguise the stitching well enough to where it is virtually invisible -
I just topstitch the label down - about 1/4" in from the edge

This is a Miniature Watercolor Quilt I made a while back.
The front -
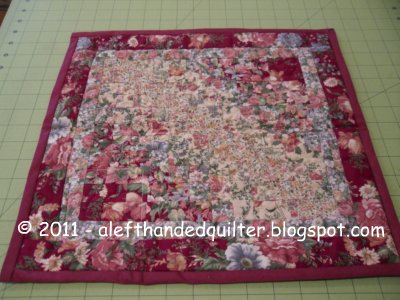
the back -

and the label (kinda crooked - but - hey - it's ON!)

And - as you can see - the label stitching barely shows on the front.
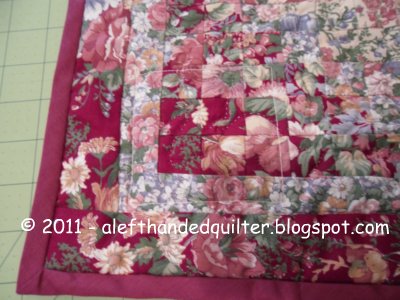
Or this label that I made "log-cabin" style

and as seen from the front

Method #2 - Machine sew the label - using a decorative stitch
If I think the stitching won't show on the front of the quilt -
I sometimes stitch the label down - using a decorative stitch.
Here I used a "blanket" stitch

And from the front - you can barely see the stitching.

Method #3 - Hand-stitch the label - using an "invisible applique" stitch
If I don't want the stitching to show on the front of the quilt - at all -
I will hand-stitch the label down - using an "invisible applique" stitch -
making sure that the stitching goes through the backing - catching a bit of the batting - but not all the way through to the front of the quilt.
(I'll tell you all about that stitch when I post my progress on my Stage 7 - Floral Applique UFO.)

In general - I prefer to hand-stitch my labels down. I just think that they look better and more professional that way. (And it is a MUST if you enter a quilt in a quilt show. I do believe that the Quilt Police frown on machine-sewn labels!)
But - when I make a quilt for my grandkids - I will machine-sew the label - for durability. (And I'm pretty good at making sure the stitching doesn't show much on the front of the quilt!)
The bottom line - how you apply your label to your quilt is personal preference.
Oh, and by the way - I'm making another rule -
Rule #4 - Don't be Afraid to Annoy the Quilt Police!
Talk to you later - gotta go - gotta sew -
Wednesday, December 22, 2010
Slow Poke Quilter
I found a new site - Mama Made This - Slow Poke Quilter.
WOW!! - a lady after my own heart!! And with a bunch of followers who feel the same way!! I will need to take some time to read her posts - but in the meantime - I added her badge to my sidebar. I think she agrees with me that quilting is not a race - it's a process - and it's supposed to be fun!!
So - Rule #3 - Remember - Quilting is Supposed to be FUN!
In previous posts I have sometimes mentioned my sister-in-law. We share a birthday - I am five years older. We are both left-handed. She is a gourmet cook - I am a quilter.
I am always amazed at her culinary expertise and she is impressed with my quilts. I think we both agree that it is easy to impress the other because neither one of us knows how to do what the other one does. She makes her elaborate meals look easy - but I can't do it for the life of me. I make quilts that are easy, but look complicated - and she is impressed with what appears to be a time-consuming and difficult hobby.
She knows that I have "worked" on some of my quilts for years. She doesn't realize that I was "working" on others at the same time - and that the "work" was actually "play" and I was having FUN!! I didn't finish them because I didn't WANT to - it would have been like packing up all of my toys and going home - and who wants to do that when they are having such a good time! My quilts are fun to play with and I actually miss them when they are done.
Now that she has discovered quilting - we have something else to share. Only problem is - she won't be as easy to impress anymore. Oh, darn!!
Talk to you later - gotta go - gotta sew -
WOW!! - a lady after my own heart!! And with a bunch of followers who feel the same way!! I will need to take some time to read her posts - but in the meantime - I added her badge to my sidebar. I think she agrees with me that quilting is not a race - it's a process - and it's supposed to be fun!!
So - Rule #3 - Remember - Quilting is Supposed to be FUN!
In previous posts I have sometimes mentioned my sister-in-law. We share a birthday - I am five years older. We are both left-handed. She is a gourmet cook - I am a quilter.
I am always amazed at her culinary expertise and she is impressed with my quilts. I think we both agree that it is easy to impress the other because neither one of us knows how to do what the other one does. She makes her elaborate meals look easy - but I can't do it for the life of me. I make quilts that are easy, but look complicated - and she is impressed with what appears to be a time-consuming and difficult hobby.
She knows that I have "worked" on some of my quilts for years. She doesn't realize that I was "working" on others at the same time - and that the "work" was actually "play" and I was having FUN!! I didn't finish them because I didn't WANT to - it would have been like packing up all of my toys and going home - and who wants to do that when they are having such a good time! My quilts are fun to play with and I actually miss them when they are done.
Now that she has discovered quilting - we have something else to share. Only problem is - she won't be as easy to impress anymore. Oh, darn!!
Talk to you later - gotta go - gotta sew -
Monday, December 13, 2010
LHQ - Rotary Cutting - Basics
LEFT-HANDED QUILTING - Rotary Cutting - Basics
============
Note - these instructions are written in LEFTISH. If you are right-handed - just reverse the directions.
============
BASICS
THIS IS HOW I DO IT - TIHIDI
General Info
Placement of the Rotary Cutting Mat

First Cut - Straighten the Edge
Method # 1 - Right (Wrong) Hand Cut
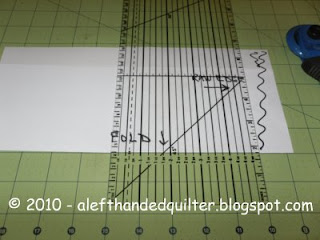
Method # 2 - Left-Hand Cut

Method # 3 - Left-Hand Cut
(the method used in the Overview - and my favorite method)

Method #4 - Left-Hand Cut

Second Cut - Cutting Strips

Sub-Cuts - Cutting Patches - Squares & Rectangles
Example - If the raw edge starts at the 2" grid line on the mat - you can/may cut 4" rectangles on the 6" - 10" - 14" grid lines - just count 2 + 4 (6) + 4 (10) + 4 (14) - etc. You are NOT counting backwards - just from right to left.

There you have it -
I'm not saying that it is the best way - or the easiest way - it's just The Way I Do It - TWIDI - another new word - sounds like Tweety!
I use all four methods at various times. Sometimes I use the grid on the mat. Sometimes I don't use the grid lines on the mat at all. Sometimes I just use the grid on the ruler. It depends.
Bottom line - I just do what works for me. So I'm making that -
Rule #2 - Do What Works For You!
Talk to you later - gotta go - gotta sew -
============
Note - these instructions are written in LEFTISH. If you are right-handed - just reverse the directions.
============
BASICS
THIS IS HOW I DO IT - TIHIDI
General Info
- Press the fabric before you cut it
- You want the cuts to be straight and accurate
- Always use a rotary cutting mat
- Always use acrylic rulers - roll the rotary cutter blade against the edge of the ruler
- Always press down firmly on the rotary cutter
- Always cut AWAY from your body
- Caution - Blades are sharp!! - Safety First!!
Placement of the Rotary Cutting Mat
- Place the rotary cutting mat so that the #1/1 square is in the bottom right hand corner - you want the numbers to run along the bottom from right to left and from bottom to top (unless you are comfortable counting backwards).

First Cut - Straighten the Edge
Method # 1 - Right (Wrong) Hand Cut
- Fold the fabric in half lengthwise
- Line up the fabric with the fold on a grid line on the cutting mat with the raw edge to the right
- Place the ruler on the fabric with the right edge close to the raw edge of the fabric
- Line up the ruler with a vertical grid line and the top of the ruler hooked to the top of the mat - 90 degree angle to the fold
- Hold the ruler with your left hand
- Using your right hand - cut along the right-hand side of the ruler trimming and straightening the raw edge
- ADVANTAGE - trimmed edge is on the right

Method # 2 - Left-Hand Cut
- Same set-up as Method #1 - but instead of using your right hand - go around to the other side of the cutting table and use your left hand to cut along the left-hand side of the ruler trimming and straightening the raw edge
- ADVANTAGE - trimmed edge is on the right

Method # 3 - Left-Hand Cut
(the method used in the Overview - and my favorite method)
- Fold the fabric in half lengthwise
- Line up the fabric with the fold on a grid line on the cutting mat with the raw edge to the right
- Place the ruler on the cutting mat with the left edge just over the raw edge of the fabric
- Line up the ruler with a vertical grid line and the top of the ruler hooked to the top of the mat - 90 degree angle to the fold
- Hold the ruler with your right hand
- Using your left hand - cut along the left-hand side of the ruler trimming and straightening the raw edge
- ADVANTAGE - trimmed edge is on the right

Method #4 - Left-Hand Cut
- Fold the fabric in half lengthwise
- Line up the fabric with the fold on a grid line on the cutting mat with the raw edge to the left
- Place the ruler on the fabric with the left edge close to raw edge of the fabric
- Line up the ruler with a vertical grid line and the top of the ruler hooked to the top of the mat - 90 degree angle to the fold
- Hold the ruler with your right hand
- Using your left hand - cut along the left-hand side of the ruler trimming and straightening the raw edge
- DISADVANTAGE - trimmed edge is on the left - and the trimmed fabric must be turned so the trimmed edge is on the right when you go to make the second cut

Second Cut - Cutting Strips
- Fold the fabric in half lengthwise with the trimmed edge on the right
- Line up the fabric with the fold on a grid line on the cutting mat with the raw edge to the right
- Decide how wide you want the strip to be (3" in the photo below)
- If the strip width is less than the width of the ruler - place the ruler on the fabric with the right edge of the fabric at the width line - the fabric showing under the ruler will be the finished cut strip (3" in the photo below)
- If the strip width is greater than the width of the ruler - use the grid lines on the cutting mat to align the ruler
- Line up the ruler with a vertical grid line and the top of the ruler hooked to the top of the mat - 90 degree angle to the fold
- Hold the ruler with your right hand
- Using your left hand - cut along the left-hand side of the ruler
- Turn the strip and cut off the selvage
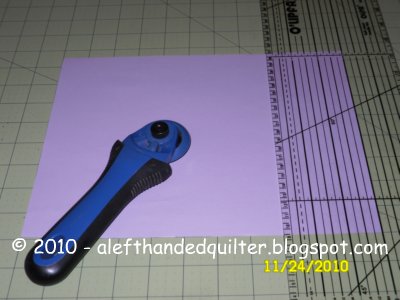
Sub-Cuts - Cutting Patches - Squares & Rectangles
- Press the strips if necessary
- Line up the strip with both a horizontal and vertical grid line on the cutting mat
- Decide how wide you want the patch to be (3" in the photo below)
- Place the ruler on the fabric with the right edge of the fabric at the width line - the fabric showing under the ruler will be the finished cut square or rectangle (3" in the photo below)
- You may also use the cutting mat grid to measure the patch -
Example - If the raw edge starts at the 2" grid line on the mat - you can/may cut 4" rectangles on the 6" - 10" - 14" grid lines - just count 2 + 4 (6) + 4 (10) + 4 (14) - etc. You are NOT counting backwards - just from right to left.
- Line up the ruler with a vertical grid line and the top of the ruler hooked to the top of the mat - 90 degree angle to the fold
- Hold the ruler with your right hand
- Using your left hand - cut along the left-hand side of the ruler
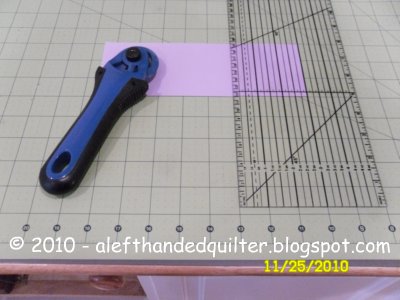
There you have it -
I'm not saying that it is the best way - or the easiest way - it's just The Way I Do It - TWIDI - another new word - sounds like Tweety!
I use all four methods at various times. Sometimes I use the grid on the mat. Sometimes I don't use the grid lines on the mat at all. Sometimes I just use the grid on the ruler. It depends.
Bottom line - I just do what works for me. So I'm making that -
Rule #2 - Do What Works For You!
Talk to you later - gotta go - gotta sew -
Wednesday, November 24, 2010
LHQ - Instructions vs. Directions
LEFT-HANDED QUILTING - Instructions vs. Directions
Again - this post originated as information written for my sister-in-law who was a beginning quilter at the time - and has been updated for this blog. I hope that it may be of help to other lefties out there in blogland.
============
I want to make a distinction between INSTRUCTIONS and DIRECTIONS.
INSTRUCTIONS
The instructions tell you how to make a quilt -
how much fabric you need,
the size of the blocks you will make,
the number of blocks you will make,
the size of the quilt you will have when you are done,
and the basic steps you need to complete your project.
The instructions will be the same for both left and right-handed quilters.
What can really mess you up are the directions. I think that it is the directions that confuse us lefties the most.
DIRECTIONS
The directions, by definition, are directional - referring to any point an object can face -
NORTH/SOUTH - EAST/WEST - TOP/BOTTOM - UP/DOWN - FRONT/BACK - LEFT/RIGHT - and DIAGONAL. And don't forget that CIRCLES can be drawn either clockwise or counter-clockwise.
 As lefties, we need to be especially aware of any reference that is directional.
Rule #1 - Don't Forget that YOU ARE LEFT-HANDED!
NORTH/SOUTH - TOP/BOTTOM - UP/DOWN - FRONT/BACK - are usually not a problem. If you look in a mirror, your reflection is not reversed from your head to your toes - you are still standing upright - and you still face front.
However -
EAST/WEST - LEFT/RIGHT can be tricky. Most diagrams and photos feature right-handed quilters - doing their thing - right-handed.
My advice is to take a pencil and circle obvious right-handed references as you read the instructions for the first time. Then you can go back through the instructions a second time and decide if you are comfortable doing the step right-handed or not. If you want to do it right-handed, erase the circle. If you want to do it left-handed, the circle will remind you that you have to compensate when you get to that step.
Some newer quilting books have diagrams and photos for both right-handed and left-handed quilters. I know they think that they are helping me - but the reality is - they just confuse me!! It's like trying to read a bilingual book and having to search through it for the stuff written in English. It would be easier to read, I think, if they just wrote two separate books - but they don't. So with these books - I do a variation of the circle thing. The first time I read them - I take a pencil and cross out the obvious right-handed references.
Just like the numbers on the rulers that go both ways - I just cross off the ones I don't want.

DIAGONAL is an often forgotten direction. One of my favorite quilts is the result of a mistake I made when I forgot to compensate for diagonal cuts.

I tried to duplicate a pattern in the book Strips that Sizzle by Margaret J. Miller (That Patchwork Place, 1992) - and I broke Rule #1 - I forgot that I was left-handed. I didn't realize, until after I had cut them ALL, that my diagonal cuts were "backwards". Instead of going from bottom right to top left, they were all going from bottom left to top right.
Here is an example of what I was trying to duplicate -

This what I cut -

so this is what I got -
 Just one small problem - the colors were on the wrong side!!
(I'll tell you the whole story of my "Blue/Yellow Monster" one of these days. That sucker was up on my design wall for over two years!!)
Anyway - in an effort to help - so you can just read through my instructions without having to think about whether or not the directions are backwards - I will try to write them in "LEFTISH". If there is an area where you may need to pay special attention - I will tell you.
I want you to be able to spend your time quilting - not decoding the instructions / directions.
This is supposed to be FUN!!
Talk to you later - gotta go - gotta write the Rotary Cutting stuff -
AND HAPPY THANKSGIVING!!
Again - this post originated as information written for my sister-in-law who was a beginning quilter at the time - and has been updated for this blog. I hope that it may be of help to other lefties out there in blogland.
============
I want to make a distinction between INSTRUCTIONS and DIRECTIONS.
INSTRUCTIONS
The instructions tell you how to make a quilt -
how much fabric you need,
the size of the blocks you will make,
the number of blocks you will make,
the size of the quilt you will have when you are done,
and the basic steps you need to complete your project.
The instructions will be the same for both left and right-handed quilters.
What can really mess you up are the directions. I think that it is the directions that confuse us lefties the most.
DIRECTIONS
The directions, by definition, are directional - referring to any point an object can face -
NORTH/SOUTH - EAST/WEST - TOP/BOTTOM - UP/DOWN - FRONT/BACK - LEFT/RIGHT - and DIAGONAL. And don't forget that CIRCLES can be drawn either clockwise or counter-clockwise.

Rule #1 - Don't Forget that YOU ARE LEFT-HANDED!
NORTH/SOUTH - TOP/BOTTOM - UP/DOWN - FRONT/BACK - are usually not a problem. If you look in a mirror, your reflection is not reversed from your head to your toes - you are still standing upright - and you still face front.
However -
EAST/WEST - LEFT/RIGHT can be tricky. Most diagrams and photos feature right-handed quilters - doing their thing - right-handed.
My advice is to take a pencil and circle obvious right-handed references as you read the instructions for the first time. Then you can go back through the instructions a second time and decide if you are comfortable doing the step right-handed or not. If you want to do it right-handed, erase the circle. If you want to do it left-handed, the circle will remind you that you have to compensate when you get to that step.
Some newer quilting books have diagrams and photos for both right-handed and left-handed quilters. I know they think that they are helping me - but the reality is - they just confuse me!! It's like trying to read a bilingual book and having to search through it for the stuff written in English. It would be easier to read, I think, if they just wrote two separate books - but they don't. So with these books - I do a variation of the circle thing. The first time I read them - I take a pencil and cross out the obvious right-handed references.
Just like the numbers on the rulers that go both ways - I just cross off the ones I don't want.

DIAGONAL is an often forgotten direction. One of my favorite quilts is the result of a mistake I made when I forgot to compensate for diagonal cuts.

I tried to duplicate a pattern in the book Strips that Sizzle by Margaret J. Miller (That Patchwork Place, 1992) - and I broke Rule #1 - I forgot that I was left-handed. I didn't realize, until after I had cut them ALL, that my diagonal cuts were "backwards". Instead of going from bottom right to top left, they were all going from bottom left to top right.
Here is an example of what I was trying to duplicate -

This what I cut -

so this is what I got -

(I'll tell you the whole story of my "Blue/Yellow Monster" one of these days. That sucker was up on my design wall for over two years!!)
Anyway - in an effort to help - so you can just read through my instructions without having to think about whether or not the directions are backwards - I will try to write them in "LEFTISH". If there is an area where you may need to pay special attention - I will tell you.
I want you to be able to spend your time quilting - not decoding the instructions / directions.
This is supposed to be FUN!!
Talk to you later - gotta go - gotta write the Rotary Cutting stuff -
AND HAPPY THANKSGIVING!!
Subscribe to:
Posts (Atom)
LinkWithin
