DESIGN WALL MONDAY -
Check out all of us who link up with Judy L. -
At Patchwork Times on Mondays.
We have some awesome stuff on our walls!
Well, THEY do - ME - not so much sometimes - ;))
===
On my wall today -
The "extra" hourglass units -
From making my FMQ class practice blocks - ;))
I didn't realize that it has been three weeks since my last post -
But - you really haven't missed much - ;))
For the last three weeks -
There has been NOTHING on my design wall -
Because I have been TRYING to get this dang thing together -
And I only got as far as getting the rows together -
And putting on the two side borders - ;))
The FMQ practice blocks were layered to be quilted "as you go" -
But - of course - I didn't space them the same distance apart -
On the backing fabric - ;))
If I HAD - I could have skipped the part about cutting the blocks apart -
And then putting them all back together again WITH sashing between them -
I could have just sewn the sashing on the top -
And then sewn the rows together and been done with it -
But - NOOOOOO - I had to do it the hard way - ;))
===
NOTE TO SELF -
Think ahead next time and include the sashing between the blocks on the rows - ;))
===
Then the blocks themselves came out all different sizes -
Some of the quilting pushed the fabric "out" on some blocks -
And made the block "bigger" than planned -
If that makes sense -
So I cut them all down to
I thought that I could maybe offset them to minimize the differences -
But I didn't like the look - ;))
I don't want to bore you with all of the fun I had -
With the back strips not coming out right -
Either too wide or too narrow to make the batting join without a gap or overlap -
Or the "air sewing" with no bobbin thread -
Or the "bird's nest" bobbin messes on the back for no apparent reason -
Or the fun I had trying to use the Bias Tape Maker -
That's a post for another time - ;))
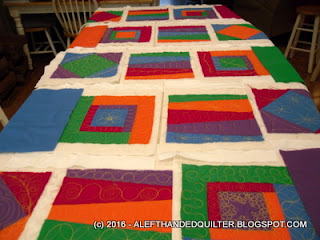
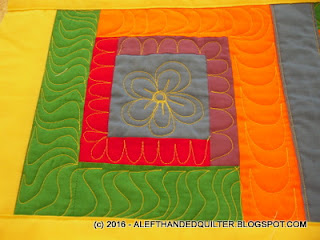
So I'll just show you photos of some of the blocks -
And the yellow sashing that I used between the rows - ;))
I like the yellow sashing with the yellow thread that I used to quilt the blocks -
BUT -
===
NOTE TO SELF -
Use a darker sashing next time so the block fabrics don't show through - ;))
===
And some of the sashing cut off some of the quilting -
But - oh, well -
Done is better than perfect - right? - ;))
I still have to add the top and bottom borders -
But it's looking a little tall and skinny -
So I think that I want/need to add some more to the sides -
To widen it out a bit -
Maybe I could use those "extra" hourglass blocks - ;))
All in all -
I'm REALLY getting tired of messing with it -
But it is so close to being DONE -
That I don't dare stop now -
Or it will be another UFO -
And the whole point of this FMQ class -
Was to make a dent in that pile -
Not to ADD to it - ;))
But I would really rather get back to practicing my FMQ -
Which is WAAAAAAY more FUN than QAYG - ;))
I made a quilt using this technique over 20 years ago -
And I remember now why I haven't made another one since then - ;))
Talk to you later - gotta go - gotta sew -


4 comments:
Oooh you got way ahead of me! Yours look good. I am looking forward to those flowers. I have decided I have to add to the sides also. Hmmm... I have those cut off triangles, I suppose I could sew those and sash them....and maybe add side panels. LOL....and then I will want to add more to make it up to a queen size...sigh.
Yeah - well I started before you did - but then I got hung up on the construction part. And those flowers were FUN - you'll like them. I want to get back to the FMQ part - and the sashing and borders look like really good candidates for some more of those flowers - if I ever get that far. I do want to make it wider - but I seriously doubt that mine will make it to queen-size. One good thing, though - it lays really flat - ;))
Super that it is so colorful and will not become a UFO. I, too am working on making a quilt bigger. Gotta get more creative soon.
Thanks, Julie - I think I have a "plan" for the sides - if it works, I'll try to post it tomorrow or the next day - ;))
Post a Comment