A blog about quilting and using the LEFT-EZE Rule - my HST/QST Ruler designed for LEFT-HANDED Quilters -
Pages
- Home
- LEFT-EZE™ Rule
- LEFT-EZE™ Rule - Tutorials
- LEFT-EZE™ Rule - Size Chart
- LEFT-EZE™ Rule - Free Pattern & Tutorial
- LEFT-EZE™ Rule - Reviews/Testimonials
- About This Blog - And Me
- Rules
- Reviews
- Quilt Journal
- QJ - Floral Applique
- Sudoku Quilts
- Studio Organization
- Fabric Storage Tips
- Left-Handed Quilting (LHQ) - Introduction
- LHQ - Basics
- LHQ - Rotary Cutting
- LHQ - Construction
- LHQ - Hand Sewing
- LHQ - Binding
- LHQ - Finishing The Quilt
- LHQSQ - LHQ Sampler Quilt
- UFOs/Projects/Squirrels
- Quilt-Along - LHQSQ 2.0
- Privacy Policy
Monday, November 3, 2014
Design Wall Monday - 11/3/14
DESIGN WALL MONDAY -
Check out all of us who link up with Judy L. -
At Patchwork Times on Mondays.
We have some awesome stuff on our walls!
Well, THEY do - ME - not so much sometimes - ;))
===
Since I FINALLY cleared off my design wall last week -
I've been trying to get myself organized - ;))
I messed with my blog and its pages -
Re-arranging stuff -
And then -
When I was trying to get my Scraps and Squirrels under control -
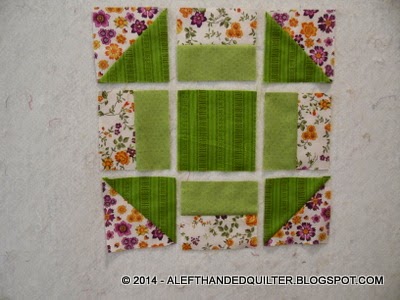
I found this little orphan Churn Dash block - ;))
It's a test block -
I found the tutorial on YouTube - HERE -
It's Jenny Doan from Missouri Quilt Co. -
EDIT CORRECTION - Missouri STAR Quilt Co.
And it's about seven minutes long -
BUT -
It's TOTALLY worth it -
AND -
Jenny is LEFT-Handed -
So she rotary cuts LEFT-handed -
Although she does use scissors and irons/presses Right-Handed - ;))
Check it out -
But watch the volume on your speakers -
The duck "quack" might catch you off guard - ;))
Anyway - I LOVE their YouTube videos -
Especially because Jenny is LEFT-Handed -
And I don't have to REVERSE anything -
In my little pea-brain - ;))
BUT -
As I watched the video -
And then went to make the block -
I thought I must have MISSED something - ;))
IF the center square is a 5" charm square -
AND the corner HST are trimmed to 4-1/2" -
I couldn't understand how the middle sections could possibly FIT -
Since they were sewn and NOT trimmed -;))
If they were sewn -
They should fit the HST but NOT the un-sewn center charm square -
And if they were NOT trimmed -
They should fit the center charm square but NOT the corner HST - ;))
It didn't make sense to me -
UNTIL I realized -
That they WERE sewn -
In ONE direction -
And that that side - WITH the seam -
Was the side that is next to the HST -
And the UN-SEWN side - WITHOUT the seam -
Is the side next to the center charm square - ;))
DUH!! - ;))
And GENIUS!! - ;))
Thanks Jenny Doan and the Missouri Quilt Co.!! - ;))
EDIT CORRECTION - Missouri STAR Quilt Co.
Now my question is -
Why didn't I find this tutorial -
BEFORE I got the die? - ;))
And while I'm thinking about it -
I can't seem to find any instructions -
So could someone please explain to me -
How to layer the fabrics on the Churn Dash die? -
If I layer four fabrics -
One of each color - in two sets of two - RST -
I figure that I can get the eight pieces needed for the bars and HST -
But that I would also get three EXTRA center squares! - ;))
Is that right -
Or am I missing something? - ;))
Talk to you later - gotta go - gotta sew -
Subscribe to:
Post Comments (Atom)


2 comments:
Sometimes those dies are not set up for practical use. What you can do is only cover that center square with as many or as few layers as you need. You don't have to cover the entire die.
Thanks, Gene! - ;)) I agree that sometimes the dies are not set up for practical use. And sometimes I don't cover the entire die - only the part I need - but the layout on this die is kinda awkward - so I think that I will probably just layer it like I said - to waste as little fabric as possible - and then use the three extra squares for something else. And there's always "something else" - ;))
Post a Comment