Saturday, April 30, 2016

Ch - ch - ch - changes -


Mr. Google is at it again. -

It seems that effective May 1, 2016 - Mr. Google is dumping Picasa -

And forcing us to switch to focusing on Google Photos. -
===

The official Google Picasa Blog says that -

Google Photos is a new and smarter product, that offers a better platform for us to build amazing experiences and features for you in the future.
===

And Wikipedia - HERE - says of the Reception -
At the May 2015 release of Google Photos, reviewers wrote that the service was among the best of its kind.
===

But from various discussions on the Product Forum -

It doesn't appear to be as wonderful as they want you to think it is -
And not everyone is happy about it - ;))
===

BOB and I are still not quite sure how to get photos from my camera to my blog - since we have used Picasa for years and don't know diddly-squat about how to use Google Photos - so until we figure it out - we may have to use some old photos from previous posts. But considering most of my projects are UFOs and date back several years - I probably have a photo of them somewhere on my blog that I can recycle - ;))

BOB and I really don't like wasting spending time on computer crap when we could spend that same time actually being productive and sewing something -

Or practicing my FMQ on this - ;))


Talk to you later - gotta go - gotta sew -


Monday, April 25, 2016

Design Wall Monday - 4/25/16


DESIGN WALL MONDAY -
Check out all of us who link up with Judy L. -
At Patchwork Times on Mondays.
We have some awesome stuff on our walls!
Well, THEY do - ME - not so much sometimes - ;))
===


On my wall today -
Same as last week - ;))


I didn't get the backing made for this one yet -

But I did get some FMQ practice done - not much - but some - ;))

To warm up - I dug out an older practice piece from a previous dismal attempt to learn how to FMQ - and tried to follow a "stipple" stencil in the upper green/blue stripe - to see if it would help me with the rhythm of the wiggles - it didn't - YET - need more practice on that one for sure - then I tried a bit of "ribbon candy" below that in the darker green stripe and again in the maroon stripe -


And continued across the stripes with some spirals in the green/blue - and more "ribbon candy" below that -


I tried to follow another stencil with some "hearts and loops" - did some wavy lines - some more "ribbon candy" - and some more spirals going the "other" way - ;))


I turned the piece when I got to the last bit of "ribbon candy" so that I was sewing it vertically - and it seemed to be a little easier for me to get the curves a little smoother. I still need a LOT more practice - and I want to be able to sew FMQ designs in ALL different directions - but for now - some patterns are easier for me to do from left to right and others are easier to do from top to bottom - ;))


As a side note - BOB has to laugh at some so-called "LEFT-HANDED" FMQ designs. FMQ designs are not "handed". Just because a "RIGHT-handed" FMQ design is re-drawn to go from RIGHT to LEFT - that doesn't mean the new design is "LEFT-handed". It only means that you now have a "mirror image" - that goes from RIGHT to LEFT. If you think of FMQ like cursive handwriting - but with a sewing machine - needle - and thread - you can see that the direction of the writing doesn't depend on which HAND you're using - it depends on which LANGUAGE you're writing. I write in ENGLISH - and although I may use my LEFT hand to do it - I write from LEFT to RIGHT just like you do - just sayin' - ;))

===

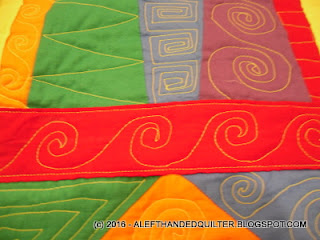
After I warmed up - I went back to my FMQ "Essentials" practice piece and put some curved spirals in the left border sash (yellow) of the second row -


Some square (sort of) spirals in the next (orange) sash -


Some more curved spirals in the red sash -


And some "piano keys" with some echo lines in the right border sash (yellow) - ;))


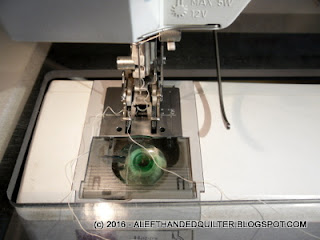
About that time the thread kept catching and I had to unsew it a couple of times - even re-threading the machine didn't seem to help - it kept "catching" as if it was getting "hung up" on "something" that was invisible to me - and then I ran out of bobbin thread - DUH!! - ;))

NOTE TO SELF - Pay attention!! When the thread starts "catching" or ANYTHING AT ALL sounds or feels strange - STOP!! - Check and/or change the bobbin!! - That takes far less time than unsewing a bunch of teeny-tiny stitches - repeatedly - ;))


Talk to you later - gotta go - gotta sew -


Monday, April 18, 2016

Design Wall Monday - 4/18/16


DESIGN WALL MONDAY -
Check out all of us who link up with Judy L. -
At Patchwork Times on Mondays.
We have some awesome stuff on our walls!
Well, THEY do - ME - not so much sometimes - ;))
===


On my wall today -


This is next up in the queue to be quilted after I finish the Christmas embroidered blocks table runner and table topper and a couple of other small projects. It's on the wall to remind me to make the backing - since I kinda need one before I can "sandwich" it - the batting just needs to be cut to size - ;))
===

I tested out some marking tools that I found in my "stash" of supplies - the red one at the top is white chalk powder for the darker fabrics - and on the right is a pink "Frixion" pen suggested by Karen M. - and the white "hera" marker suggested by Katie M. - for the muslin - thanks, guys - ;))


After ironing/pressing - the Frixion pen disappeared like it's supposed to - YAY!


And after a shot of water from the spray bottle - the rest of them disappeared as well - except for the indentation from the "hera" marker - but that's not an "ink" mark - so I'm not worried about that one - ;))


Then after I marked the first block using the stencil and the "hera" marker -


I had an "aha" moment and realized that I could ditch the stencil - and do it the old-fashioned way - use a ruler to mark along the seam lines of the blocks in the sashing/border - then just split the difference for the areas in between - DUH!! - ;))


I stitched a couple lines and some of them came out kinda wonky and have to be redone - but that's OK - my seam ripper and I are very good friends -


And I had completely forgotten about the quilt "guides" - so I dug some out - thinking they were all the same - and quickly realized that not all quilt "guides" are created equal - ;))


This one doesn't do me any good way back there - ;))


Turns out I have three different kinds of "guides" -


And the one for my Brother machine(s) -


Doesn't fit my Husqvarna Lily 555 either -


So I located the ones that belong to this machine and its "dual feed foot" -


Much better -


And there's one for the RIGHT side AND the LEFT side - ;))


I had a little chat with another quilter and neither one of us could figure out why my other "guides" are only for the RIGHT side of the foot.

Sorry - but that makes no sense to me - having the guide always on the RIGHT means that if I am following a seam that has already been sewn - that that seam has to be to the RIGHT of the needle - AND under the harp. Why not have it on the LEFT - so the bulk of the sewn seams are to the LEFT??

And no offense to any male quilters who may be reading this - but that LEFT/RIGHT guide thing is something I would tell my husband - "Some GUY must have designed that - because a WOMAN would have done it differently." He would always laugh - but he knew it was true - ;))

Anyway - taxes are done and filed and my chores are done for the next couple of days - so I have play dates scheduled with my various projects and I hope to get a whole bunch of quilting done -

That is - unless I see a couple of "Squirrels" - then all bets are off - ;))


Talk to you later - gotta go - gotta sew -


Wednesday, April 13, 2016

Squirrel chasing -


Seems like I've been "Squirrel chasing" lately - ;))

I re-watched some of the FMQ class lessons and then watched a couple more of the "walking foot" class and got to the part where the instructor discussed "decorative stitches" using the walking foot. Some students said that their machine would only do "straight" and "zig-zag" stitches with the walking foot - and NOT "decorative" stitches - according to the manual - and the dealers. Other students said that it shouldn't make any difference since the walking foot didn't have to go side-to-side, only the needle had to do that. Interesting - I wondered what mine say.

So - squirrel chasing - I had to check my manuals - and sure enough - the manuals on my Brother machines said that sewing decorative stitches with the walking foot was a no-no. ALL of the stitch charts had a HUGE "NO" in the column for "walking foot". The manual for my Husqvarna Viking Lily 555 didn't say one way or the other. So - another squirrel - I looked for and found the "accessories" book for my Lily - and it said that I COULD do decorative stitches with the walking foot. Good thing - 'cuz that's the one I have set up that way - ;))

Then there was the "stencil" squirrel - ;))

I have a bunch of stencils and was SURE that I had some that would be suitable for my Christmas table runners and table toppers. I thought that I might even have some with "grids" for the "cross-hatch" pattern I want to do. I found one with a "holly leaf and berries" design that might work on the one - but the grid ones were the ones I was looking for.

I found one that uses a "Quilt Pounce" - but the BLUE pounce powder that washes out will SET if you iron it - can't use that and iron the top to the fusible batt and backing. The WHITE pounce powder will IRON OFF - can't use that with the iron either - besides the fact that I won't be able to see it on the muslin background. Add that to the fact that the grid hits two corners of the square - and not the others - I won't be using this stencil - ;))


So - on to Plan B -

This stencil will work with the "Quilt Pounce" also - but since I can't use either the BLUE or the WHITE powder - I'll have to do it the old-fashioned way - I'll have to MARK it - oh, the horror! - ;))


I like how the grid lines hit each of the four corners - AND how it fits in the sashing, too - ;))


Now I need to find a marker that I can use that can be seen against the muslin - which means it has to be a color (Duh!) - and that won't SET when I use the iron. I have some that will IRON OFF - but I think they might be the right colors - and I can fuse it before I mark it. I also have some that will wash out - so I should be able to find something that will work -

And that's tomorrow's "Squirrel" - ;))


Talk to you later - gotta go - gotta sew -


Monday, April 11, 2016

Design Wall Monday - 4/11/16


DESIGN WALL MONDAY -
Check out all of us who link up with Judy L. -
At Patchwork Times on Mondays.
We have some awesome stuff on our walls!
Well, THEY do - ME - not so much sometimes - ;))
===


On my wall today -


I put this together some time ago -

But I couldn't quite decide how to quilt it -

Then I saw what Karen did on her Antique Cars Quilt - HERE -

And thought it looked terrific - ;))

I had considered quilting a simple "cross-hatch" on this table runner and its matching table topper - but I wasn't sure whether or not I should stitch across the embroidery itself -

Part of me said not to - it would put white (background) thread on top of the red embroidery designs and ruin the embroidery - and another part of me said that if I skipped over the embroidered part, it wouldn't be quilted and that might be too big of an area to leave "unquilted" -

As it turns out - the embroidery designs are 4" across and the fusible batting that I like to use can be quilted up to 4" apart - so I think I should be able to skip over the actual embroidery design and still be good - ;))

And a "cross-hatch" design should tie in perfectly with my "walking foot" class - ;))


As far as my FMQ class goes -

I "warmed up" on a "practice pad" -

And then did some more "practice" in the sashings of the first row - ;))

Some Wiggles -
I sewed these from left to right and half-way down the row realized that I could run the edge of the presser foot along the line I had just stitched to keep my spacing consistent between them - DUH!! - ;))


Then some Ribbon Candy Wiggles -
Those poor things definitely need work - ;))


Then a Loopy line -
I tried to squish that last loop in - probably should have left it alone - ;))


Then some Lazy-8 loops -
Those are fun but definitely need more work - ;))


With 2 sashes between the blocks and 2 border sashes on each row, I can practice 4 designs in each lesson/row and work my way down the rows to try to re-learn the stuff that I have already managed to forget - ;))

And these Wiggles and Loops would look great in that middle section on my blue placemats - don't you think?


Talk to you later - gotta go - gotta sew -


Saturday, April 9, 2016

How soon I forget -


I didn't realize that it has been over a month since I did any Free-Motion Quilting.

I have said before that I am a S-L-O-W P-O-K-E Quilter so it should come as no surprise - least of all to me - that it took me that long to get those practice blocks made into a full-blown quilt.


I put them all together as a "quilt-as-you-go" quilt and still have to quilt the sashing and borders - so I plan to use those areas for more "practice". And since it has been over a month - I am totally "out of practice" and I have managed to forget most of what I thought I had learned. I need to go back and re-watch that class and re-do all of the lessons - but that is one of the best parts about getting a Craftsy class.

OK - so now I'm going to sound like a commercial/ad for Craftsy.

Craftsy classes are online videos of course - but - unlike some other classes that I have seen offered - once I buy the class - it is available to me 24/7 - any day - any time - FOREVER. All I have to do is go to the Craftsy site - sign in to my account and choose the class that I want to watch - then watch it - haha. You can download the "class materials" list - ask the teacher questions - and share your projects. And the classes have a "pause" button and a "30-sec repeat" feature that is really cool. You can watch the teacher - hit repeat - and replay what she just did. You can replay the lesson - or the whole class - which is what I plan to do.

These practice blocks are from the class - Free Motion Quilting Essentials with Christina Cameli. The "class materials" list includes the patterns for the blocks and each lesson uses three of them. Christina shows you how to quilt various designs in large squares - small squares - corner triangles - in wedges going from small to large or large to small - and how to go around corners. It truly does cover the Essentials. At the end of the class you will have 15 blocks ready to be assembled in a "quilt-as-you-go" quilt.

I have tried FMQ before - many times - and failed. This class is TERRIFIC!!

The best thing is that I'm not afraid of FMQ designs any more. I may not be able to do them well at first - but I know now that I CAN do them! All I have to do is PRACTICE!

Now I could/would give you the link to her blog or to the Craftsy site - but my bloggy buddy, Gene Black - is an "affiliate" and gets a small "stipend" if you go to his blog and click through and purchase - so I'll give you a link to his blog instead - HERE. I don't mind supporting my friends - and the "stipend" might be enough to keep him in supplies and/or fabric.

DISCLAIMER - Gene Black's blog states that - "Links in posts may be affiliate links for which I am compensated if you click through and purchase."

EDIT UPDATE - I forgot to mention that your cost is the same whether you sign up with Craftsy - or through Christina's blog - or through Gene's blog. The "stipend" is paid by Craftsy - not you - ;))

Last night I watched part of another class - Creative Quilting With Your Walking Foot with Jacquie Gering. I have some tops that might be better quilted with my walking foot - so I'm going to get some of them basted and ready to go. If I get bored with one class/technique - I can always switch to the other one.

That pile of unquilted tops should keep me busy for quite a while.

And that's not counting the "backs" that need to be made - and the bags of blocks - scraps - strips - and half-done projects that are lying around - ;))


Talk to you later - gotta go - gotta sew -

===
DISCLAIMER - GeneBlack's blog states that - "Links in posts may be affiliate links for which I am compensated if you click through and purchase."


.


Thursday, April 7, 2016

The sides are attached -


Last week I got the top/bottom borders sewn to my FMQ "practice" quilt -
Quilt-as-you-go style - ;))

Then the other day I got the side borders cut and sewn together -

And the backing/batting sections cut - ;))

Yesterday I got the borders/backing sewn on -

And today I inserted the batting (I'm using fusible) and pressed it all together -

Pinned along the inner/outer border seam - for extra stability -

Took it to the machine and "quilted-in-the-ditch" along the seam lines -

Machine-basted the outside edge to stabilize it -

And trimmed the sides to match the top/bottom borders - ;))


I made the "front" an inch and a half larger than the "back" all around -
And plan to double-fold it to the back -
Then top-stitch it from the back -
To make a "self-binding" edge - ;))


I haven't decided if I'll quilt that last border before or after I "bind" it -

If I do it "before" -
I'll have a "stop" line and be able to FMQ without any of it getting cut off in the binding -
But I run the risk of the FMQ quilting bunching the quilt at the edges -

If I do it "after" -
I will be able to accommodate any "bunching" -
But I run the risk of getting the FMQ in the "binding" area - ;))

Decisions - decisions -

I think I'll worry about it later - ;))

For now -

I'm ready to practice more FMQ on this one -

I can add some FMQ to the blue placemats -


And to the Christmas placemats -


And then see if I can make a dent in that HUGE other pile - ;))


Talk to you later - gotta go - gotta sew -


Monday, April 4, 2016

Design Wall Monday - 4/4/16


DESIGN WALL MONDAY -
Check out all of us who link up with Judy L. -
At Patchwork Times on Mondays.
We have some awesome stuff on our walls!
Well, THEY do - ME - not so much sometimes - ;))
===


On my wall today -


This will be the center of a Christmas table runner -

With a little Free-Motion Quilting -

And a couple of borders -

It should be kinda cute - ;))

===

I don't know where this week went -

I re-watched some of the next FMQ class lessons -

Messed with the borders on my FMQ "practice" piece -

Did my chores -

And the next thing I know - it's Monday again - ;))

I sure hope I can get more "Done" this week - ;))


Talk to you later - gotta go - gotta sew -


LinkWithin

Related Posts Plugin for WordPress, Blogger...