LEFT-HANDED QUILTING - Review - Brother SQ9050
============
Note - these instructions are written in LEFTISH.
If you are right-handed - just reverse the directions.
============
Today I want to show you my new sewing machine -

Lots of features -
And VERY reasonably priced -
My kind of sewing machine!! - ;))
But first -
Disclaimer -
I am in no way affiliated with the manufacturer or supplier of this product - to my knowledge.
I did not get this product for FREE in exchange for a review - aka barter. I paid for it.
I have no intention of slandering or libeling anyone or any product.
I am simply stating my opinions - I could be wrong - you may disagree.
My opinions are based on my experience with this product - your results may vary.
I think that about covers it - if I missed something - let me know.
I am not a lawyer - and I am just trying to cover my a$$. ;))
===
I have THREE sewing machines already and didn’t really NEED a new one -
But I was looking for another basic sewing machine for piecing and found this -

It’s called the -
Brother SQ9050 - Computerized Sewing and Quilting Machine -
Made by Brother - here -
Made in China
Description -
It is described as a "Computerized Sewing and Quilting Machine" -
And Includes a Built-In Sewing Font for Basic Monogramming -
I think that it's technically an "Electronic" machine -
If you define a "Computerized" machine as one with USB computer capability -
This machine has computerized parts - but no USB computer connection/port -
The USA version has a polarized plug (one blade is wider than the other) for the wall outlet -
I'm not sure if other versions are available for other countries -
You might need to contact the company about that - ;))
Where you can get it -
I picked mine up at Walmart for $200 - here - ;))
If the store doesn’t have one in stock - have them order it for you -
I wouldn’t recommend ordering it online - I’ve had trouble with their site - ;))
What you get -
Some Quick Start Guides - an Instructional DVD - and a 77 page Operation Manual -

100 Built-in Stitches -

An Alphabet Font -

On a little Flip Chart -

There’s a set of buttons to tell the machine which set of stitches you want to use -

And then there’s the Start/stop button -
The Reverse button -
The Needle Up/Down button -
The Speed Control -

And a whole BUNCH of other stuff - ;))
What I LIKE about this sewing machine -
It came with a LOT of “extras” that other sewing machines do NOT include -
An extension table - 14" total -
Eight inches to the LEFT of the needle -

AND our favorite QUILTING goodies -
Walking foot -
FMQ spring foot -
1/4” foot -
Quilting guide -

It has THREE different ways to sew a 1/4” seam -
It has an ALPHABET font for monogramming - or quilt labels - ;))
LED light on needle area -
Button for needle up/down - raise or lower the needle -
Stop/start feature - you can sew without the foot controller -
Needle threader -
Stipple stitch - honest! - I’ll show you in a minute - ;))
What I DON’T like about this sewing machine -
The only thing that I DON’T like so far is that the default stitch is #00 -
And that is the LEFT needle position -
After I turn on the machine -
I have to change the stitch # to #01 for the CENTER needle position -
It’s not hard - it’s just annoying - ;))
===
EDIT UPDATE - 12/20/15 -
I found - on page 11 of the Operation Manual -
"Changing the initial needle position" instructions which state -
(1) Turn off the sewing machineNOTE TO SELF -
(2) Hold down the "+" side of the (graphic) (stitch selection key) on the left and turn on the sewing machine.
The initial needle position changes to the center needle position.
Review the manual occasionally - you may have missed something - ;))
===
A couple of things that are not "bad" -
Just "different" than my Husqvarna/Viking Lily 555 - are -
It has a Vertical spool holder -
My Lily 555 has a Horizontal spool holder -
But the top thread guide may make it easier to use my Cone Thread Holder -

The presser foot lever is on the inside RIGHT side - not the back -
But I use my RIGHT hand to reach through to raise the presser foot anyway -
So that is a minor adjustment for me -
EDIT UPDATE - 12/23/12 -
CAUTION!! Do not accidentally hit the foot pedal-
When you are trying to raise the presser foot lever -
Your thumb may get caught between the needle bar thread guide -
And the presser foot lever - ask me how I know - ;))
The thread cutter is on LEFT side - not the back -
So I have to get used to pulling the fabric FORWARD -
And then cutting the thread off the LEFT side -
The bobbins are a different type - of course -
They are a clear plastic - not metal - or green plastic -
So that makes three kinds of bobbins in my collection now - ;))
How I use it to Sew a 1/4” Seam -
There are three ways to sew a 1/4” seam on this machine -
#1 - 1/4” foot -
Her 1/4” inch foot works really well -
Straight stitch - single hole foot -
Center needle position -

My HST came out at 2-1/2” like it was supposed to -

And my two little pieces cut 1-1/2” x 2-1/2” -
Came out at 2-1/2” square - YAY!! -

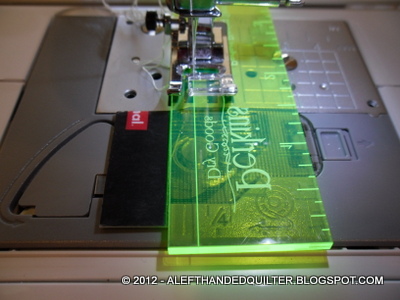
#2 - Stitch #43 - RIGHT side -
Zigzag foot "J" -
I lined up my little guide with the Seam Guide ruler -
I stitched two strips - 1-1/2” wide -

And it came out at 2-1/2” - Right on!! -

#3 - Stitch #44 - LEFT side -
Zigzag foot "J" -
I did the same thing using the other stitch -
I lined up my little guide with the Seam Guide ruler on the LEFT side -
I stitched two strips - 1-1/2” wide -
It was a bit weird lining up the fabric on the LEFT -

But it came out at 2-1/2” - Right on!! -

How I use it to sew some Sample Stitches -
Alphabet font sample -
I drew lines on some blue fabric about 1/2” apart -
And used a coffee filter as a stabilizer -
The top three lines are the three fonts on my Husqvarna/Viking Lily 555 -
The bottom line is the Brother SQ9050 -

With the Lily - I simply push the button with the letter I want/need -
With the SQ9050 - I have to push two stitch selection keys to enter the number of the stitch -
So it’s a bit more time consuming -
But I actually like the looks of the SQ9050 letters better -
“Stipple stitch” - Stitch #49 -
The one in the middle - I was fiddling with the stitch width and length -
But the ones on the left and on the right are at the default settings -

“Lazy Daisy stitch” - Stitch #27 -

“Loopy” decorative stitch - Stitch #75 -

Quilting sample -
I did a little FMQ - Leah Day style -
With my “broken” FMQ spring foot and the feed dogs UP - here -

Not bad - but I need more PRACTICE!! - ;))

Summary -
I have only had this machine for a very short time -
And I have just scratched the surface in terms of what she can do -
And I have some more testing/playing to do yet -
And some reviews have said that she develops tension problems about six months down the road - so we’ll have to wait and see about that -
But -
From what I have seen/done so far -
What it can do -
And - especially - for the PRICE -
I think that it’s quite a cool little sewing machine!! - ;))
Would I recommend this sewing machine?
YES
EDIT UPDATE - 8/29/13 -
As I told Miau in the comments below -
YES - she still does a good job!! - ;)) I use her mostly to do my piecing - and use Method #2 described above - Stitch #43 with the zig-zag presser foot "J" - and my stitch guide. Her tension messed up on me ONCE - I simply turned her OFF for a second - then turned her back on - sort of like re-booting your computer. When I turned her back on - all of the tension settings had re-set to the defaults - and she was fine - ;)) Would I still recommend this machine? - YES!! - ;))
EDIT UPDATE - 11/6/13 -
Today I was having some tension issues - loops were showing on the back of the fabric. I turned her off - re-threaded both the top thread and the bobbin - turned her back on - and she was back to normal - ;))
Talk to you later - gotta go - gotta sew -

10 comments:
So it will make quilt labels huh? hahaha I caught it!!
Seriously, that really is a nice machine. I loved my Brother.
Yeah - that part was for you - ;))
My hubby bought me this same model six months or so ago. I have been very pleased. It makes a very nice even strait stitch. He bought it for my back-up machine, so I could teach my kiddos and not have them on my expensive Pfaff. It has been great having a second machine, and it is so light. I am not use to light machine so sometimes when I get going it likes to march on my table.....LOL. I haven't tried the FMQ yet. Over all very pleased, minor dislikes are, I need a screw driver to change anything but just a presser foot, i.e. put on the walking foot. The walking foot certainly increases the noise level, of this quiet machine. In my Pfaff tiptronic 2040 everything is pretty much a finger screw, no tools needed. PLUS unlike my Pfaff it doesn't need oiling. I give my Pfaff a drop of oil nearly everytime I change the bobbin just to keep her happy.
... another one of us in our right minds .....
.... Okay back to sewing by the seat of my pants .....
Tracy - I remember that you got a new machine not long ago to teach the kids how to sew - but I didn't realize that it was the SAME one until just now! I'm so glad you like yours - and I have noticed that mine "marches" a little, too. Guess great minds - in their right minds - think alike - ;))
Suzie Q sounds like she is going to work out, just fine. I think mine feels neglected this week. (Binding and knitting going on)
Maybe if you just pat her as you go by? - ;))
Hi!
Does it still a good job? I would like to buy me this machine, too. But I'm not sure which one exactly...
Thank you
Hi there, Miau - you show as a "no-reply commenter" so I will answer your question here if you don't mind - ;))
YES - she still does a good job!! - ;))
I use her mostly to do my piecing - and use Method #2 described above - Stitch #43 with the zig-zag presser foot "J" - and my stitch guide.
Her tension messed up on me ONCE - I simply turned her OFF for a second - then turned her back on - sort of like re-booting your computer. When I turned her back on - all of the tension settings had re-set to the defaults - and she was fine - ;))
Would I still recommend this machine? - YES!! - ;))
Nice review! I have the same machine and like it quite a bit. Your review actually made me realize that I HAD all these quilting feet that I thought I never got. lol OOPS
Just a questions... do you know if you can adjust the presser foot pressure for use with a walking foot?
Thanks!
Andree
Thanks, Andree - you come up as a no-reply commenter so I will answer your question here if you don't mind.
No - The manual doesn't address "adjusting the presser foot pressure" so I don't think that you can - I think that is "automatically" adjusted no matter which "foot" you use - ;))
Post a Comment