A blog about quilting and using the LEFT-EZE Rule - my HST/QST Ruler designed for LEFT-HANDED Quilters -
Pages
- Home
- LEFT-EZE™ Rule
- LEFT-EZE™ Rule - Tutorials
- LEFT-EZE™ Rule - Size Chart
- LEFT-EZE™ Rule - Free Pattern & Tutorial
- LEFT-EZE™ Rule - Reviews/Testimonials
- About This Blog - And Me
- Rules
- Reviews
- Quilt Journal
- QJ - Floral Applique
- Sudoku Quilts
- Studio Organization
- Fabric Storage Tips
- Left-Handed Quilting (LHQ) - Introduction
- LHQ - Basics
- LHQ - Rotary Cutting
- LHQ - Construction
- LHQ - Hand Sewing
- LHQ - Binding
- LHQ - Finishing The Quilt
- LHQSQ - LHQ Sampler Quilt
- UFOs/Projects/Squirrels
- Quilt-Along - LHQSQ 2.0
- Privacy Policy
Sunday, June 24, 2012
LHQSQ - Adding QST to the mix
EDIT UPDATE -
Since posting this post -
I designed a LEFT-HANDED ruler to cut HST and QST -
LEFT-HANDED!! -
No more Flippin' rulers!! -
I call it a LEFT-EZE™ Rule -
Check it out on my other blog - HERE - ;))
===
Note - these instructions are written in LEFTISH.
If you are right-handed - just reverse the directions.
============
My Left-Handed Quilter's Sampler Quilt -
LHQSQ - See the page/tab above -
So far -
Is comprised of 6” sampler blocks -
That you can make using -
2-1/2” squares -
HST that FINISH at 2” -
Strips - cut 1-1/2” x 2-1/2” -
And 4-Patches that FINISH at 2” -
Three across and three down -
Variations of the basic NINE-PATCH -
The sewn block will MEASURE 6-1/2” -
And FINISH at 6” -
===
Now I’m going to add another element -
QUARTER SQUARE TRIANGLES (QST) that FINISH at 2” -
Because -
One half of a Quarter Square Triangle - One UNIT -
Measures the same as one half of a HST -
And when the two halves - the UNITS - are sewn together -
The QST -
Will measure - 2-1/2” square -
And FINISH at 2” -
Just like everything else - ;))
===
There are a number of different ways to make QST -
You can buy the die -
Or you can use Triangles on a Roll -
It’s really cool stuff -
I have several different sizes -
The top roll - Green -
Will make 735 -
QST - 2” finished squares
The second one - Red -
Will make 1200 -
HST - 1” finished squares
The bottom one is -
What I have left of the roll -
That makes -
HST - 2” finished squares
They come in real handy -
When I only need a couple of blocks -
And not a bunch of “multiples” -
===
Or you can use Triangulations -
Like I did - here -
Just make sure that you print out the QST ones that will FINISH at 2” -
===
Or you can cut 1-1/2” strips -
And use the Companion Angle ruler -
By Darlene Zimmerman -
Like this -
I layered a light and medium fabric - right sides together -
And cut out some triangles -
LEFT-HANDED -
Starting at the RIGHT end of the strip -
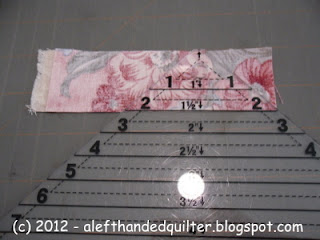
Line up the BOTTOM of the strip on the “2” line (2” FINISHED)
Cut one -
Cut UP the LEFT side and DOWN the RIGHT side -
Move the ruler to the LEFT - FLIP it up -
And line up the TOP of the strip on the “2” line (2” FINISHED) -
To cut the second one -
Cut UP the LEFT side -
Cut two sets -
The tops of the triangles are flat -
And they look like they won’t fit -
But they DO - and you have -
One less dog-ear to trim - ;))
Stitch them up -
BUT -
When I sewed them together -
I flipped them over -
So that the lighter fabric was on top -
And sewed from the top of the triangle -
To the base -
That’s how this -
Turned into this - ;))
Gotta watch that -
Whichever fabric is on TOP -
When you sew them together -
Will be on the RIGHT -
When you open them up - ;))
And when the two halves - the UNITS - are sewn together -
The QST will measure 2-1/2” -
And FINISH at 2” -
Just like everything else - ;))
===
I love how there are SO many different ways -
To do the SAME thing -
I think that is what makes quilting so much FUN -
So - try everything -
Find a method that YOU like -
And USE that one - ;))
===
In the next batch of blocks -
Sometimes the two halves - the UNITS - of the QST -
Will be different - the QST will be “mixed” -
So be sure to check the photo -
To see which part of the QST is which color/fabric -
===
For simplicity -
I will just list the number of individual QST -
That you will need to complete the block -
How you choose to cut and sew them -
Is entirely up to you - ;))
Talk to you later - gotta go - gotta sew -
Subscribe to:
Post Comments (Atom)


No comments:
Post a Comment