Well - maybe not my FIRST Feather -
But at least it's the first one that actually LOOKED like a feather -
And THAT - to me - is worth the WOO HOO!! - ;))
I'll show you in a minute -
But first I want to show you why I'm SO EXCITED!! - ;))
As I may have mentioned before -
I'm what you could call "directionally - challenged" -
Probably from being Left-Handed -
And having to mentally "reverse" stuff all of the time - ;))
Anyway -
When it comes to Feathers -
I can think of FOUR different ways to approach them - ;))
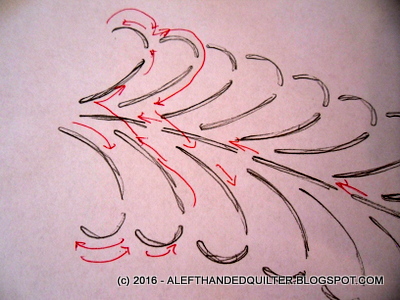
Here's a photo of one of my stencils -
Simply (R) Quilting Stencils by Plaid -
Feather Border #28742 - Design Width: 5-1/2"


Really nice stencil - BUT where do I start? -
Do I -
#1 - Start at the bottom and go to the top and work my way down -
Alternating from one side to the other? -

#2 - Start at the bottom and go to the top and work my way down -
Going down one side and then up the other? -

#3 - Start at the top and go to the bottom and work my way up -
Going up one side and then down the other? -

#4 - Start at the top and go to the bottom and work my way up -
Alternating from one side to the other? -
One book/teacher will show one way -
Another book/teacher will show a different way -
And then I feel like Vinnie Barbarino on "Welcome Back Kotter" -
"I'm SO confused!" - ;))
Yeah - I know - I am REALLY dating myself -
And for those of you who have NO idea what I'm talking about -
You could probably Google it - haha - ;))
Anyway -
Here's MY FIRST FEATHER -
TA DAH!! - ;))

And if you want to know where I started -
I'm not telling -
But I WILL tell ya - again -
I'm LOVING this class!! - ;))
EDIT UPDATE - And - just so you know -
I didn't use the stencil to do that feather - I "winged it" - the stencil was just for the "directionally-challenged" demonstration of how confusing feathers have always been for me - ;))
Talk to you later - gotta go - gotta sew -

8 comments:
I can't tell which way you went. The picture is kind of small on my screen.
Sorry about that, Gene - you could probably tell if I posted the full-size photo - but I re-size my photos so I don't exceed my available Google storage limit - you'll see for yourself when you take the class - ;))
Woohooo that looks pretty impressive, well done :)
Thanks - YOU can do this - if you can do your gazillion piece foundation-paper-piecing stuff - you can do THIS - ;))
looks good! Did you draw a 'spine' first and put your feathers on the spine or did you let your feathers 'create' the spine? Just curious....
Practice practice and more practice and you will see improvement. A left handed quilter.
Thanks, Katie - since you asked so nicely - I stitched the spine from top to bottom - then worked my way back up - putting one feather on one side and then another feather on the other side - squishing them to fit the space - ;))
Thanks, lady - I agree - it takes LOTS of practice - but it's also LOTS of fun - ;))
Post a Comment