============
Note - these instructions are written in LEFTISH.
If you are right-handed - just reverse the directions.
============
Lately I have seen a lot of blogs talking about – and showing you – how they made a “Twister” block using a special ruler –
Last year I did a couple of posts showing you how I made a very similar block –
“No-Waste Windmill Block” - from the book by Anita Grrossman Solomon –
Rotary Cutting Revolution – C&T Publishing – © 2010 –
http://alefthandedquilter.blogspot.com/2010/10/feeling-better-today.html
http://alefthandedquilter.blogspot.com/2010/11/november-already.html
without the ruler -
Now –
Just for fun –
I thought I would try my hand at making a LEFT-HANDED version of this block -
I call it a LEFTY TWISTER BLOCK –
So - This Is How I Do It -
I sized it to use 5” x 5” charm squares –
Each sewn block should measure about 4” square –
And finish at about 3-1/2” square -
Mind you – these are just estimates – your sizes may differ -
My sample is a 3 x 3 layout – 10-1/2” x 10-1/2” - 9 squares –
4 – 5” x 5” charm squares for the blocks –
5 - 5” x 5” squares all the same color for the borders and corners –
I used some yellows from one of the same charm packs that I sent Edit – in Hungary –
and muslin for the borders and corners

If you want a 5 x 5 layout – 17-1/2” x 17-1/2” - 25 squares –
You will need –
16 – 5” x 5” charm squares for the blocks – in the colors of your choice –
9 - 5” x 5” squares all the same color for the borders and corners -
If you want a 6 x 6 layout – 21” X 21” – 36 squares -
You will need –
25 – 5” x 5” charm squares for the blocks -
11 – 5” x 5” squares all the same color for the borders and corners -
First my apologies – I am no expert in EQ7 –
Exporting images – metafiles – and all of that –
but I gave it a shot – and here’s what I got -
Image of the block –
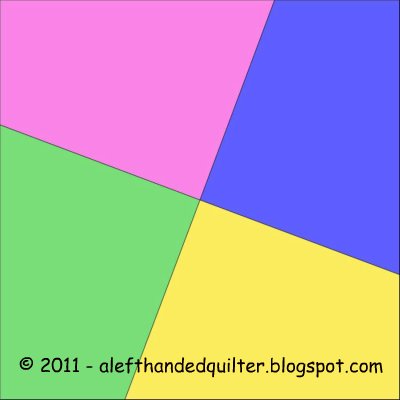
Image of the quilt –
I'll explain the RED bits later -
for now - just pretend they are PINK - ;))

=====
WARNING -
BEFORE you cut –
You might want to mark your cut lines with chalk or something removable
(I used a chalk marker)
You might want to double check –
That all of the pieces will be the SAME SHAPE and SIZE –
BEFORE you cut –
Ask me how I know ;))
=====
ROTARY CUTTING -
I usually cut 4 or 5 charm squares at a time -
Line up the 5” x 5” charm squares on the grid of your cutting mat –
You will use the little dots on the grid to line up your ruler -
FIRST CUT -
First – put the ruler – TOP to BOTTOM –
Mark a chalk line – starting and stopping at -
1-3/4” TO the RIGHT of the BOTTOM LEFT corner
1-3/4” TO the LEFT of the TOP RIGHT corner


SECOND CUT -
Second – put the ruler – LEFT to RIGHT –
Mark a chalk line – starting and stopping at -
1-3/4” DOWN from the TOP LEFT corner
1-3/4” UP from the BOTTOM RIGHT corner
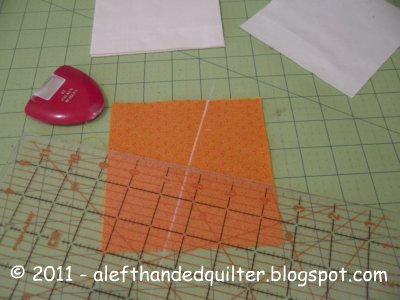
When you are SURE that each piece
will have both a 1-3/4" side AND a 3-1/4" side –
Make the two cuts as shown -


We’re not working with templates here –
The seam allowances in the center will eat up some of the “block” fabric –
So we’re going to leave the outer edges raggedy –
And cut them all to a standard size after they are all sewn -
Each sewn block should measure about 4” square –
LAYOUT –
Arrange them ALL on your design wall –
One LEFTY TWISTER at a time –
Before you sew them together –
You may have noticed that they appear to “twirl” counter-clockwise -
(RH twisters appear to “twirl” clockwise)
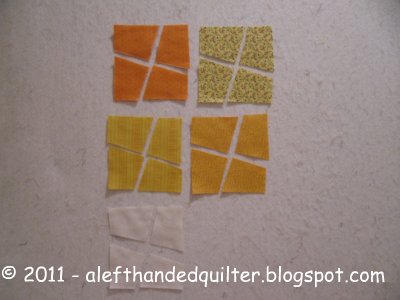


Re-arrange them until you are satisfied –
This part normally takes me about a week ;)) –
If I had this one to do over again -
I would switch the two on the right -
Put the light yellow on the bottom right -
And the medium orange on the top right -
ADD CORNERS
We need 4 corner pieces –
So – using the border fabric -
Cut one 5” x 5” square - just like the regular block –
(I cheated – I added one border fabric square to the bottom of the stack when I cut the charm squares) –

See - I told you I would explain the RED bits - ;))
ADD BORDERS –
The border cut is even easier -
One square - cut just ONCE –
Will give you TWO border pieces –

For the 3 x 3 layout –
We need 8 border pieces –
So – cut four 5” x 5” squares – once –
(I layered these at the same time I cut the charm squares –
And marked the stack in blue – before I cut them) -

And put the 8 pieces where the PINK ones are in the diagram
When your design is complete –
Including the borders and corners –
It’s time to sew it together -

(And – yeah – I know I messed up the bottom corners – but I was in a hurry – and trying to sew – take pics – and write this – all at the same time. My Swiss-cheese brain has trouble multi-taking these days. That’s my story – and I’m sticking to it!!)
SEW THE BLOCKS
I transferred all of the patches to my mini-design board so that I could have them sitting next to my sewing machine -
It's hard to see the muslin patches - but - trust me - they're there - ;))

You might find it easier to sew each block separately –
But I like to sew them together assembly line –
One column of blocks at a time –
LEFT-SIDE TOP to LEFT-SIDE BOTTOM – each block –
(Sewing the seam from the center of the block out to the edge)
Then RIGHT-SIDE TOP to RIGHT-SIDE BOTTOM – each block –
Then the LEFT SIDE to the RIGHT SIDE to make the block –
Try to match the CENTER seam the best you can –
Let the outer edges be whatever they want to be -
Put the blocks back on the design board/wall to keep them in order until they all have been sewn – that way - any screw-ups can be fixed BEFORE it’s too late -
I pressed as I went along –
Because my borders were muslin –
I pressed my outside blocks away from the muslin –
Toward the colored sections –
I pressed the center block – whichever way it wanted to go - ;))


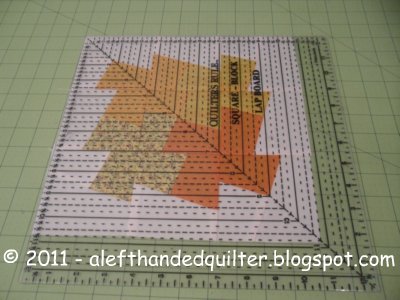
TRIM THE BLOCKS
Then find your smallest block – measure it –
Mine looks like the one on the bottom left –
And about 4” – told you so - ;))

Trim all of the blocks down to size –
The seam down the middle in both directions makes them kinda wonky –
So they do need to be trimmed – but the waste should be minimal -

Line up the ruler with the TOP LEFT corner –
Cut UP the LEFT side –
And across the TOP from LEFT to RIGHT

Flip the block around so that the trimmed edge is in the BOTTOM RIGHT corner –
At the 4” mark (or whatever your measurement is)

And trim the TOP LEFT corner again –
Cut UP the LEFT side –
And across the TOP from LEFT to RIGHT

When they are all trimmed -
There is minimal waste -

NOTE - the outside edges of these blocks are on the STRAIGHT of grain – not on the bias. The bias cuts are already sewn – they are the center seams.
ASSEMBLE THE TOP
Then sew the blocks into twosies – foursies – eightsies – etc. –
Until the top is sewn together –
Mine was little –

So I just sewed the second column of blocks to the first column

added the third column

to make rows

then sewed the bottom two rows together


and added the top row

And –
When you are done -
The border is included –
Front –

Back –

How cool is that?
Now you can square it up –
Here you can see that the middle square came out just short of 3-1/2” at the bottom – (Oh, well – close enough for me this time) -

You can use a large square ruler -
or line up the seams with the cutting mat -

and use a regular ruler to trim -


or not –

I usually quilt mine first – then trim it later -
Anyway –
That’s How I Do It –
And - remember -
There is ALWAYS more than one way to do something -
So -
Do What Works For You!!
=====
Talk to you later – gotta go – gotta sew -

2 comments:
I love me. I also cut up tissue. Look here:
http://editfoltmuhelye.blogspot.com/2011/10/vegtelen-szamban-varialhato-blokk.html
I totally agree! I don't need another single use gadget. I sewed my 5" blocks together then cut them apart Lil Twister style using lines I drew on my 8.5 sq ruler. I hesitated cutting and sewing a lot of little pieces when I don't have to.
Post a Comment