============
Note - these instructions are written in LEFTISH.
If you are right-handed - just reverse the directions. (I love saying that!!)
============
As promised - here is a step-by-step tutorial on how I make my "hearts" - Foundation Paper Piecing.
WARNING - This post is going to be really - really - really - really - really long!! I thought about splitting it into several parts - but couldn't decide just where to split it - so here goes.........
In my post - LHQ - Scrapbook - Overview - I briefly mentioned -
that - I
Remember TIHIDI?
THIS IS HOW I DO IT - Foundation Paper Piecing.
WARNING - My method is COMPLETELY BACKWARDS from the way you may have seen it demonstrated before. Just so you know!!
First - a little background -
A few years back - I came across a box of scraps - all in baggies of various sizes - all separated by quilt. WOW!! So many scraps - so many quilts - so many memories. I wanted to do something very special with them before I put them back into my "stash".
I decided to make a Memory Quilt. And I wanted to use the scraps in a way that would remind me of the actual quilts that I had made - and not just a jumble of fabrics that I had used once upon a time.
Foundation Paper Piecing to the rescue!
I decided to make one foundation paper pieced block from each one of the baggies. Each block would represent one quilt - how simple! And a "heart" seemed appropriate - so I added that step to my "process". Now my quilts are not "DONE" until I have made a "heart" from the scraps - one "heart" for each quilt.

I use a Large Crazy Hearts pattern by ABC Patterns - Temecula, CA - but you can use any pattern you want The link doesn't show an image of the hearts - but mine has a dozen different designs - all with only four patches - great for quilts with only a few colors. I can always add more fabrics - and kinda fake it a little.

And - as usual - this post originated when my sister-in-law e-mailed me asking -
How do I "Foundation Paper Piece" to make the hearts for my (someday) memory quilt?
I have heard the term "paper-piecing" but am clueless about it.
===
My awesome answer (just checking to see if you're paying attention...:)) was -
People use the terms "Paper Piecing" and "Foundation Piecing" and "Foundation Paper Piecing" interchangeably - but they are actually three different things to me.
Paper Piecing - aka - "English" Paper Piecing -
This is a technique that uses a paper/cardstock pattern/shape as a base/template. Fabric is basted to the paper shape - such as a hexagon - and then the pieces are sewn together - whip-stitched along the edges. After all sides of the shape have been stitched to another shape - the paper is removed and re-used as the base/template for another piece of fabric. You have probably seen quilts with hexagons in a circular flower pattern - Grandmother's Flower Garden - it's most likely paper pieced. Hexagons and stars are popular shapes.
Foundation Piecing -
Foundation Piecing is a technique that uses either paper or fabric as a "foundation" - with fabric sewn directly to it. A square of muslin, for example, is used as a base for a block on which a strip is placed - right side up - diagonally from corner to corner, Another strip is placed - right side down - on top of the first strip and both are sewn to the muslin base. The second strip is "flipped" over to show the right side - and another strip is placed on top of it - just like before. This is repeated (sew - flip) until you get the corner covered. You turn the block around and sew strips to the other side of the diagonal. When the entire muslin square is covered - you trim it up and sew it to other blocks - with or without sashing between the blocks. The "foundation" is usually left in the quilt. Some really old quilts have been found with newspaper used as the "foundation". "String" quilts use this technique.
Foundation Paper Piecing - FPP -
What we use to make the "hearts" -
On the other hand - "Foundation Paper Piecing" is a totally different technique that uses a paper pattern as a "foundation". The pattern pieces are numbered and fabric is sewn to the paper foundation in numerical order. (I saw instructions once that wanted me to sew the pieces in "chronological" order - I'm not exactly sure how to do that!) Pieces are added one at a time - sewn - pressed - and trimmed. Then the paper is removed - carefully. You use a size 14 needle - to make big holes - to perforate the paper. And you use a really short stitch (1.5mm) - to keep the stitching tight - so the seam doesn't pull apart when you remove the paper. Some patterns can get quite complicated. It's possible to get really sharp points and make some very intricate blocks. Pretty much like "paint by number" - just "sew by number". It is not as hard as some say - it's fun - and it can be really addictive.
MY WAY - I do it all a little differently - 'cuz I'm special...;)
WARNING - My method is COMPLETELY BACKWARDS from the way you may have seen it demonstrated before. Just so you know!
First off - everyone is all paranoid about the ink from the foundation paper bleeding onto the fabric - so they put the fabric on the side without the printing - which makes sense if you use copier paper - but it's a total waste of time - and it makes the whole process harder than it needs to be.
I just copy/print my patterns on special foundation paper - HCTW - Fun-dation. (It's usually available at Joann's.) It is a non-woven interfacing sheet - seems to absorb the ink - so the ink doesn't bleed - and I don't have to reverse my patterns. It's great stuff!!

I put the chunks of fabric on the front - the printed side - and then flip it over and stitch from the back. It's easier to see the numbers on the front - I can tell what the block will look like - it won't be reversed - and the line is visible from the back so I don't have any trouble sewing on it.
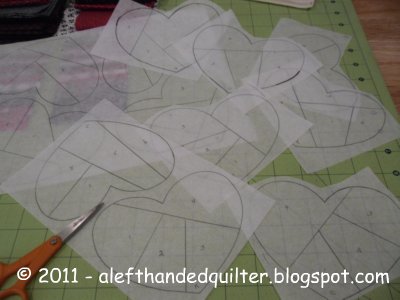
I usually make several "hearts" at a time - so I gather up all of my fabrics - some muslin squares - foundation paper - pattern - ruler - and rotary cutter. (The size of the muslin squares will depend on the size of your "heart". I need my squares to be 6".)
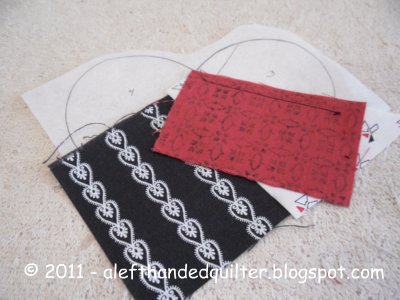
Here I have the fabrics ready for the 5 B/W/R quilts and the Pillowcases(s) scrapbook page. I have them paired with the scrap card so I know which one I'm working on. And because I didn't want 5 hearts with all fourteen fabrics - I chose four different fabrics for each heart - the focus fabric - and three others - plus the black accent strip. (The Pillowcase heart will have the five pillowcase/focus fabrics plus the two border fabrics and the white accent strip.)


and choose which ones I want.

Then I set up my sewing machine -
- Regular presser foot - the center mark will follow the stitching line
- Needle - Size 14 - (new) - to make big holes - to perforate the paper
- Straight stitch - width 0
- Short stitch length - 1.5mm - to keep the stitching tight - so the seam doesn't pull apart when you remove the paper
MY WAY - Fabric on top - wrong side to the paper - sew from the back
NOTE - The pattern will not be reversed if the fabric is right side up on the front of the paper and sewn from the back - only the numbers will be reversed. I will refer to the fabric side as the "front" and the paper side as the "back".
Prep - cutting the chunks of fabric
Using scraps - rough cut a "chunk" of fabric for each patch - make sure that the "chunk" is larger than the patch by at least 1/4" on all sides.
I want two "chunks" from the Floral -
The first patch will be for "Pillowcase Heart" - patch #1 - (set that aside for now). (You can almost see the patch numbers 1-2-3 down the left side and #4 on the right. I should have darkened them up for the photo - sorry.)

The second patch will be for the "Multi Heart" - patch #4 - accent top piece. Patches 1-2-3 go from left to right on the bottom.

Then I choose the order of the other fabric/colors (patches 1-2-3 from bottom to top)

cut the chunk of black - patch #1

cut the chunk of white - patch #2

cut the chunk of red - patch #3

This heart should look like this when it's done - not bad!!

Now we get to the fun stuff!! The sewing!!
Sewing patch #1 (black) and #2 (white) to foundation
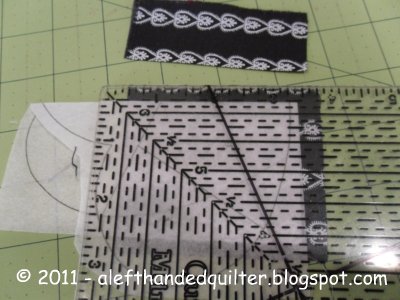
I want to "fussy cut" the black patch to make sure i get one of the white strips in the patch - and need a 1/4" seam allowance - so
I fold the pattern on the line between #1 and #2

Place the folded pattern on the #1 (black) - where I want it

Trim the black - 1/4" past the edge
Put the #1 (black) patch on the front of the pattern (right side up) and flip it over to check it from the back - to make sure the whole area is covered -

On the front - I layer patch #2 (white) right side down on top of patch #1 (black) - raw edges even (you can't see the black patch - but it's there - under the white one)

Flip it over and check it from the back again - make sure both fabrics show 1/4" past the line between #1 and #2 - (now you can see the black)

Sew on the line - a couple of stitches extra at the beginning and end of the seam -

This is a shot of the sewn seam -

From the front - press to set the seam -

From the front - press the patches open

Check out the back - to make sure the areas are covered -
Adding patch #3
Fold back the pattern on the line between #2 and #3 -

Trim patch #2 (white) - 1/4" past the edge of the pattern

Turn it to the front

Add patch #3 (red) - right side down on top of patch #2 (white) - raw edges even -

Turn it to the back - make sure both fabrics show 1/4" past the line between #2 and #3

Sew on the line -

Again - the sewn seam -

From the front - press it -
From the front - press patch #3 (red) open -

Check it from the back - again -

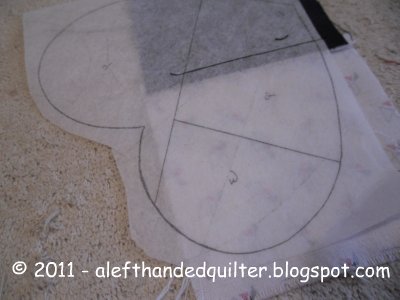
Adding patch #4 -
Fold back the pattern on the line between #1/2/3 and #4 - (you may have to pull the paper away from a couple of the stitches - but that's OK - the paper should tear pretty easily - just be gentle so you don't undo the stitches)


Trim patch #1/2/3 - 1/4" past the edge of the pattern


Turn it to the front -

This next bit is a little "extra" step I added - and has nothing to do with the pattern. Since the quilt blocks had black "accent" strips - I thought it would be cool to put one in each of the hearts. I'm showing it here in case you want to do something similar in one of your blocks.
Add the folded black accent strip - raw edges even -

Add patch #4 (floral) - right side down on top of patch #1/2/3 - raw edges even -

Turn it to the back - make sure all of the fabrics show 1/4" past the line

This time I just basted the line - just in case
(it's a PITA to have to "unsew" these little itty-bitty stitches) -

Check it from the front - and sew it "for real" -

Check it from the back -
got it a bit close on the left side - just below the black patch - but it's OK - I still have about 1/8" past the seam line -

Turn it around -

After I have pieced the entire heart - and before I trim it - I put it right side down on a square of muslin (gotta luv that muslin) -

and sew on the line - completely around the heart.
I start on a flat side near the bottom right of the heart -

Backstitching a little at the end -

As seen from the muslin side -

Then I trim it to about 1/8"-1/4" around the outside of the heart.
(I find it easier to cut clock-wise - holding the heart in my right hand and my scissors in my left. That way I'm left holding the heart - not the scraps!)

Here's the trimmed heart -

I clip the "V" - and trim the bottom point -

and remove the foundation paper - carefully -

All the paper is removed -

I turn it over and make a small slit in the muslin -

And turn it inside out (using my "Purple Thang") -

And press it -

Now it's all nice and neat - with no raw edges showing - MAGIC!!

The hearts will eventually be appliqued to plain blocks - but I haven't decided what size or in what combination or layout yet. Right now I'm just collecting them for my "Someday Memory Quilt".

So gather up your scraps. Try to keep them separated by "quilt" - so you can make a separate "heart" for each one. I just put mine in baggies - then all of the baggies in one box - and make a bunch of "hearts" at one time. Works for me!!
Talk to you later - gotta go -

4 comments:
What a great paper-piecing tutorial and I like the way you put muslin on the back. Thank you Left-Handed Quilter! I've done paper-piecing before but haven't really liked it, following your left-handed directions may do the trick.
Connie -
Glad you liked the tutorial. I hope it helps make the process easier the next time you try Foundation Paper Piecing. Let me know.
And thanks for leaving a comment. I wonder sometimes if anyone is actually reading my blog. (I think most of the stats are just me - trying to make what I write make sense.)
^..^
Wow, very detailed! I have to look for that Fundation stuff.
mainer - I get mine at Jo-Ann's. Try it - I think you will like it! ^..^
Post a Comment