Note - these instructions are written in LEFTISH.
If you are right-handed - just reverse the directions.
============
This tutorial will show you how to make -
Quarter-Square Triangle units that FINISH at 2" -
Using the Companion Angle ™ Ruler -
by Darlene Zimmerman -
And 1-1/2" strips - ;))
Of course you can make other sizes as well -
Depending on the size of the strip you use -
1" strips will make QST that FINISH at 1" -The technique is the same -
1-1/2" strips will make QST that FINISH at 2" -
2" strips will make QST that FINISH at 3" -
2-1/2" strips will make QST that FINISH at 4" -
Etc.
The strip size matches the marking down the center of the ruler -
And the FINISHED size will be number shown on the side of the ruler - ;))
=====
FIRST CUT -
Layer your 2” strips - right sides together -
I layered a light and medium fabric -
Cut the selvage off to straighten the RIGHT end of the strip -
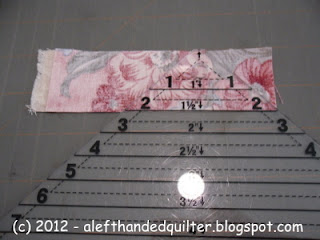
Then starting at the RIGHT end of the strip -
Line up the BOTTOM of the strip on the “2” line (2” FINISHED)
Cut UP the LEFT side and DOWN the RIGHT side -
SECOND CUT -
Move the ruler to the LEFT - FLIP it up -
And position it so that the "2” mark is on the TOP edge of your strip
(Line up the TOP of the strip on the “2” line (2” FINISHED) -
Then cut UP along the LEFT side of the ruler -
Continue across the width of the strip - ;))
Here I cut two sets -
The tops of the triangles are flat -
And they look like they won’t fit -
But they DO - and you have -
One less dog-ear to trim - ;))
Stitch them up -
BUT -
When I sewed them together -
I flipped them over -
So that the lighter fabric was on top -
And sewed from the top of the triangle -
To the base -
That’s how this -
Turned into this - ;))
Gotta watch that -
Whichever fabric is on TOP -
When you sew them together -
Will be on the RIGHT -
When you open them up - ;))
And when the two halves - the UNITS - are sewn together -
The sewn QST unit will measure 2-1/2” square -
It will FINISH at 2” - ;))
Talk to you later - gotta go - gotta sew -


No comments:
Post a Comment