LEFT-HANDED QUILTING - Binding - Hand Sewing the Mitered Corner
============
Note - these instructions are written in LEFTISH. If you are right-handed - just reverse the directions.
============
I was talking to Rose (one of my readers) recently about quilt binding. She asked me to show
How I hand sew the mitered corners -
so here goes -This Is How I Do It -
=====
For this demo - I used white thread so that it would show up against the dark fabric in the photos. Normally I would choose a thread color to match the binding. I also would try to make the stitches a little straighter - and pull them a little tighter - but I had to make them visible. (That's my story and I'm sticking to it!)
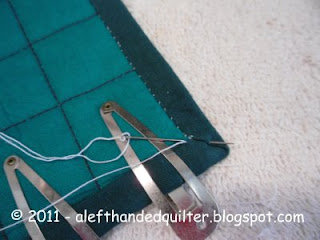
Stitch down to the corner - keep a clip on the point until you get there - then replace it with a pin to keep the miter in place -
Take one stitch right IN the corner
Turn it 90 degrees - take one more stitch down the next side
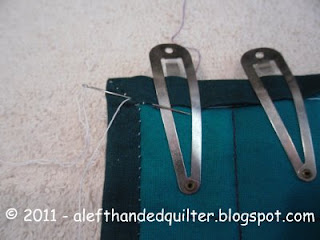
Turn it back so the corner is between your right thumb and index finger
Take one stitch halfway between the corner and the point
Then one more stitch at the very tip
Turn it around so that you are stitching left to right - back to the corner
(Yeah, I know - but it's only for two stitches)
Put these two stitches in the middle of the space between the ones you sewed going to the point - like this -
OR take your first set of stitches 1/8" apart toward the point and then run your needle under the binding to come out where you want to start stitching down the next side.
When you get to the corner - go in at the corner and come out 1/8" away from the stitch you did before -
=====
The closer you can get the needle to coming out right at the fold - and
the closer you can get it to going in straight across from where the needle came out -
the more invisible this stitch is - MAGIC!!
MORE MAGIC - If you have trouble getting your stitches 1/8" apart - eight stitches to the inch - sew around your quilt at 1/4" intervals and then go around it again sewing in the middle of the space between your previous stitches. It will look like you sewed them 1/8" apart the first time around - MAGIC!!
Talk to you later - gotta go - gotta sew -
A blog about quilting and using the LEFT-EZE Rule - my HST/QST Ruler designed for LEFT-HANDED Quilters -
Pages
- Home
- LEFT-EZE™ Rule
- LEFT-EZE™ Rule - Tutorials
- LEFT-EZE™ Rule - Size Chart
- LEFT-EZE™ Rule - Free Pattern & Tutorial
- LEFT-EZE™ Rule - Reviews/Testimonials
- About This Blog - And Me
- Rules
- Reviews
- Quilt Journal
- QJ - Floral Applique
- Sudoku Quilts
- Studio Organization
- Fabric Storage Tips
- Left-Handed Quilting (LHQ) - Introduction
- LHQ - Basics
- LHQ - Rotary Cutting
- LHQ - Construction
- LHQ - Hand Sewing
- LHQ - Binding
- LHQ - Finishing The Quilt
- LHQSQ - LHQ Sampler Quilt
- UFOs/Projects/Squirrels
- Quilt-Along - LHQSQ 2.0
- Privacy Policy
Subscribe to:
Post Comments (Atom)


1 comment:
Great tute and good photos!
Post a Comment