DESIGN WALL MONDAY -
Check out all of us who link up with Judy L. at Patchwork Times on Mondays.
We have some awesome stuff on our walls!
Well, THEY do - ME - not so much sometimes - ;))
============
Note - these instructions are written in LEFTISH.
If you are right-handed - just reverse the directions.
============
I took another break –
From my LHQ Sampler Quilt -
See the page/tab at the top of my blog -
I decided to finish the backing for the Wolf Song quilt –
I started working on it a while back -
But I got sidetracked - ;))
The panel came with two more wolf scenes –
Perfect for the back –
Add some brown trees for a strip in the middle -
Add some green trees and the extra wolf vignette fabric –
For a strip along the top –
Then fill in with some black along the bottom -
Looking good!! –
And then -
I saw another squirrel - :))
And never got back to it -
Until now -
So -
One problem is that my first plan doesn’t fit this wall -
It's too big -
So I switched to the wall in the hallway -
And - because I have a tendency to measure WRONG -
I put up the top first -
Now - if I pin the back on top of it -
With some extra on each side -
I can SEE if it’s big enough -
Or not - ;))
The green trees and extra wolf vignette fabric -
At the top -
A chunk of dark green at the bottom -
Gotta save that BLACK - LOVE that BLACK!! -
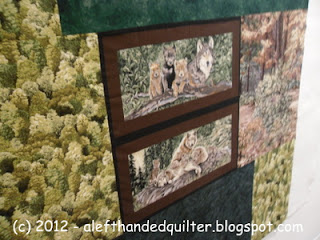
The wolf scenes can go in the middle -
So they won’t get chopped off when it gets trimmed -
With a spacer strip to set off the wolf vignette fabric -
Sew some more green trees to the left -
And some brown trees to the right -
Shift the big green chunk on the bottom -
Over to the left side -
Add some more green trees to the right side -
NEVER going to use those green trees again -
Might as well use it UP!! -
And when I sew larger pieces together -
I always put an extra pin to keep the sides straight -
See the top pin on the right?
I’m sewing the edge along the bottom -
Close-up of the wolf scenes -
Looking good!!
Here’s another shot from the other end of the hallway -
The whole top is covered -
Looks big enough to me - ;))
Sew it all together -
Put it up on the wall -
Top and back -
Side by side -
Now I need the sleeve - binding - and label -
Then I can pack it up for my friend/quilter -
To quilt -
While I make the scrap card -
Heart -
Write the story -
And gather photos - ;))
Talk to you later – gotta go – gotta sew –
A blog about quilting and using the LEFT-EZE Rule - my HST/QST Ruler designed for LEFT-HANDED Quilters -
Pages
- Home
- LEFT-EZE™ Rule
- LEFT-EZE™ Rule - Tutorials
- LEFT-EZE™ Rule - Size Chart
- LEFT-EZE™ Rule - Free Pattern & Tutorial
- LEFT-EZE™ Rule - Reviews/Testimonials
- About This Blog - And Me
- Rules
- Reviews
- Quilt Journal
- QJ - Floral Applique
- Sudoku Quilts
- Studio Organization
- Fabric Storage Tips
- Left-Handed Quilting (LHQ) - Introduction
- LHQ - Basics
- LHQ - Rotary Cutting
- LHQ - Construction
- LHQ - Hand Sewing
- LHQ - Binding
- LHQ - Finishing The Quilt
- LHQSQ - LHQ Sampler Quilt
- UFOs/Projects/Squirrels
- Quilt-Along - LHQSQ 2.0
- Privacy Policy


1 comment:
I too am a Lefty handed quilter and as you well know we do do things in the "leftish" style. But what I really like is all my quilter friends are so jealous that I can rotary cut with both hands.....and do it well!! Left handers are in their right mind....creative and smart all at the same time. Love your wolves!!
Post a Comment