And DONE!! -
Ta Dah!! -;))


The colors are more "true" in this one -
And I really like that little touch of lime green -

Last time I told you that I found a YouTube channel by Jordan Fabrics - HERE - that shows a variety of binding methods. So I tried their version - #4 - Flange Binding -
I used this quilt as my "test piece" to see whether or not I liked the method -
And I DID - a LOT!! - ;))
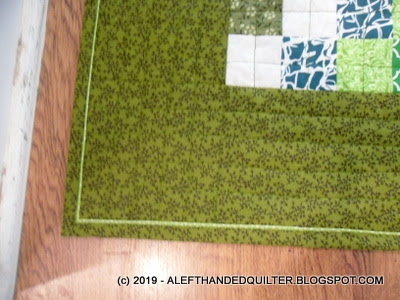
The backing is pretty straight considering I couldn't see it when I layered it -

I used left-over fabric of the lime green dot fabric on the right for the "flange" and matched the top thread to that - per her suggestion -

And the corners mitered nicely -
But I didn't fold the corner the way she did -
I find it easier to fold the "bottom up" with my left hand - using my left index finger to make the miter fold in the corner - then fold the side of the binding over on top of it - and hold it all down with my right index finger as it goes under the needle - stop with the needle down in the corner - and pivot - the presser foot doesn't get caught in the fold because it is on TOP of it - if that makes sense - and continue down the next side -
And there was not a binding clip in sight - didn't need any - LOL -

I used the same thread color in the bobbin as I did with the quilting - so the line that doesn't quite match the "ditch" looks like another line of quilting -
And I won't tell if you won't - LOL -

As a test piece - I REALLY like this binding method -
It took me a while to join the ends - because I'm slow - but her technique resulted in the flattest join I have EVER done - so the time it took me to do it was time well spent - and you have to make the join anyway whether you stitch it by machine or by hand - so "flat" is more important to me than the time it takes -
And the time she takes to flatten the seam with her fingernail (I used my wooden "pressing" stick) was also "worth it" - it made the fold-over to the top VERY easy - very smooth - and very flat -
All in all - I HIGHLY recommend this method -
If you want to do a binding entirely by machine -
And avoid all of the "hand-stitching" to the back -
For whatever reason -
Now I may actually bind those quilts in that pile over there - LOL - ;))
Talk to you later - gotta go - gotta sew -

5 comments:
The touch of lime green in the flange binding is very effective. I always like to find a new technique that changes the way I do things. Great project.
I like that lime green pop also.
This method does take a bit longer, but it certainly doesn't take as long as hand binding.
Congratulations on the finish! It looks wonderful. That little pop of color really adds to the overall look of the quilt.
So, whatcha gonna show us next????
Have a great day.
It looks great! I cant believe you're done already. Slow quilter no more!!! And I'm gonna go check out that video later. Right now I gotta run the vacuum - for whatever reason, the new vacuum makes the hubby all stuffed up (it's a Dyson animal vac, so super filtered...and not a piece of junk by any means!), so since he's on vacation this week, I need to run it while he visits the doctor. Maybe I'll blog later about my quilting adventures...or tomorrow...
If it works, it is the right way. It does look great. Congratulations on the finish. Now I need to get inspired to make a finish of the baby quilt. Well, the binding and quilting are dine but a few details are being dithered over...
Post a Comment