Today was one of those days -
I started to make Potholder #3 - QST -
Got sidetracked with Potholder #4 - Flying Geese -
And wound up going back and forth between the two -
So - if you bear with me for a bit -
And I'll show you how I made BOTH of them -
Using the LEFT-EZE Rule™ - to cut QST and Flying Geese - ;))
First I pulled four 2" strips -

And layered them four deep -
Top one - light PURPLE - right side UP -
Second one - GREEN/WHITE - right side DOWN -
Third one - dark PURPLE - right side UP -
Fourth one - GREEN floral - right side DOWN -

Trimmed the end to straighten it - like before -


Cut a HST - like before -

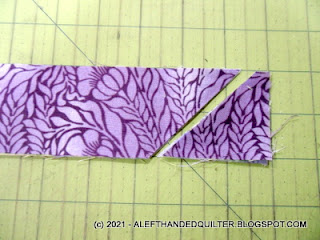
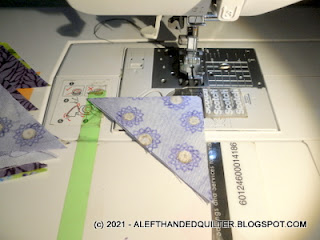
To cut a QST - Quarter Square Triangle -
Turn the strip -
So that the cut edge is along a horizontal line on your cutting mat -

Using the DIAGONAL LINES on the LEFT-EZE Rule™ -
Line up the cut edge along the bottom of the ruler -
The TEENY BLACK triangle will be in the BOTTOM LEFT corner -
The long edge of the strip will line up with a DIAGONAL line on the ruler -
That corresponds to the WIDTH of the STRIP -
NOTE - I did NOT number the DIAGONAL lines - on purpose -
because you don't really NEED them - LOL - ;))
Cut STRAIGHT UP the LEFT side of the ruler -


Rotate the ruler so the TEENY BLACK triangle is on the TOP RIGHT corner -
Cut STRAIGHT ACROSS the TOP of the ruler from LEFT to RIGHT -
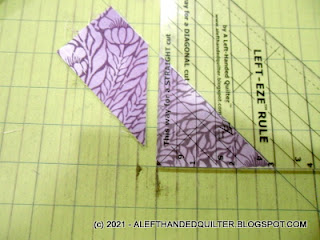
PLEASE note -
The LONG DIAGONAL SIDE is on the STRAIGHT edge of the STRIP -
That's the difference between a HST and a QST -
QUARTER-SQUARE triangles are used for SETTING Triangles to keep the edges of an "on-point" quilt on the STRAIGHT of grain - so they don't stretch. If you used HST on the edges - the DIAGONAL would be on the BIAS - and that's not what you want - LOL - ;))


I only had enough left to cut one more HST -
So I did - LOL -


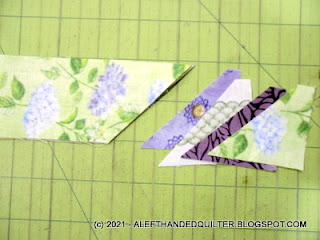
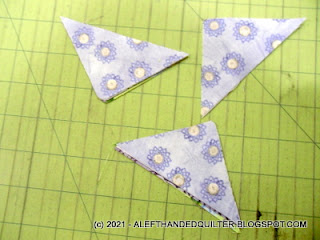
Then I laid out all of the pieces to see what I had -

And that's when I forgot what I was doing - LOL -
I realized that I was missing some "wings" on my Flying Geese -

And remembered a "trick" to cut the COLORS that I WANT -
ON THE SIDE that I WANT them to BE -
For the ones above -
I need some GREEN/WHITE ones on the RIGHT -
And some PURPLE ones on the LEFT -
SO - REMEMBER - RIGHT SIDE UP -
And layer the fabrics that you want -
With the RIGHT one - RIGHT SIDE "UP" -
Which leaves the LEFT one - RIGHT SIDE "DOWN" -


Same with these two -

GREEN - RIGHT SIDE "UP" -
PURPLE - RIGHT SIDE "DOWN" -


Trim the edge to straighten it - like before -


Cut some HST - like before -


Lay them out -

Match them up -

Then I remembered -
That I wasn't making the Flying Geese one - #4 - YET -
And that I needed some QST for Potholder #3 - LOL -
So I grabbed some more strips -
Top one - GREEN/WHITE - right side UP -
Second one - light PURPLE - right side DOWN -
Third one - GREEN floral - right side UP -
Fourth one - dark PURPLE - right side DOWN -


Cut a HST first - like before -

Turned the strip - like before -

Cut the QST - like before -

Since these were short strips -
I didn't have enough to cut another QST -

But I did have enough for a HST -
So I cut one more of those -


QST - I only had four -


And needed more than just four -
So I grabbed more strips -
And layered those four deep -
With two sets of fabrics - RIGHT sides together -
And cut them like before -


I didn't have enough to cut a last HST -
So these went in the "scrap" pile -

And I had three more sets of four QST -

They were already paired up -
RIGHT sides together -
So I took them to the sewing machine -
And sewed them together along the SHORT sides -
Starting at the FLAT/STRAIGHT end -


When you press them open -
The one on TOP will be on the RIGHT -


And there will be ONE DOG-EAR at the corner to be trimmed -

Match two units - nesting the seam -

And sew them together -

They should measure 3-1/2" square -
And have TWO DOG-EARS to be trimmed -

One at the TOP LEFT corner -

And one at the BOTTOM RIGHT corner -

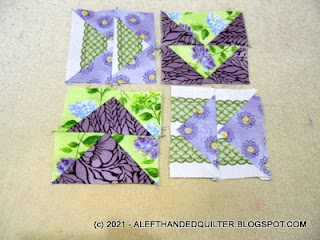
Four of them together -

Will nest nicely if you "spiral the seam" -
A trick I learned from a book by Billie Lauder - years ago -

The four together measure 6-1/2" -

And that's Potholder #3 -
Then I realized that I already had the Flying Geese ones cut for Potholder #4 -
So I might as well sew them together -
And make that one, too - LOL -
So - sew the RIGHT "WING" to all of the QST -


Press it open -
And add the LEFT WING -


Flip it over when you take it to the sewing machine -
So you don't start sewing at the "pointy" end -


Press it open -
And it should measure 2" x 3-1/2" -
With TWO DOG-EARS to trim -


Sew two of them together -
With the "Flying Geese" on the top -
So you can see the "tip" - and can hit that point -

Press them to the top unit -

And lay them out -
Sew them together in rows -
Then sew the rows together -

It should measure 6-1/2" -

Like the other ones -

So that's the first four Potholders -
Tomorrow I'll try to add the border strips -
And finish them up - ;))
Talk to you later - gotta go - gotta sew -

2 comments:
I think we got a bonus "Flying Geese" lesson in this one - thanks to your -detour- from HSTs.
Super blog
Post a Comment