A blog about quilting and using the LEFT-EZE Rule - my HST/QST Ruler designed for LEFT-HANDED Quilters -
Pages
- Home
- LEFT-EZE™ Rule
- LEFT-EZE™ Rule - Tutorials
- LEFT-EZE™ Rule - Size Chart
- LEFT-EZE™ Rule - Free Pattern & Tutorial
- LEFT-EZE™ Rule - Reviews/Testimonials
- About This Blog - And Me
- Rules
- Reviews
- Quilt Journal
- QJ - Floral Applique
- Sudoku Quilts
- Studio Organization
- Fabric Storage Tips
- Left-Handed Quilting (LHQ) - Introduction
- LHQ - Basics
- LHQ - Rotary Cutting
- LHQ - Construction
- LHQ - Hand Sewing
- LHQ - Binding
- LHQ - Finishing The Quilt
- LHQSQ - LHQ Sampler Quilt
- UFOs/Projects/Squirrels
- Quilt-Along - LHQSQ 2.0
- Privacy Policy
Friday, August 2, 2019
Sneak peek -
It doesn't look like much yet -
And I'll give you a sneak peek in a minute -
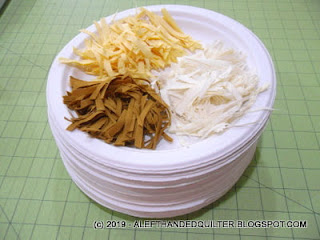
But first - let me start with these guys - ;))
I didn't think that I had enough background -
So I made some more confetti from these -
And put them on their own plate -
Then I found a piece of foam core board - 20" x 30" in the closet -
And used that as a base so I could carry it from the kitchen island to the "studio" without messing it up -
Then cut a fat quarter from some pale yellow for the backing -
Cut a piece of polyester batting about an inch shorter all around -
And laid that on top of the yellow backing -
And spread out all of the plates -
That made me feel like a kid with a new box of crayons - LOL - ;))
Like I said -
It doesn't look like much yet -
And I don't want to spoil the ending -
The first layer is all of the background stuff -
And a general layout of the sections -
But here's some of the "leaf" background -
And some of the "ground" -
This is a shot of the YELLOW backing (that my camera thinks is GREEN) -
And you can see why it will have a second backing when I add the next layer -
So my wonky stitching won't show - ;))
The foam core board worked wonderfully for transporting the "work in progress" to the sewing machine without getting confetti all over the place - LOL - ;))
The least fun part of it so far was stopping to re-thread the monofilament thread that kept snapping. My normal tension setting is 3.5 - so I lowered it 2 whole numbers - to 1.5 - and it still kept breaking. I slowed waaaaaaaaay down and that seemed to help - but FMQ that first layer was a royal pain. I'll switch to 100% cotton thread for the second layer - I should have fewer issues with that - ;))
Tomorrow I have some chores to do before company comes for the weekend -
So I won't be able to play with this again for a couple of days -
The second layer has all of the FUN stuff -
So when I get that done -
I'll show you more - ;))
Talk to you later - gotta go - gotta sew -
Subscribe to:
Post Comments (Atom)


7 comments:
I always have to put the top tension at 0 when I use monofilament.
Looks like you are having fun! Well, except for the thread breaking. New crayons - I love that.
This is looking awesome! Your supplies look very organized, and using a foam board was a great idea. Taking a break between stages of a project is often a good idea. You will go back refreshed, and maybe even with a new idea or two as it comes together.
This is an interesting start. i look forward to seeing how it develops as you add more layers of confetti.
Your workspace is WAAAAYYY too tidy! And then you tease with a start and tell us you're going to be a few days? Ugh. Some people...*eyeroll* But seriously, it's looking good and interesting and I'm excited to see how the next steps have gone.
Can I just say that I hate cliff hangers! ROFLOL
It is looking interesting. . .and I second the comment that you are waaaayyyy too organized and neat! My pictures would never look that good.
Looking forward to seeing how things all come together.
Somehow I am having trouble imagining where this is all going. I just wish I could send you some piles of crumbs so you don't have to chop up big fabrics into tiny pieces.
Post a Comment