OK -
I was going to show you how I sorted the strips for SETS #5-6-7-8 -
But I sat down to sew a couple of strata -
And before I knew it -
I had the first set of blocks -
For my Upstairs/Downstairs - Pastel Brights sewn -

And then I thought that this post could be an "all-in-one" tutorial -
On how I make these -
Except for the layout - that will come later -
Because I can't show you that until I finish making ALL of the blocks - LOL -
Anyway - to backtrack a little -
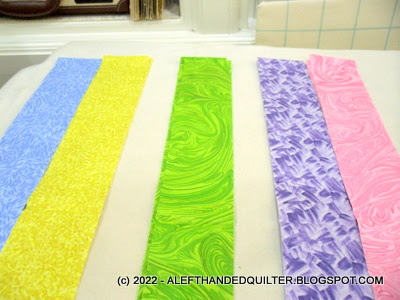
I pulled out SET #1 from its baggie -
(Sorted yesterday on THIS post) -

Strips for TWO strata -
Five strips in each strata -
Same order - identical strata -
Enough for SIX identical blocks -

And laid them out on my ironing board -
Since I will be sewing BOTH strata at the same time -
In order - both BLUE - both YELLOW - both GREEN - both PURPLE - both PINK -
Linda - Art in Search - is going to use BLUE as her "main diagonal" -
So hers are in order already -

I'm going to use YELLOW as my "main diagonal" -
So I moved the BLUE one to the other side on the right -
That way - the colors are still in the same order as hers -

Linda will be joining her strata - in her order - this way -
I'll be joining mine this way -
And will be showing you "my way" -
Now - because I have BOTH strips - for BOTH strata -
I can sew the GREEN ones to the YELLOW ones -
And the BLUE ones to the PINK ones -
Chain-piecing - one right after the other -

Then I can clip off the YELLOW/GREEN ones -
And add the PURPLE ones -


Then - by that time - I can clip off the PINK/BLUE ones -
And add them to the YELLOW/GREEN/PURPLE ones -


And I have BOTH strata sewn at the same time -

PRESSING - IMPORTANT -
Press the MIDDLE strip OUT -
And the END ones OUT -


Label BOTH of the strata with the same label as the baggie -
Until you decide to cut them -

I sewed and pressed SET #1 and SET #2 -

And then decided to go ahead and cut SET #1 for this post -
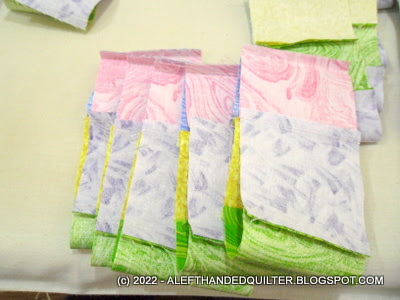
So I laid out both strata on my die cutter -
And staggered them a bit -
And sub-cut them into 2-1/2" segments -


And laid those out on my ironing board -
Five piles of SIX - for SIX identical blocks -

Some people like to sew the strata into "tubes" first -
And THEN cut them -
But I find that my accuracy is much better if I cut them FIRST -
The trade-off then - is that I have to sew them into "tubes" individually -
But I don't find that to be a problem -
It's easy - mindless - and I'm more accurate on shorter seams anyway - LOL -
SO -
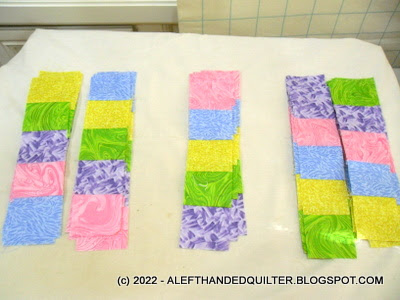
The first SIX are already the way I want them -
So they stay put -

The other 24 were taken to the sewing machine -
And sewn into "tubes" -

Chain-piecing - one right after the other -

And - I won a game of "bobbin chicken" - LOL -
I ran out of thread right after I sewed this one -

Anyway - all of the tubes were sewn -

And clipped apart -
And put into four piles of SIX - for the SIX blocks -

Each tube was separated at the spot needed for the "stair-step" effect -
Like a "Trip Around The World" block -

Once I found the "correct" spot -

I adjusted the other tubes to correspond -
And "chain-un-sewed" them - at the same spot -
And un-sewed the rest of the tubes the same way -

One thing that I find interesting -
Is that I am NOT locked into -
Having the YELLOW as my "main diagonal" at this point -
I can easily make BLUE the "main diagonal" -
By moving the YELLOW one to the last one on the right -

Or move the BLUE one over and make the PINK one the "main" -

Or move the PINK one over and make the PURPLE one the "main" -

Or move the PURPLE one over and make the GREEN one the "main" -

Or move the GREEN one over and make the YELLOW the "main diagonal" again -

Anyway - before we sew these together -
We need to PRESS them -
IMPORTANT -
The YELLOW or MAIN DIAGONAL gets pressed OUT -
In Column #1 - 3 - 5 -
The patches at the TOP - MIDDLE - BOTTOM are pressed OUT -
In Column #2 - 4 -
The SECOND and FOURTH patches are pressed OUT -
This helps the seams nest when we get to sewing the blocks together -

Now I sew the block together -
The same way I sewed the strata together -
The first two get sewn together -
The last two get sewn together -


Then the third one gets sewn to the first two -

And - finally -
The last two get sewn to the first three -
And you have your block -
Times SIX -

The blocks gets pressed like so -
The SECOND and FOURTH columns get pressed OUT -

SIX blocks -

I put the label back on the stack of blocks -

And put the stack on my cookie sheet -
Where it can wait for its friends -

Tomorrow I'll show you and Linda -
How I sorted the strips for SETS #5-6-7-8 - ;))
Talk to you later - gotta go - gotta sew -

3 comments:
Wow, that is a lot of information in one post. Great tutorial.
Love this tutorial. You do a great job in explaining & photographing each step.
Stratas sewn and pressed, but not cut. Horsin' around with the horse quilt. Takes all my concentration.
Post a Comment