LEFT-HANDED QUILTING - Binding - Basics
============
Note - these instructions are written in LEFTISH.
If you are right-handed - just reverse the directions.
============
For this demo I assembled a little mini-quilt and some strips for binding
I prepped the binding like I showed you before – and made a little roll
BASICS -
Machine stitch down
Leaving a “tail” of about six inches – for joining the ends later
Start about 2/3 of the way down one side – 1/3 of the way before a corner
(I usually start on the bottom side - and you don't want to start AT a corner - there's too much going on there!)
I like to use my quilting even-feed foot – to attach my quilt binding.
The seam allowance is 3/8” instead of 1/4" and results in the binding being the same width on the front and back – if you cut the strips 2-1/2”.
Some quilters like to use a 1/4" foot so the binding is wider on the back and there is more fabric to fold over – it’s not as tight when they go to hand stitch it down.
Personally - I prefer my bindings to be the same width on the front and back. I think it looks nicer – just my personal preference, that’s all.
MITERING THE CORNERS -
Fold up the bottom – ("bottoms up") - 3/8” – to mark the stopping point
See the 3/8" mark on the right side of the ruler - lined up with the bottom of the piece?
If you were using your 1/4" foot - you would fold it up 1/4" - not 3/8".
Stop at the marked point and backstitch
Remove the quilt from the sewing machine – turn it so that the side you just sewed is on the top – and the second side is on the right - fold the strip up
and then back down – on top of itself - line up the raw edge with the second side
Starting at the top – stitch it down
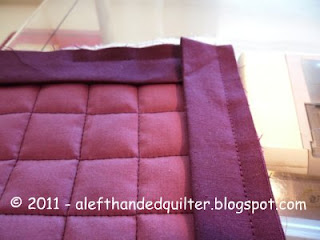
You can see the fold in the corner – that’s going to be the miter
Fold it up a bit – to see
JOINING THE ENDS -
mainer-meinca uses a one-pin system – check it out – here
I do it a little differently – but not much!
Sew around the quilt – mitering the corners as shown above.
When you get to the end – stop about 6” away from where you started.
Remove the quilt from the machine – you should have about 6” “tails” at both ends.
(Mine are a little short - and it made joining the ends more difficult than it had to be.
You are better off with longer tails - more room to "sew" - mine got a bit tight.)
The easiest way to join the ends – is to use a straight seam. That's why I like to use straight seams when I stitch the binding together. You can find demos of diagonal seam joinings on other blogs - so I won't do it here. (Diagonal seams are trickier – and you better watch which piece you have on top – or your seam may go the wrong way – ask me how I know!)
Lay the quilt on your pressing surface – fold the binding to “meet in the middle” and press them both.
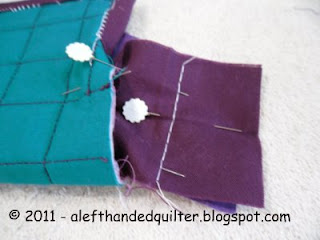
Open up the binding – pin them together – folding the rest of the quilt out of the way.
(Make sure you pin them the right way. You want the seam allowances to be on the "inside" - I've done THAT part wrong, too!)
and sew on the crease lines.
(This is where it got tight.)
DO NOT TRIM THE SEAM YET!!
Take the quilt back to your pressing surface – spread the binding out to see if it fits - and that the seam allowances are on the "inside". If it doesn’t fit – repin and restitch the seam.
(If you trimmed the seam already - you may not be able to fix it.)
When it fits – trim the seam – press the seam allowance open (like the rest of the binding strips) and finish stitching the binding to the quilt.
After the binding is completely sewn to the quilt – I trim the backing and batting even with the binding all around.
Next up - the "other" side -
Talk to you later – gotta go – gotta sew –
A blog about quilting and using the LEFT-EZE Rule - my HST/QST Ruler designed for LEFT-HANDED Quilters -
Pages
- Home
- LEFT-EZE™ Rule
- LEFT-EZE™ Rule - Tutorials
- LEFT-EZE™ Rule - Size Chart
- LEFT-EZE™ Rule - Free Pattern & Tutorial
- LEFT-EZE™ Rule - Reviews/Testimonials
- About This Blog - And Me
- Rules
- Reviews
- Quilt Journal
- QJ - Floral Applique
- Sudoku Quilts
- Studio Organization
- Fabric Storage Tips
- Left-Handed Quilting (LHQ) - Introduction
- LHQ - Basics
- LHQ - Rotary Cutting
- LHQ - Construction
- LHQ - Hand Sewing
- LHQ - Binding
- LHQ - Finishing The Quilt
- LHQSQ - LHQ Sampler Quilt
- UFOs/Projects/Squirrels
- Quilt-Along - LHQSQ 2.0
- Privacy Policy


2 comments:
OK! This is how I do it! See my blog:)
I'm going to try this method. I end the strips on the diagonal other than that, much like you do.
Do you backstitch before and after the mitered corner?
Post a Comment