============
Note - these instructions are written in LEFTISH.
If you are right-handed - just reverse the directions.
============
I want to show you how I prepare my quilt binding - whether I bind the quilt myself or send it to my long-arm quilter. Either way -
This is How I Do It.
When I cut the fabric for JELLY BEANS - I put the binding strips into a baggie and labeled it with the number of strips - the width of the strips and the WOF - until I needed it.
Width - The standard cut width of binding strips for a double-fold binding is 2-1/2". I prefer 2-1/4" myself - but the pattern called for 2-1/2" and my long-arm quilter likes that width - so 2-1/2" it is. (Use whatever width makes you happy.)
Length - You will need it long enough to go completely around the quilt plus extra for mitering the corners and joining the ends - I usually make waaaay more than I need - just in case. Any left-overs just go in my scrap bin - after I make my scrap card and heart.

Binding strips can be joined using straight seams - or diagonal seams. They say that a diagonal seam is "less bulky" - but I prefer to sew mine in straight seams - so do whatever works for you. (I talk about diagonal seams at the end of this post - just keep reading.)
When I'm ready to "prepare the binding" - I chain piece the strips together.
I partially unfold the strips and lay them across my right knee.
I pick up the top two - right sides together - stitch them together (straight seam - not diagonal). Then I fold the top one so the end is right side up - pick up the next strip from my knee - put it right side down on top of the other one - and stitch them together - one right after the other.
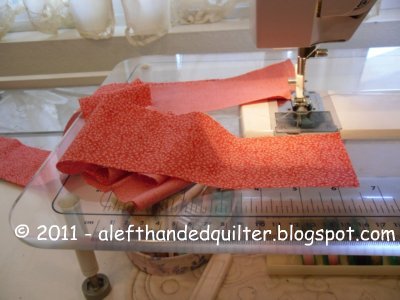
This is what I get -

So I clip them apart -

And - starting at one end - fold the strips and press them wrong sides together - letting them just fall off the left side of my pressing board as I go -

When I get to a seam -
I fold it up so that I can press the seam to set it -

Press it open -


Then continue on my way -

When I'm done - I have a nice little pile on the (clean) floor. (Normally, I would have used a basket to catch the binding - but I was in a hurry and didn't want to take time out to get one.)

I pick up the pile and put it on my pressing surface -

And starting with the right/last end - with the raw edge on top - I simply roll it up - from right to left -

When it is all rolled up - it is ready to apply to the quilt - it will just unroll toward me as I stitch it down - cool, huh?

But this one is going to the long-arm quilter - so it goes back in the baggie with a re-done label.

Easy - peasy!!
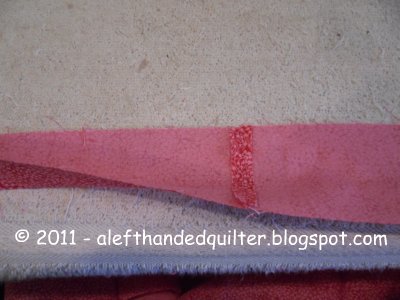
One other thing - Diagonal Seams -
Have you ever noticed that the diagonal seam on quilt binding goes in a different direction - depending on which strip is on top? Check this out -
Here I have two sets -
#1 - Green on top - purple on bottom
#2 - Purple on top - green on bottom

#1 - Fold the green one up and press it
#2 - Fold the purple one down and press it
(you could press it up also - if you want - it's just shorter if you press it down)

Open them both up to see the creases (you can barely see them - but they are there - they go from the top left to the bottom right)

Pin them both for sewing

Fold them as if they had been sewn (I didn't really sew them for this demo)

Move #2 and put it below #1 so the purple sides are on the left.
See??

One more thing - take a look at Bonnie Hunter's new trick for turning the corner part (the part you would probably throw away) into a 2" half-square - it is really cool - especially for any scrapaholics out there like me. (You can use it on snowball and flying geese blocks, too!)
And Congratulations to Bonnie for winning the 2011 Golden Quilter Award for "Teacher Of The Year"!! How cool is that?
Talk to you later - gotta go - gotta sew -

2 comments:
So far, I have been doing it the same way except I use diagonal seams to connect the strips and sometimes they don't play nice with me. I'm going to do straight seams next time. I like the way you continuously sew them together and then clip apart. I also use 2 1/4" strips. Neat idea on rolling the binding. I'm such a neat freak and love organization, so you know I love the way you package your bindings. Thanks for sharing.
Great tutorial, I use diagonal seams to connect strips but straight seam to join my ends on the quilt. I've always used 2 1/2 binding, tried 2 1/4th a couple times but don't care for it. Interesting on the direction of the diagonals!
Post a Comment