Sometimes when I tell a story -
Or try to explain something -
I tend to think faster than I talk -
And trying to explain something without pictures -
Is like trying to talk without using my hands - LOL -
So before I try to explain my "wonton wrapper" theory -
Let me backtrack a little to yesterday -
I wasn't going to bore you with my "process" photos -
But I changed my mind - LOL - ;))
I started with this and - since it's HUGE - decided to test a Cathedral Window background square type of thing on something a lot smaller -

I started with a plain muslin square -

Pressed it in half - and stitched both ends with a 1/4" seam -

Made a little "pouch" -

And then matched the side seams in the middle - and sewed a partial seam starting at one corner -

Through the center -

To within an inch or so of the other end -

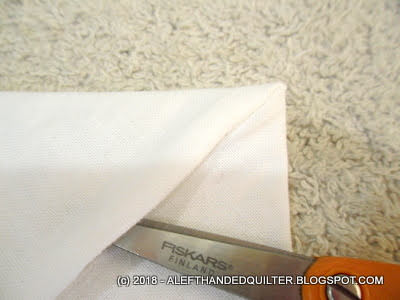
Opened it out - and had the corner "open" so I could turn it inside out -

Did that - and then had a wonky corner that I didn't like -

So - I un-stitched a bit and re-sewed the end of the seam - making the opening closer to the center seam and about an inch away from the corner -

That worked better - the opening is away from the corner -

And the corner is much neater -
Pressed it on the seam side -

And the plain side - looking good -
But then I needed to figure out how to get some batting in there - ;))

So - I tried it again -
Cut another square and centered some fusible batting "on-point" -

Pressed/fused it in place using my teflon applique sheet -

And pinned it in place just to make sure it didn't shift -

Folded it in half - right sides together -

And stitched the ends like I did the muslin one -

Got the same little "pouch" with batting on the outside -
Matched the side seams in the middle - and sewed a partial seam starting at one corner - like I did before -

Leaving an opening in the center of one seam -

Removed all of the pins holding the batting in place -

Turned it inside out -

And pressed it from both sides -
And it worked - same as the other one but with batting inside -
On a small scale -

But on a larger scale -
I wouldn't be able to pin the batting in place -
I would need to baste it pretty well - because even though it IS fusible - it would undoubtedly shift while I was turning it inside out if it wasn't "secured" somehow -
SOOOOOOOOOO -
Today I tested my "wonton wrapper" theory - ;))
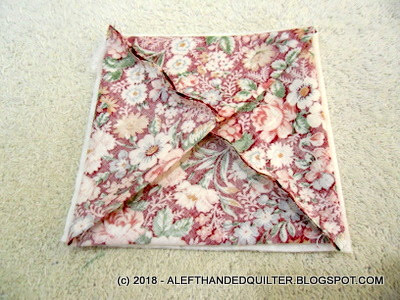
I unfolded the monster on my kitchen island - wrong side up -

Then folded one corner in toward the middle -

And pinned it along the edge that would be the "new" side -

Did the same to the next corner -

And then - turned the "new" corner inside out and fiddled a bit to hand-baste about 8" of the corner seam where I thought it should be -
Then turned it right side out again to show you the "seam" side -

Then I flipped the "new" corner up to show you the other side -
The yellow flower-head pin is in the top "new" corner square -

It's funny - because the original layout is "on-point" - this is working out much better than I thought it would - the "new" sides fall along the seam lines of the patches - which is very convenient - LOL - ;))
So now I have two ways I could do it -
===
#1 - Cathedral Window Method - I could add the batting - and baste it really well - then actually "sew" the side seams - leaving an opening for turning it inside out - like the Cathedral Window method above -
Which is why I decided to show you how I did that - LOL - ;))
It could get too big to handle - but I could also have nicer/neater seams - I could trim them after I sew them - and then turn it all inside out - press/flatten it out - and hide the "seam opening" with quilting - ;))
===
#2 - Wonton Wrapper Method - I could add the batting - and baste it just because - fold the corners in toward the middle - sew partial seams in the "new" corners to neaten them up - and then "fold in" the rest of the side seams and topstitch them down - trimming and matching as I go. Then it could be done in stages and wouldn't have to be turned inside out -
The topstitching could look like additional quilting if I did it right - LOL - ;))
===
So - there you have my two days of "testing" -
The "I think this might work" part -
My "process" -
And the "results" - ;))
What do you think? -
Which way would you do it? - ;))
Talk to you later - gotta go - gotta sew -

3 comments:
Very clever of you! I am looking forward to seeing the finished quilt.
So are the two methods very similar? The difference being only "how it is sewn" but still the same folds?
Okay, it's making more sense now. (I'm very visual with stuff like this, though sometimes I just know how to do it, too...don't ask, I don't know why!) Both methods look good to me, so I'm just gonna sit back and watch!
Post a Comment