Is not fast -
But it IS FUN -
And can be quite addictive - ;))
I've been playing with these off and on for a couple of years -
In August of 2016 - I decided to play with my "crumb" scraps -
DWM - 8/1/16
And I showed how I cut weird angles BEFORE adding a piece -
DWM - 8/8/16
Then the next day - I clarified the previous post -
Crumby fun - 8/9/16
Considered setting options -
So - now what? - 8/12/16
Started letting them accumulate -
DWM - 8/15/16
Then considered a possible-maybe layout -
DWM - 8/22/16
Let them sit for a while - again -
Until -
Oh what a Scrappy Day! - 2/11/18
And -
Crumb factory - 2/15/18
All along the way - I've shown How I Do It -
But here are
To show that are are NO RULES when it comes to putting these little goodies together - ;))

First off - I had a head start on my "crumb" blocks. The mindless willy-nilly sewing of bits and pieces made a whole bunch of "partial" blocks. When they get "almost to size" - I have to pay attention and get a little more systematic about the whole thing. That's when I dig into my "strips/strings" and sew a bunch of "partial" blocks to a strip -

One after the other -

Until I run out of "strip" -
This also makes sure that the "same" fabric appears in more than one block -
To sort of tie them together -

Press the strip away from them all -
Which helps them lay flatter -
There are no "seams" on the "strip" side -


Then clip them apart -
Following the "line" of the crumb section - if possible -

I'm going for a 3-1/2" cut block -
So this one just needs a corner to be "up to size" -

This green looks good to me -

Stitch it down -

Press it open -

And trim it -
Giving me a "crumb block" and two more pieces to add to the "crumb" pile -

Then grab another strip -


And keep on keepin' on - until I get another bunch -

Some close-ups -
Note the green was used in another block -
And the floral on the right side appears in both blocks -

The gold strip shows in the block on the right -

And after a while - I have another pile -

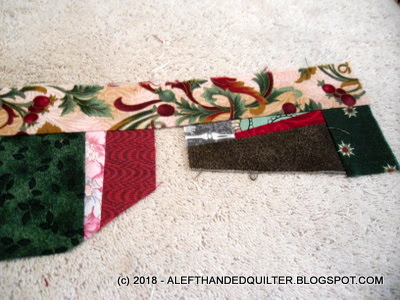
The bottom strip is a fun one -
It looks like it's pieced - but it's a "cheater" strip -
From some yardage that I used to back one of my quilts -

This one is "almost" the correct size but looks a little too "square" -

So I added another strip at an angle to liven it up -

Stitched it on - pressed it open -

Trimmed it - and got two more "crumbs" -
The top left one can be used in another block -
The other one is probably too narrow so will go in the "bits and pieces" pile -

Like I said - it's FUN - it's ADDICTIVE -
And there are NO RULES - ;))
Talk to you later - gotta go - gotta sew -

2 comments:
Thanks for the pictures tutorial. I've been trying to figure out how to make straight seams doing this, and your 'sewing to the strip' method will work for my brain, lol.
I find it funny that we do the same things but sometimes in different ways. I usually only work on two or three pieces at a time. Sometimes those two pieces get sewn into one block. (But then, I am making bigger blocks.) I may have to try your strip trick if I can make myself sew more "bits" first.
Post a Comment