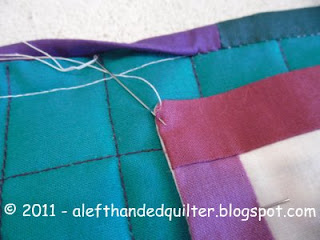
LEFT-HANDED QUILTING - ATTACHING A QUILT LABEL BY HAND
============
Note - these instructions are written in LEFTISH.
If you are right-handed - just reverse the directions.
============
For this demo I was going to show you how I attached the label to my
Hawaiian Applique Hibiscus – Red on White – UFO
But –
Because I didn’t want this label to show on the front –
I made it with simple muslin border strips
And then realized that if I used “cream” thread to sew it to the back –
IT WOULDN’T SHOW!!
Kinda hard to show you something – if YOU CAN’T SEE IT!!
So – on to Plan B –
I made a label like I showed you before
And want to attach it to the LOWER LEFT CORNER - as I explained before
I'm going to start sewing in the bottom right corner -
so I put the pin in from left to right - so it wouldn't "stick" me when I started to sew -
(The middle of this demo label is MUSLIN. I wouldn't recommend putting a pin in any SEW-IN INKJET FABRIC SHEET - if you used that - it may LEAVE HOLES!)
I would normally use a matching thread (match the label color - not the quilt) to make the stitches virtually invisible - but I want you to be able to SEE what I am doing - so I used white thread on the dark fabrics.
So - first make a quilter’s knot
And -
To hide the knot -
Slip your needle in “under” the label –
And make it come “out” in the corner of the label –
(I usually start in the lower right corner - but you can start wherever you want - just be sure to place the pin so that the "head" of it will be in the palm of your right hand - or you will get "stuck") -
Then go straight across and “in” the quilt -
Point the needle at an angle to come “out” again in the fold of the label a little bit away -
(If you want an idea of "how far away" - just look at the stitches in the hem of your shirt -
"that" far way - or whatever looks good to you) -
Take another couple of stitches
Then another couple of stitches
(The stitches that look like they go diagonally are actually the stitches coming up under the label and will be hidden when the stitches are pulled tight)
Do that all the way to the end -
Pull the thread slightly to tighten the stitches - (not TOO tight) -
Then sew a couple of stitches on top of each other to end it -
Clip the thread –
Can you see the stitches?
NO??
Well – that’s EXACTLY what we want – isn’t it??
============
The closer you can get the needle to coming out right at the fold - and
the closer you can get it to going in straight across from where the needle came out -
the more invisible this stitch is - MAGIC!!
And if this stitch looks familiar - it's the same one I showed you here.
Talk to you later – gotta go – gotta sew –
A blog about quilting and using the LEFT-EZE Rule - my HST/QST Ruler designed for LEFT-HANDED Quilters -
Pages
- Home
- LEFT-EZE™ Rule
- LEFT-EZE™ Rule - Tutorials
- LEFT-EZE™ Rule - Size Chart
- LEFT-EZE™ Rule - Free Pattern & Tutorial
- LEFT-EZE™ Rule - Reviews/Testimonials
- About This Blog - And Me
- Rules
- Reviews
- Quilt Journal
- QJ - Floral Applique
- Sudoku Quilts
- Studio Organization
- Fabric Storage Tips
- Left-Handed Quilting (LHQ) - Introduction
- LHQ - Basics
- LHQ - Rotary Cutting
- LHQ - Construction
- LHQ - Hand Sewing
- LHQ - Binding
- LHQ - Finishing The Quilt
- LHQSQ - LHQ Sampler Quilt
- UFOs/Projects/Squirrels
- Quilt-Along - LHQSQ 2.0
- Privacy Policy


1 comment:
I love how you speak in leftese. How nice to see something done with lefthanded directions! It looks so odd to see something done correctly. But my dad used to tell me that only the top ten percent of the population is left handed! (he was left handed too!)
Post a Comment