Of my Upstairs/Downstairs - Wild Things is quilted -
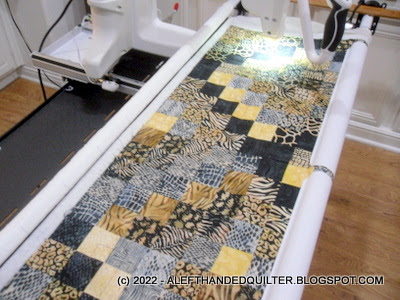
I decided to go with the "E" pattern -
Changing direction with each block -

In an email to Katie - katiemaytoo quilts - I explained my reasoning -
The more I think about it - the less I want to stitch diagonals this first time around. I also want to avoid the ditch and corners - too many seams coming together - and that's enough to get me nervous about hitting "points". "Precision" can wait until I get better at this. This quilt top is pretty busy - so most of the quilting won't be seen anyway - just the black thread on the yellow squares - LOL. I'll live with that since the backing is black - and I really don't want to change the color of the thread.The middle E designs wouldn't need any marking other than a visual reminder at the beginning of the next block so I don't forget to change direction. The Es would be stitched down the middle of the patch - away from the ditches. I'm leaning more toward them since I could do the whole row in one pass. And since it's loaded sideways - there are only 6 rows - YAY!!I'm also thinking that I might want to stitch it from right to left - "steer" the machine with my right hand - and smooth it out with my left - as I move across the row. I could stitch the first row from left to right - then try stitching the second row from right to left - see which one is easier.I also have the option of changing the buttons from right-handed to left-handed. I tried that once and got myself so confused as to which button was go/stop and which one was needle up/down that I switched it back to right-handed. I do a lot of stuff right-handed - because there IS no left-handed version - so it wasn't that bad. So never mind - I'll leave the buttons right-handed - LOL - ;))

And I was right -
The quilting hardly shows - except in the yellow squares -
So - in another email - I continued -
I just finished the first row - left to right. I did the Es and did it one block at a time so I wouldn't get messed up. I even put little stickers with arrows to remind me to change directions - I figured it couldn't hurt.I usually have both hands on the handles - except when I get to the edges and have to get the bungee things out of the way. Funny thing - on the old frame I could prop a yard stick on the rails under the bungees and they were out of my way. I tried that on this one and it doesn't get them high enough to be out of the way - the ruler base still hit them on the right side. Oh, well - I did the last column one handed and basted the edge of that side while I was at it. I basted down the left side then the top - but left the right side unsewn so I didn't get a bubble at that edge.Now to write up my post - and tackle the second row tomorrow - ;))


Thanks, Katie - for helping me write up my post -
And all of that quilting really doesn't show - LOL -
It should give the quilt some nice texture, though - ;))

6 comments:
The only place that quilting shows at all is on the yellow. The black thread certainly hides well.
However, I am sure that will have great texture.
How difficult is it to remove that ruler base?
How are you managing to see what you're doing? I'd be blind by now trying to focus on where the thread went! But it's looking good from here!
Nice choice. I had that design quilted on my farmhouse quilt and I love the texture it gives. However, the quilter used a panto and not freehand. Your doing a great job!
Looking real good and thanks for explaining.
Some machines make a better quality stitch left to right and some machines don't like going right to left at all. Luckily my machine likes stitching in all directions.
It looks GREAT! You're doing an awesome job.
Post a Comment