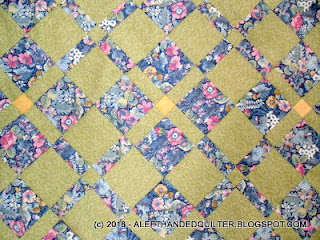
Is finally a Flimsy - ;))
And I'll show you in a minute -
But first - LOL -
I was "talking" to a friend and mentioned that I like to start in the middle because then I can sew the side triangles on the end of each row in the SAME orientation - all the way to the corner - flip it around and do it the SAME way to the other corner. Easier for me - I'll try to post pictures tomorrow to show you what I mean - ;))
So here are the pictures of the last row with the corner squares and "wings" for both "ends" -
The side triangles are sewn on in the SAME orientation on ALL of the rows -
And since I start in the middle -
I can add a new/shorter row to the ones that have already been sewn together -
I pin the "triangles" because there are no seams to match and I don't want them to shift -
And it helps to have the end triangles on each row pressed TO the BLUE -
So they lie flat and are not folded over to the green -
I don't bother to pin the rest because I can match and "nest" the seams as I go along -
Take it to the ironing board - press to set the seam - flip it up -
And press it toward the corner -
The colors are more "true" in these photos -
The "Sage" green matches the green in some of the leaves really well -
Funny how I could never think of the word "Sage" to describe the color until now -
Getting older is not for wimps - the "senior moments" will mess you up - LOL -
And - while I'm here - add the corner -
Press a crease in the middle to help center it on the middle sashing of the block -
Pin it in the center and several times on the ends - to prevent shifting -
Stitch - press to set the seam - and press it open -
One corner down -
And this is why I don't trim the side triangles until I am DONE -
The opposite corner had a wonky seam that needed to be "adjusted" - LOL -
So - now it's like its friends - not wonky -
And I was able to finish the second corner the same way I did the first one -
The "other" corners are actually the ends of the first rows that I sewed together -
And because I started in the middle and pressed the rows to the corners -
The seams are pressed AWAY from the BLUE on these two corners -
But I still pin and press them the same way as the other two corners -
Third corner done -
Fourth corner done -
And it's finally a Flimsy!! - ;))
The lighting above is with the lights OFF -
The lighting below is with the lights ON-
Neither one shows the "true" colors -
Like I said - the colors are more "true" in the photos at the beginning of this post -
Even the close-ups are "off" -
Then I put it up on the design wall in the hallway -
You can see the difference in size between this one - set 5 x 6 -
And the Cheddar one - set 4 x 4 -
It wasn't until I put it up there -
That I noticed the waves and bubbles ALL over the top -
That didn't seem to want to "smooth" themselves out - UGH!! -
It sure didn't look that wavy and bubbly when I was pressing it -
Or when it was on the floor -
I wonder if it will "quilt out" - LOL - ;))
BOB is pretty sure that it won't -
And figures that it may need a
To get it to lie flat like it's supposed to -
But she doesn't want to
So she'll
Because she's BORRRRRRRRRRRRRRED with it already -
And has at least three new Squirrels she wants to chase - LOL - ;))
Talk to you later - gotta go - gotta sew -


2 comments:
Your pics were what I had thought you meant, thank you for posting them.
I like the way it turned out.
Can not wait to see what squirrels you are going to be chasing.
Thanks for sharing the step-by-step photos of your process. The 'sage' quilt is going to be a nice size. Congrats on the flimsy...or until BOB convinces you to tackle some seams again.
Post a Comment