I won't bore you with all of the "process" photos on this part -
You've seen me press and pin before - LOL - ;))
So after I fixed the corner and sewed it back it on -
It was time to see if I actually FIXED it -
Pressed it in place -

Pressed it open -
And it looks good enough to me -
So I consider it DONE - ;))

Three of the corners look like the one above -
Separate corner section -
The fourth one looks like the one below -
The side triangles are sewn to the long rows instead -
I doubt that anyone will notice - and if they do - they'll have to read this blog to see what happened and why I did it that way - and I doubt anyone will bother - ;))

So -
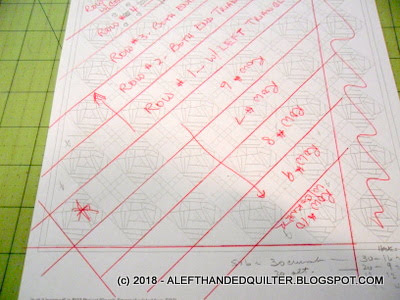
NOTE TO SELF - Original plan of sewing long rows from center out to corner sounded good - Row #1 with a Left Triangle - then Row #2 with one on each end - etc. - to the corner -

Turn it around and repeat - Row #6 on out to the corner -

BUT - that resulted in a "bunch" in the bottom LEFT corner - at the large STAR-X -
So -
Revised sewing sequence - for future reference -
Sew a center section 6 blocks x 4 blocks -

Sew two END rows with 5 blocks and a Side Triangle on the LEFT end -

And four identical Corner Sections -
With one row of 3 blocks with Side Triangles on each side -
And the corner row with one block and Side Triangles on each side -
And the corner triangle -

Then assemble it like a "Square-In-A-Square" -
Add End Rows to opposite sides of the Center Section -
Then Corner Sections to two opposite sides -
Then the remaining two Corner Sections -
That should work - at least it's worth a try -
I think I'll assemble the Deep Red Crumb Square top that way -
When I get there - ;))


Anyway - after I fixed that - I folded it up neatly and set it aside -
Because BOB and I wanted to play with my LEFT-EZE™ Rule and make some Hourglass Blocks for the
I cut two 2-1/2" strips - one each of the Blue Floral and the Green -

Starting at the RIGHT end of the strips -
Trimmed off the selvage ends -

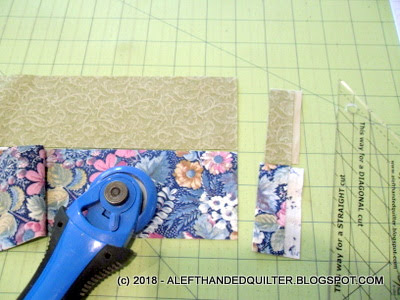
Put the strips Right Sides Together with the GREEN on TOP and folded it over so that I had four layers with the GREEN on the "inside" if that makes sense -

Then the ends got wonky and I had to trim them again -
You can't see it in this photo -
But there are four layers there -
BLUE - wrong side up -
GREEN - right side up -
GREEN - wrong side up -
BLUE - right side up -
Like in the photo above -

Cut a HST -


Then line up the strip with the 45-degree line on my cutting mat -

Cut the first QST straight up the LEFT side of the ruler -
4 layers - enough for one Hourglass Block -


Cut the second QST straight across the TOP of the ruler -
4 layers - enough for one more Hourglass Block -


Rinse and repeat until I get to the fold -


By this time - I have 6 sets of QST -
Enough for 6 Hourglass Blocks -
And the HST that I cut at the very beginning of the strip -

So - open up the folded piece and see what I can "make" with it -

The HST - because I cut two sets BLUE/GREEN right sides together -
Gave me two sets of mirror image HST - one BLUE and one GREEN -

So I opted to cut two QST to go with them - for Flying Geese -


What else can I "make"? -
I have enough for one more set of HST -
If I cut it UP the LEFT side of the ruler -

So I did -

That left me with this -
And it's not QUITE enough for another set of HST -

But it kinda looks like a "chisel" and a "corner" -

So I'll sew that together and see what I get -

All together -
From two strips 2-1/2" x WOF -
I cut 6 sets of QST for 6 Hourglass Blocks and 2 Flying Geese-
And 1 HST and 1 "Chisel" -

The HST only has the top "dogear" to trim -


And it measures 2-1/2" square - in case you're wondering -
Because I used a 2-1/2" strip -

I trimmed the "chisel" down to 2-1/4" x 4-1/4" and have no idea where I will use it -
But it's trimmed and it's straight - LOL -

The Flying Geese need the dogears trimmed -
And will be 2-1/2" x 4-1/2" -


So - 6 Hourglass Blocks - 2 Flying Geese - 1 HST and 1 "Chisel" -

By the way - the Hourglass Blocks measure 4-1/2" x 4-1/2"

And since the Flying Geese measure -2-1/2" x 4-1/2" -

And the HST measures 2-1/2" x 2-1/2" -

They will ALL fit together (except for the oddball "chisel") -
Because I cut them ALL from the SAME SIZE STRIP - ;))
TWO strips and ONE ruler -
And no "backhanded" cuts -
And no "upside-down and/or backwards" numbers -
Except for the times I ignored the numbers because I was using the LINES - LOL - ;))
Now BOB and I can play with making the
And use what we made today together with the 1/4 yard cuts that we pulled the other day -

Tomorrow should be s FUN day - ;))
Talk to you later - gotta go - gotta sew -

1 comment:
Happy your top (the real top) is all done and you are moving on to the next top ;)
Love the way you made your QST. Can't wait to see how you incorporate them into the backing (the other top)
Post a Comment